The Installer Portal
The Installer Portal is a useful tool which allows you to take CT clamp readings and change or update settings remotely such as:
- Max charge current
- Load Balancing settings
The Installer Portal can also be used to commission the Ohme ePod.
Note: To commission the Ohme Home Pro, use the on-device touch controls on the front of the charger.
Jump to:
Ohme ePod commissioning via the charger
The commissioning of the ePod can be completed in as little as three taps, taking less than a minute. Once the charger has powered up, you can tap ⏹️ stop to set the max amp to 32A, then press ⏹️ stop again to accept that the customer has a 100A fuse, then hold ⏹️ stop for 5 seconds to confirm these settings.
If you need to enable custom settings, refer to this PDF.
Once the initial commissioning process has been completed the charger settings can only be accessed and changed via the Installer Portal.
Ohme Home Pro commissioning via the charger
The commissioning of the Home Pro can be completed using the on-device touch controls, taking less than a minute. Once the charger has powered up, use the blue buttons to adjust each setting as required and advance to the next screen.
Power on
Once the charger has connected to power, you’ll see the Ohme logo pop up on screen.
Step 1
The first screen of Installer Mode will allow you to set the maximum output of the charger. This will be set to 32A by default, but you can use the buttons to increase or decrease the amperage output. When you’re finished, tap the right button to continue.
Step 2
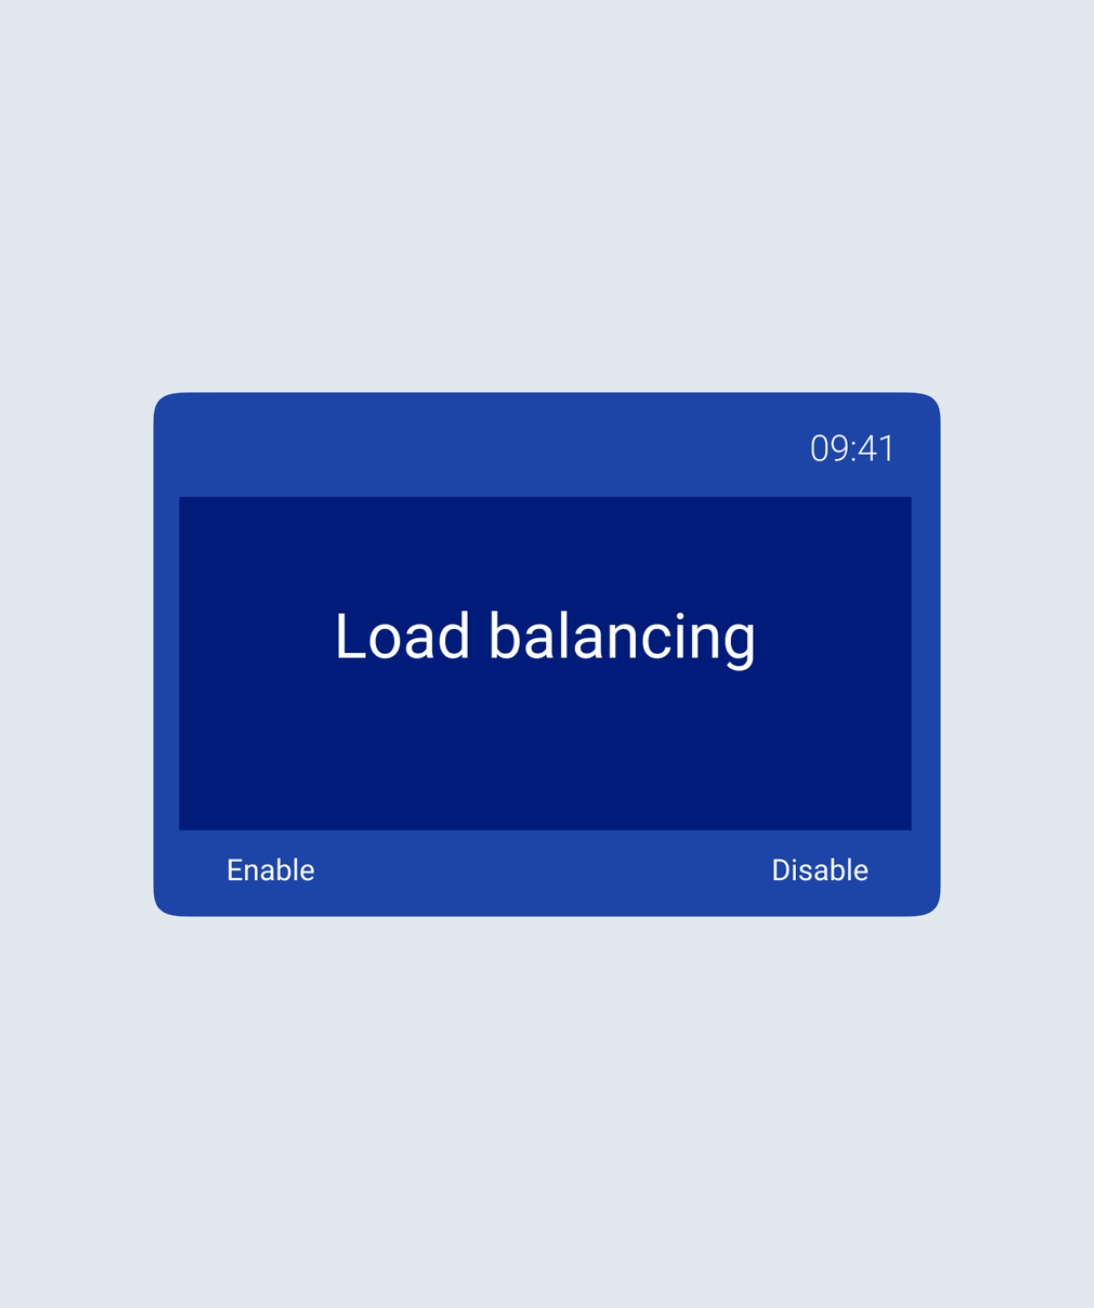
Load Balancing works in conjunction with the CT clamp and allows Ohme to dynamically adjust the output of the charger to keep within the electrical capacity of the home and prevent a loss of power. Load Balancing can be enabled or disabled using the touch controls. If Load Balancing is disabled, skip to Step 4.
Note: If no CT clamp is installed, Load Balancing should be disabled. Enabling Load Balancing without a CT clamp will mean the charger output is capped at 16A.
Step 3
If Load Balancing is enabled, the next step is to set the Load Balancing threshold. For a standard installation, this will be set to the size of the main incoming supply.
Step 4
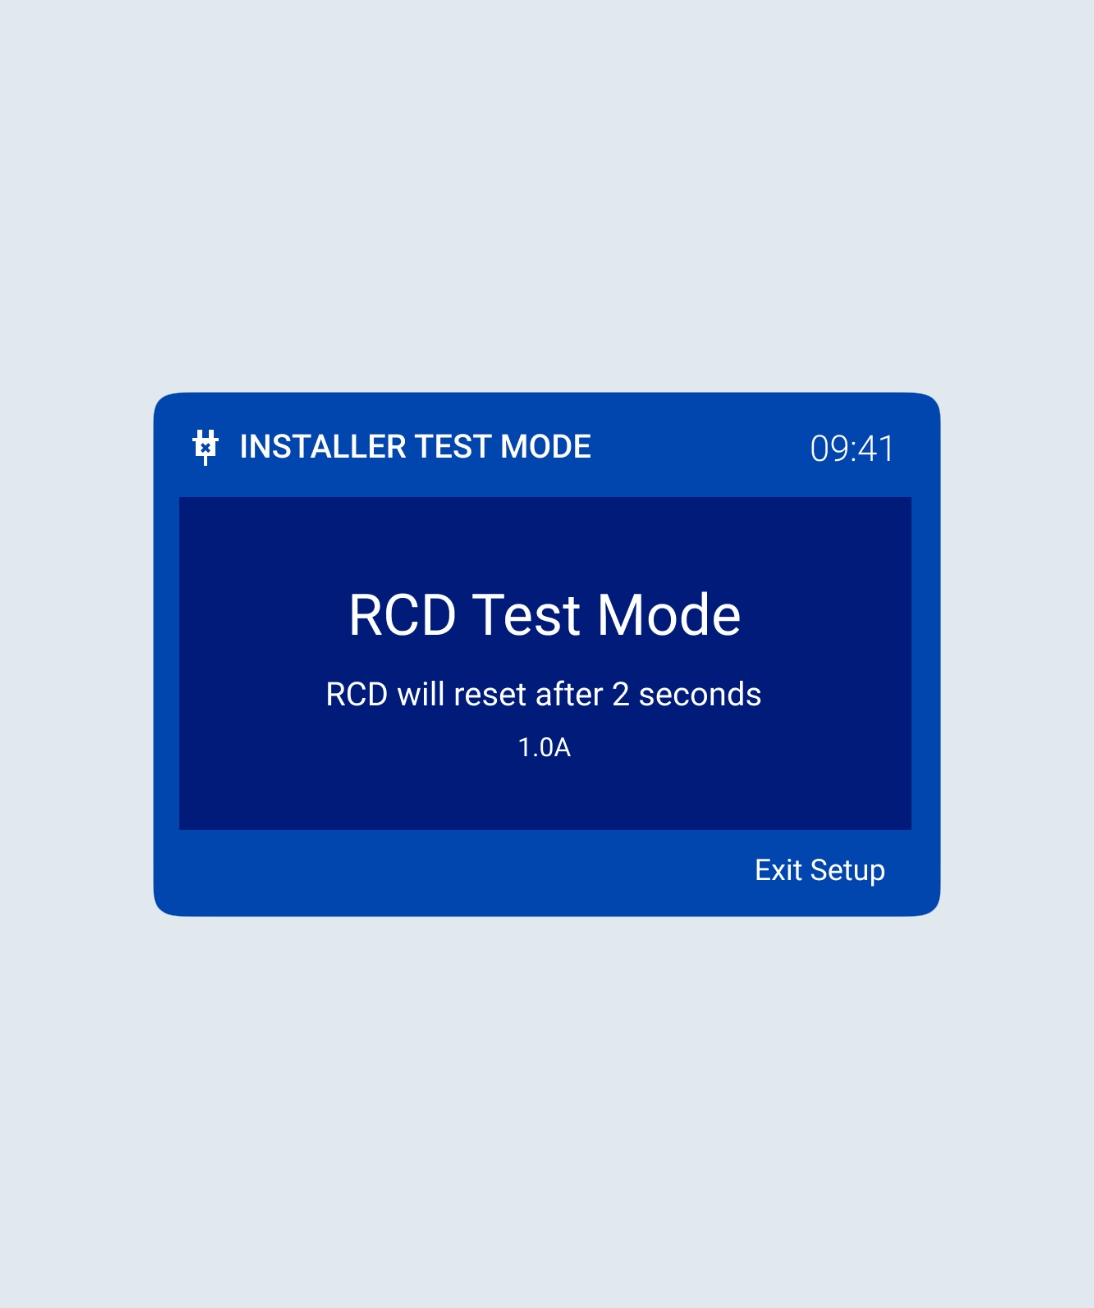
The final screen is the RCD Test Mode. The RCD will reset after 2 seconds. When Load Balancing is enabled and a CT clamp has been installed, you’ll see the CT clamp reading at the bottom of the screen. Here you can see the reading is 1.0A.
If you can’t get a reading, try boiling a kettle or using another high powered appliance as this can help record a reading. Once finished, tap Exit Setup for User Mode.
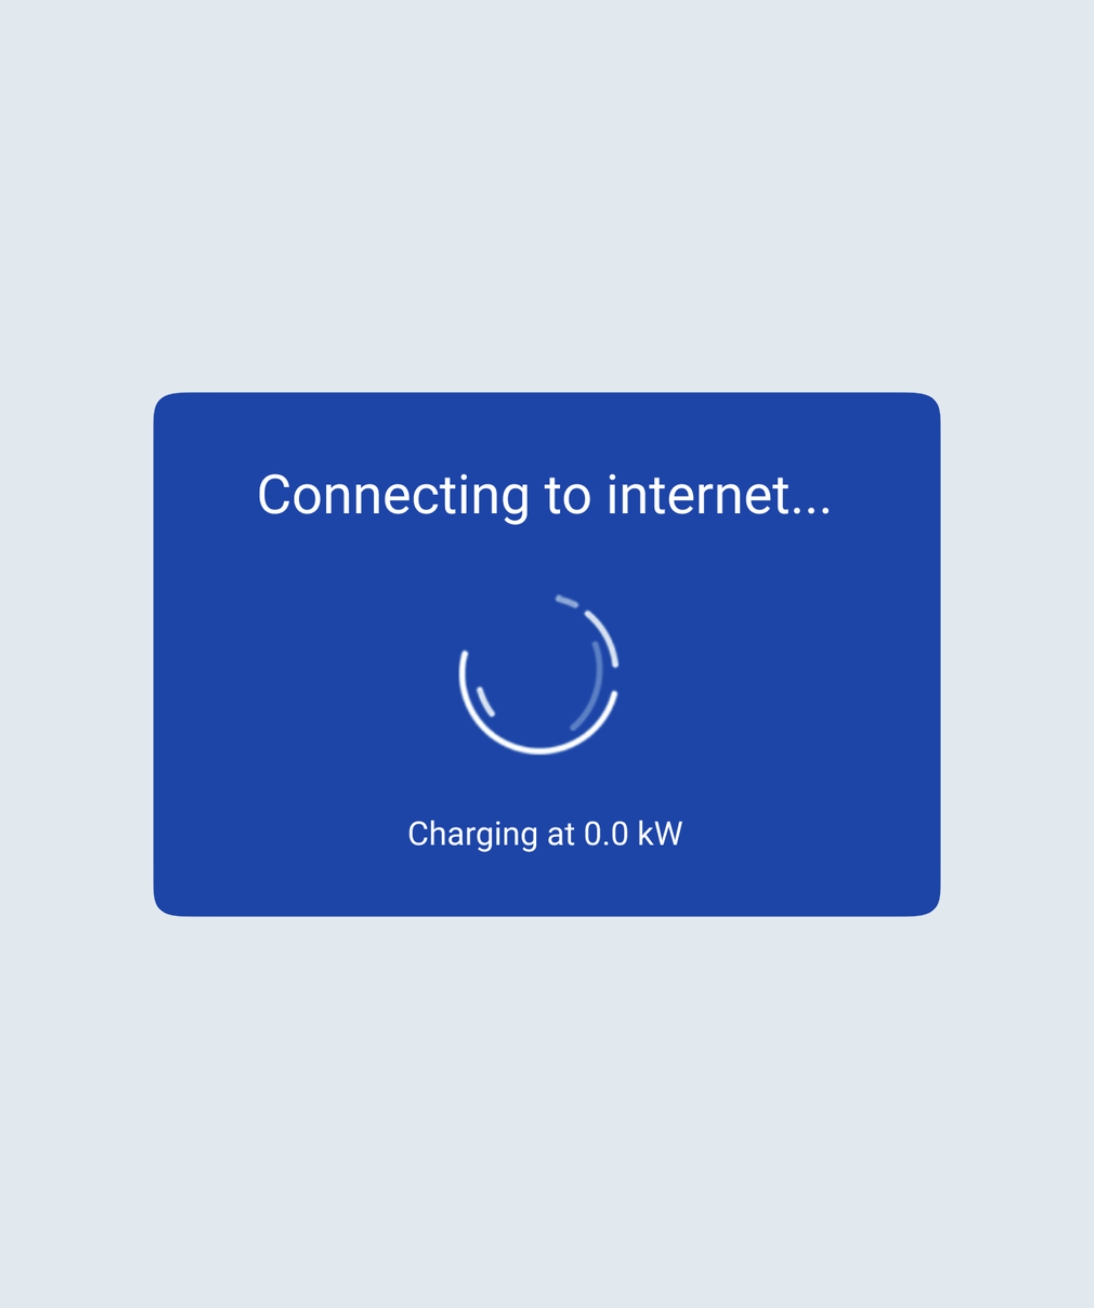
Connecting to internet
Once the Installer Mode set up has been completed, the charger will establish a connection to the internet.
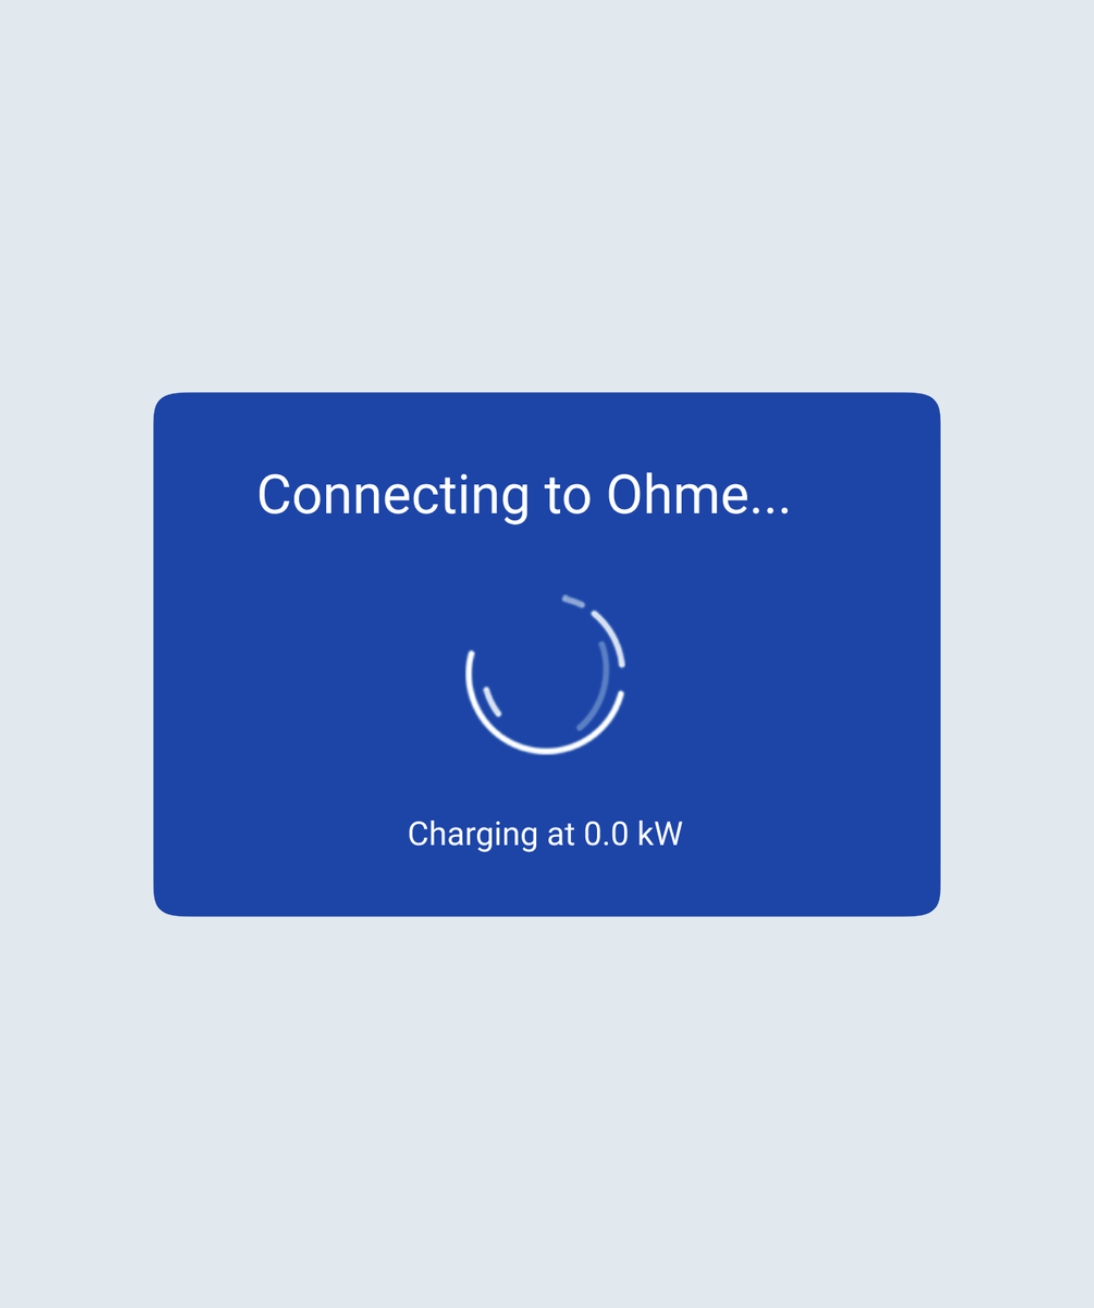
Connecting to Ohme
Once a connection to the internet has been established, the charger will connect to the Ohme server.
Checking for updates
Finally, Ohme will check for any firmware updates.
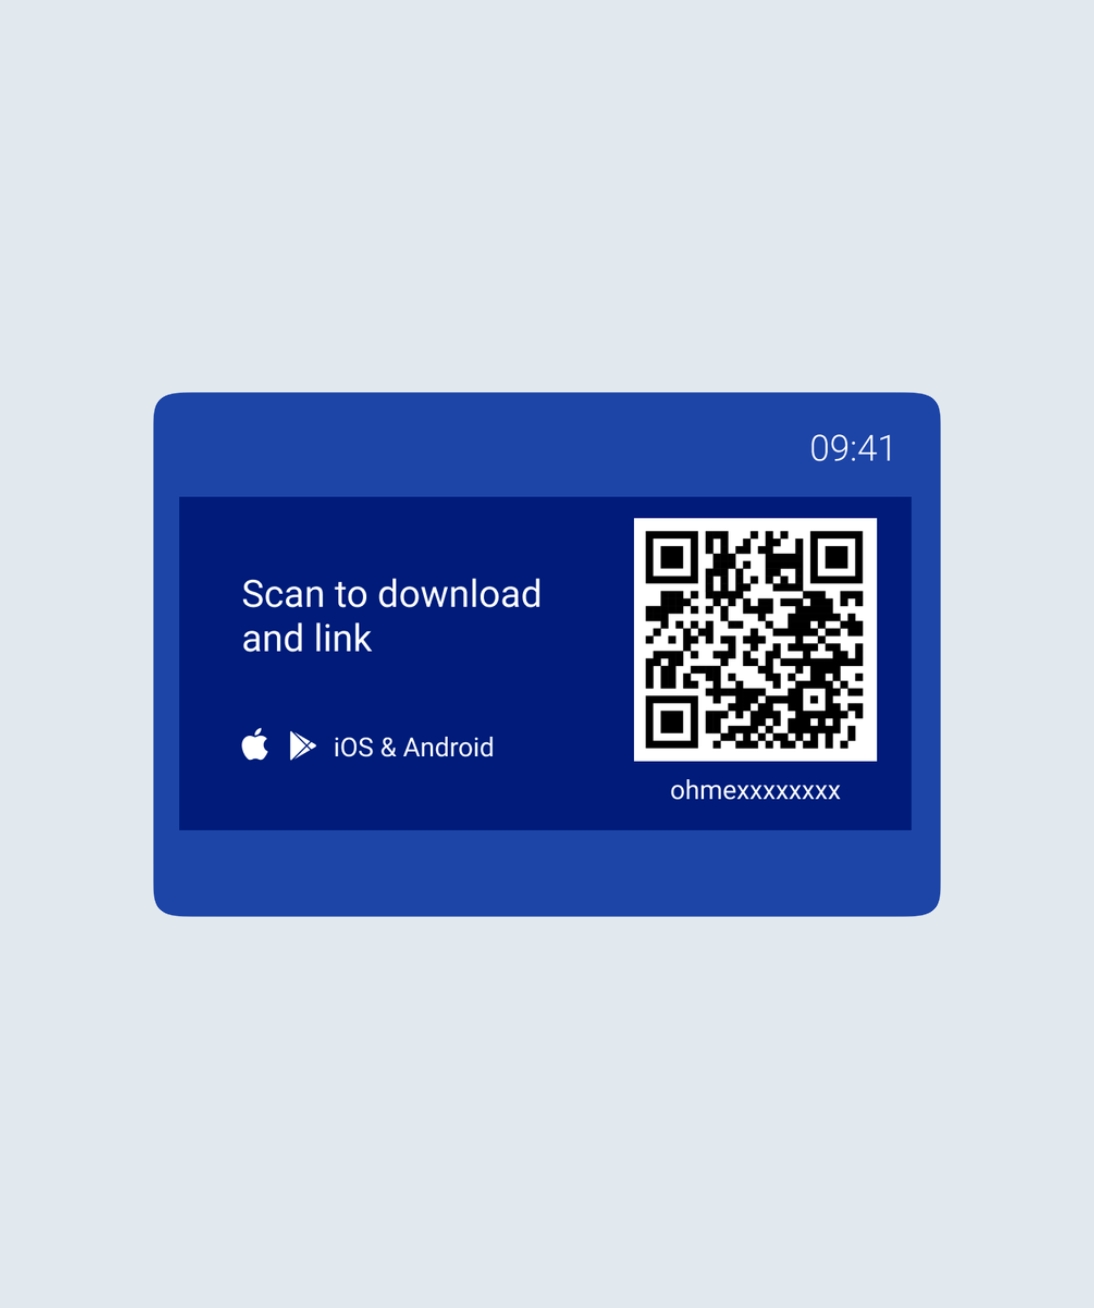
Commissioning complete
A QR code will then be displayed ready for the charger to be linked to a customer’s Ohme account.
When creating their Ohme app account, the customer can use their device camera to ‘scan’ the QR code and link the account with the charger. The charger serial number is displayed beneath the QR code, and on the underside of the unit if required.
Online commissioning via the Installer Portal
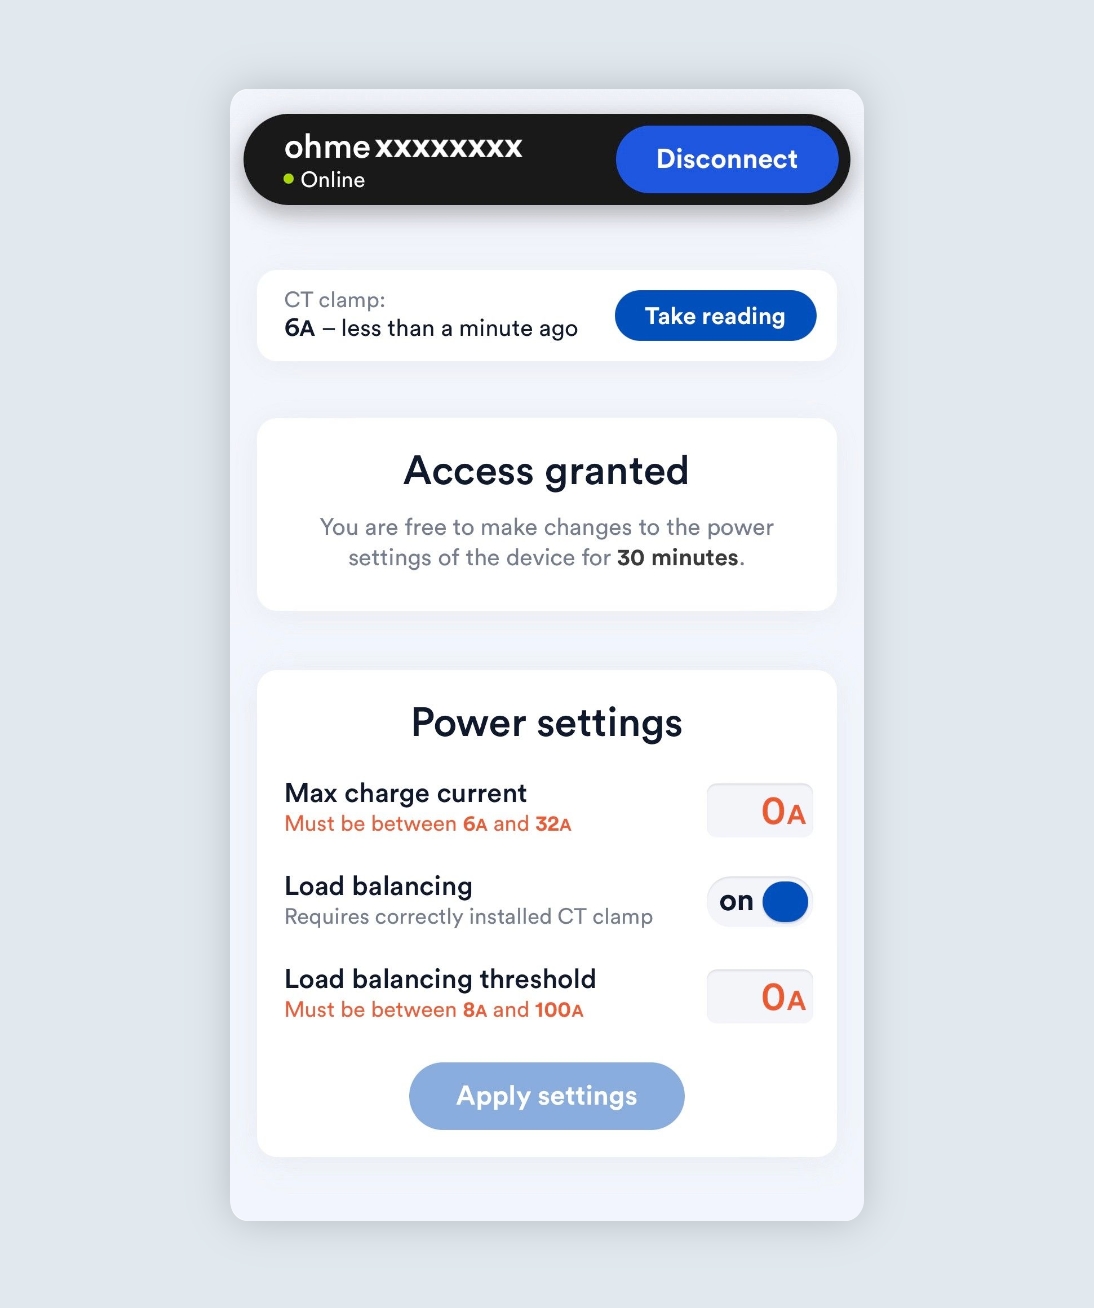
Once the initial commissioning process has been completed the charger settings can be remotely accessed and changed via the Installer Portal. You can use the Installer Portal to take a CT clamp reading (to check it’s connected correctly), adjust the max amp setting, activate load balancing, and set the fuse rating.
Step 1
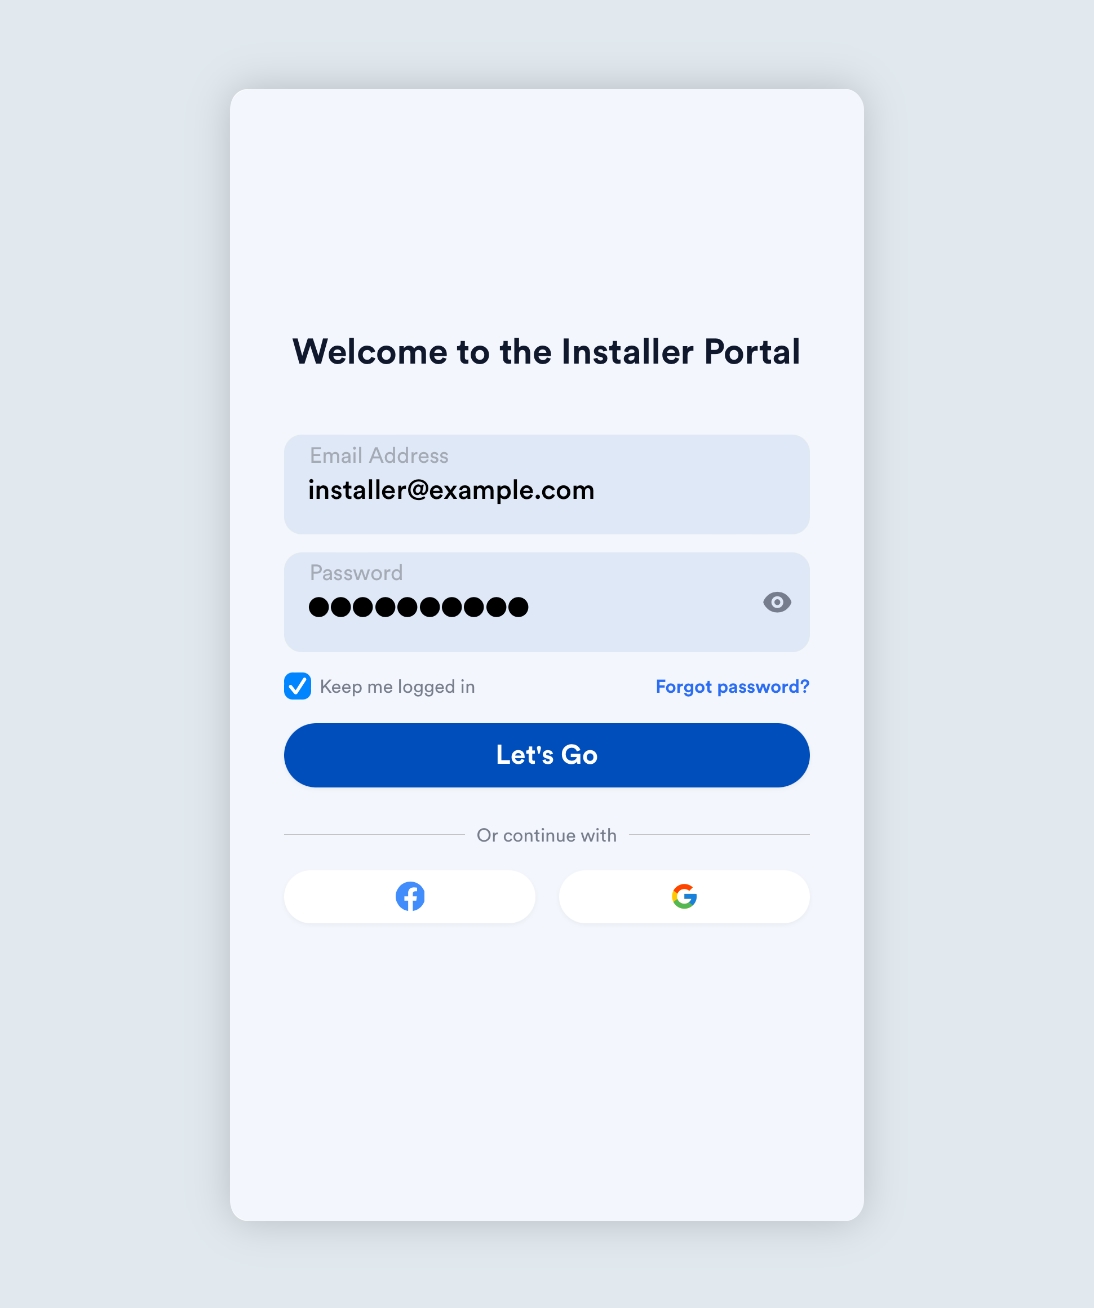
Navigate to the Installer Portal page and log in with your Installer account details. To get access to the Installer Portal, register here.
You’ll receive your login detail via email (make sure you check your junk mail folder). It’s a good idea to bookmark the link to the installer app on your phone or tablet so you can easily access this when installing a unit.
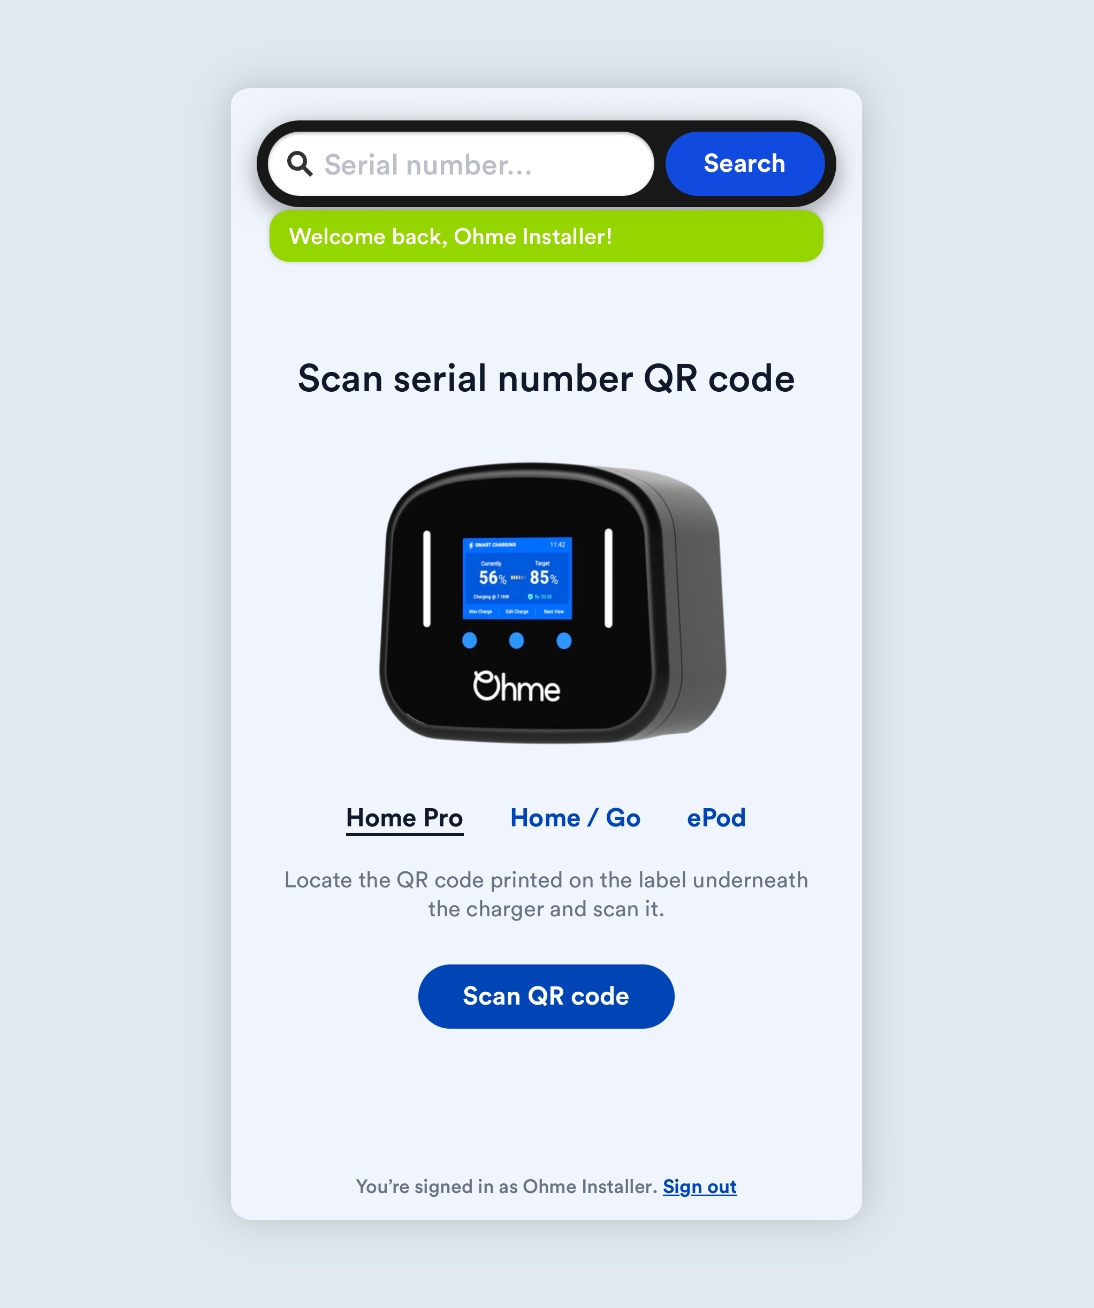
Step 2
Once logged in, click on the type of unit you want to commission then scan the QR code on the underside of the unit. If you’re unable to scan the QR code, you can enter the serial number manually, then tap ‘search’.
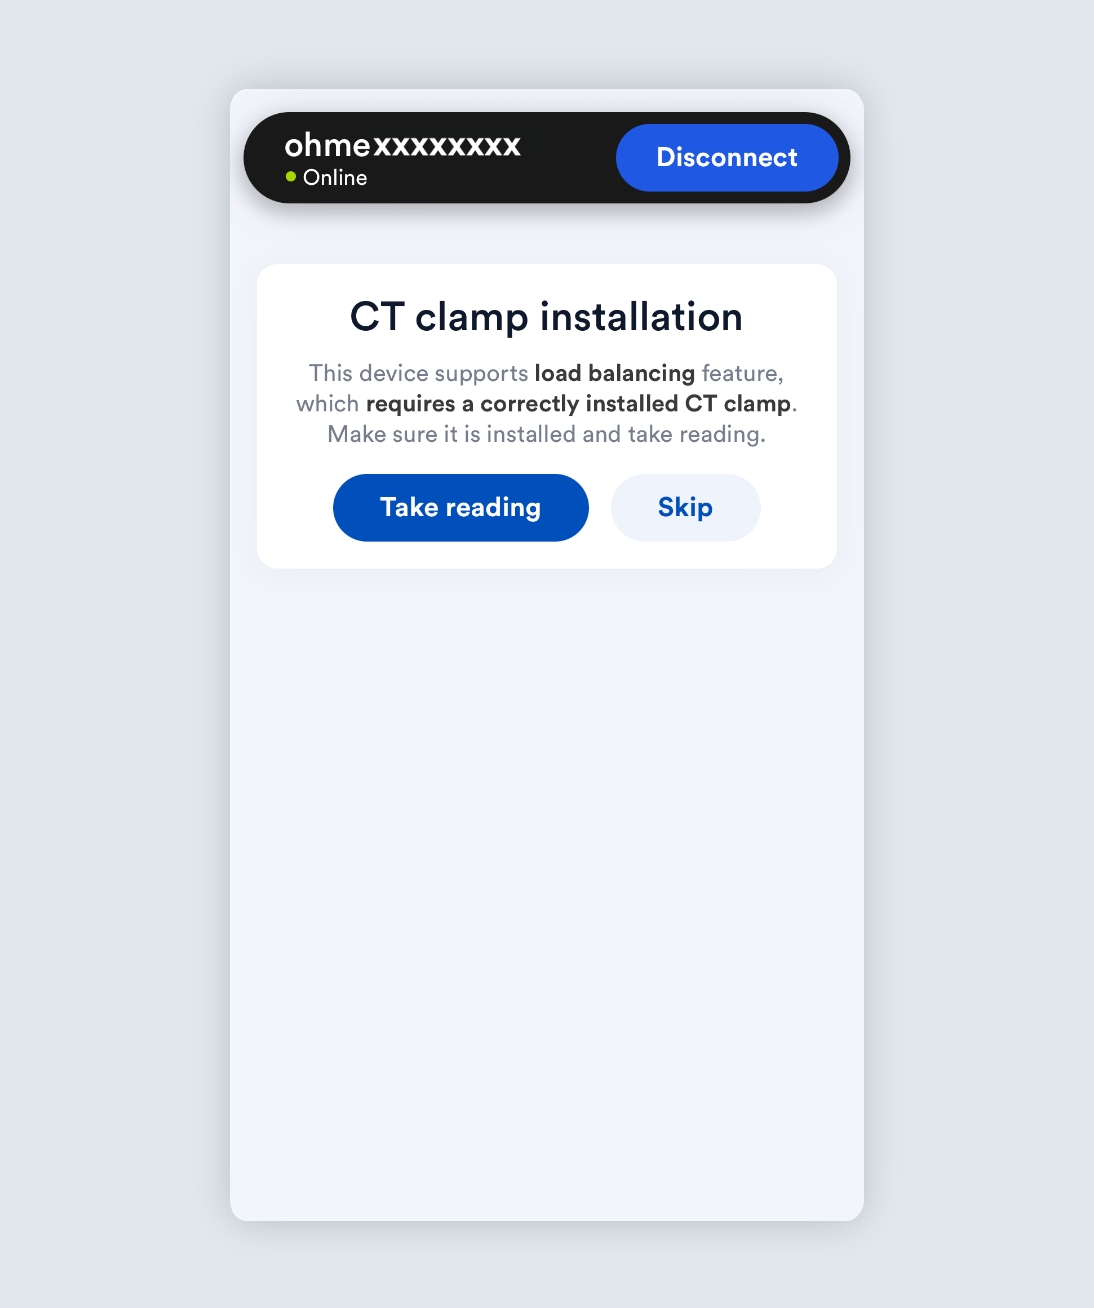
Step 3
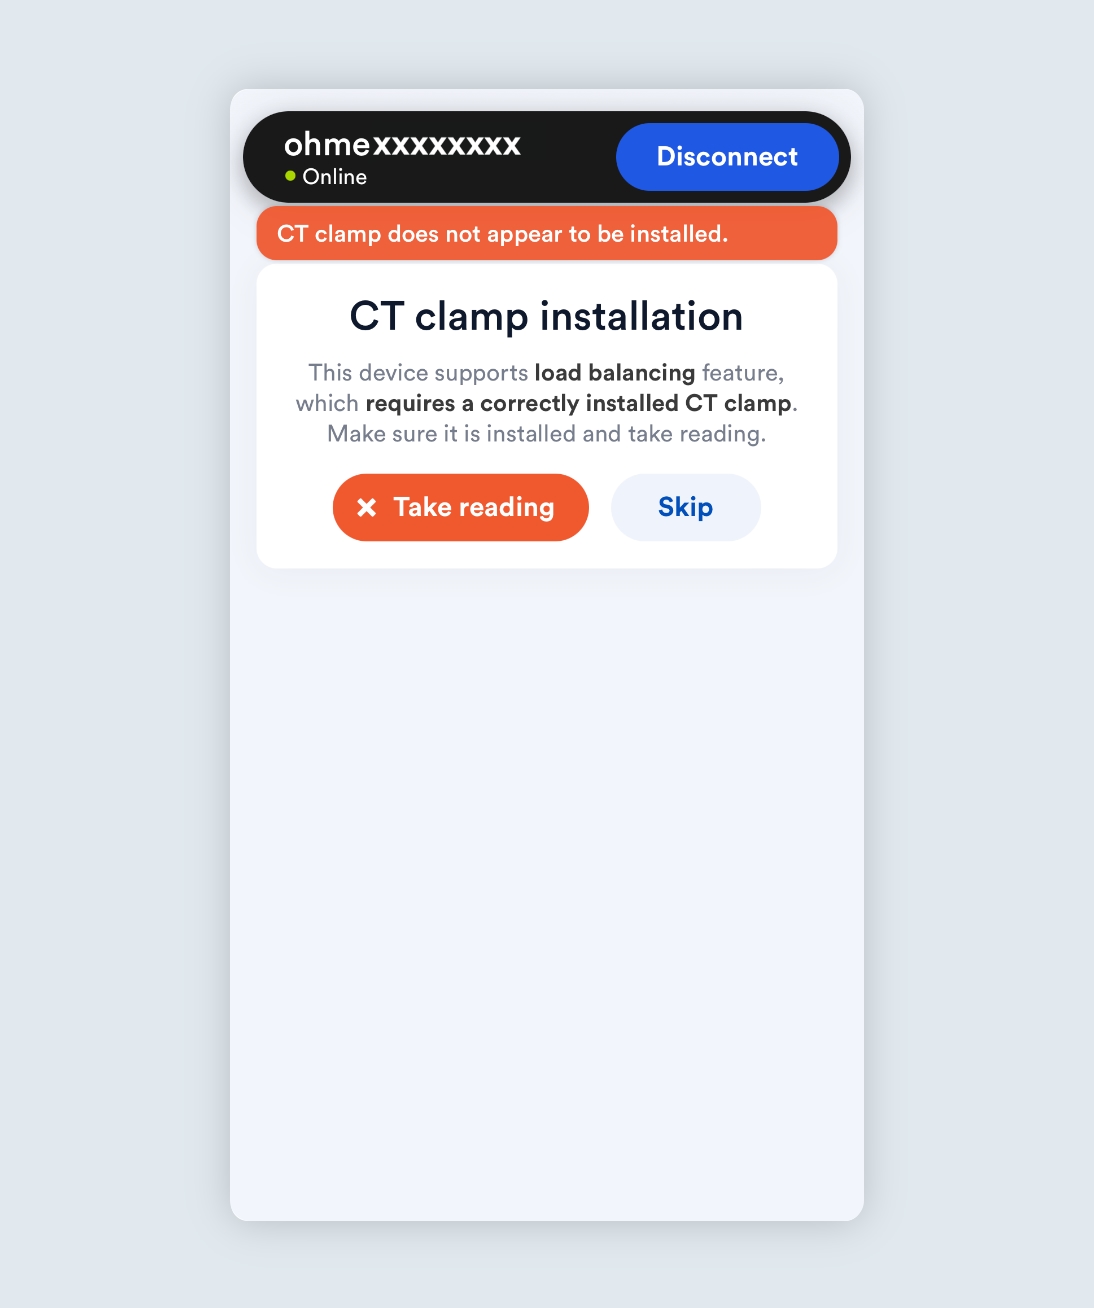
Once you’re connected to the charger, you’ll be asked to take a CT clamp reading. A successful reading will confirm the CT clamp has been installed correctly.
Unsuccessful CT clamp reading
If the reading is unsuccessful you will see this message. Check the CT clamp position and wiring, then take another reading until you get a measurement recorded.
Tip: Sometimes the usage can be too low to trigger a reading. Turning on an appliance such as a kettle or toaster can help to increase the usage and confirm the CT clamp is connected successfully.
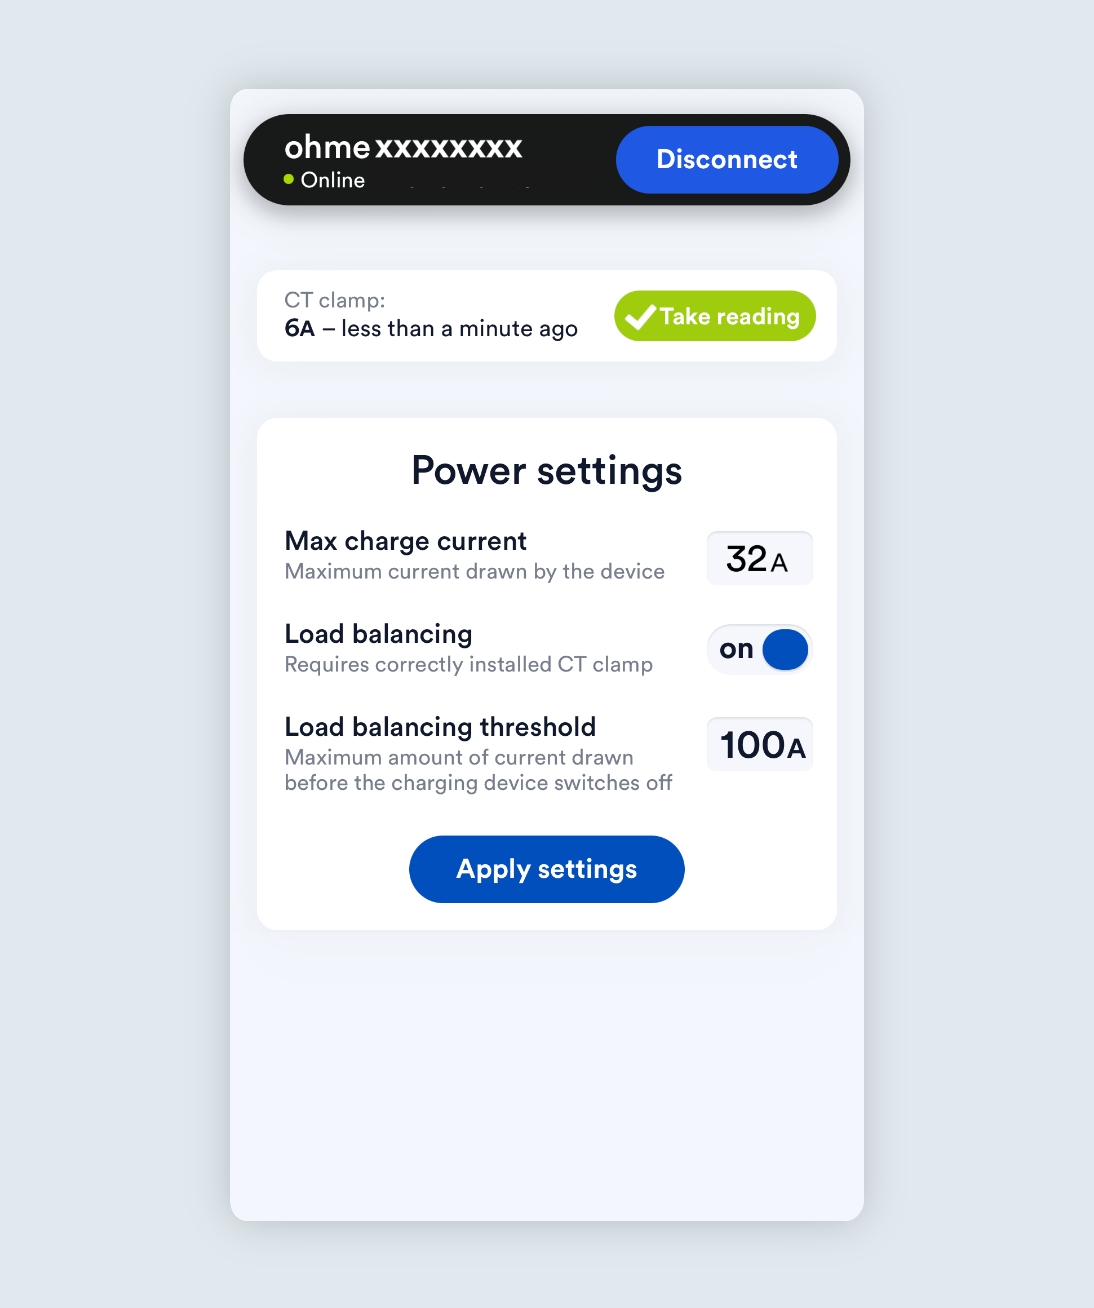
Step 4
A successful CT clamp reading will show the measurement recorded and the button will turn green to confirm. Now you can finish commissioning the charger, setting the max charge current and load balancing threshold.
When you’re finished tap ‘Apply settings’.
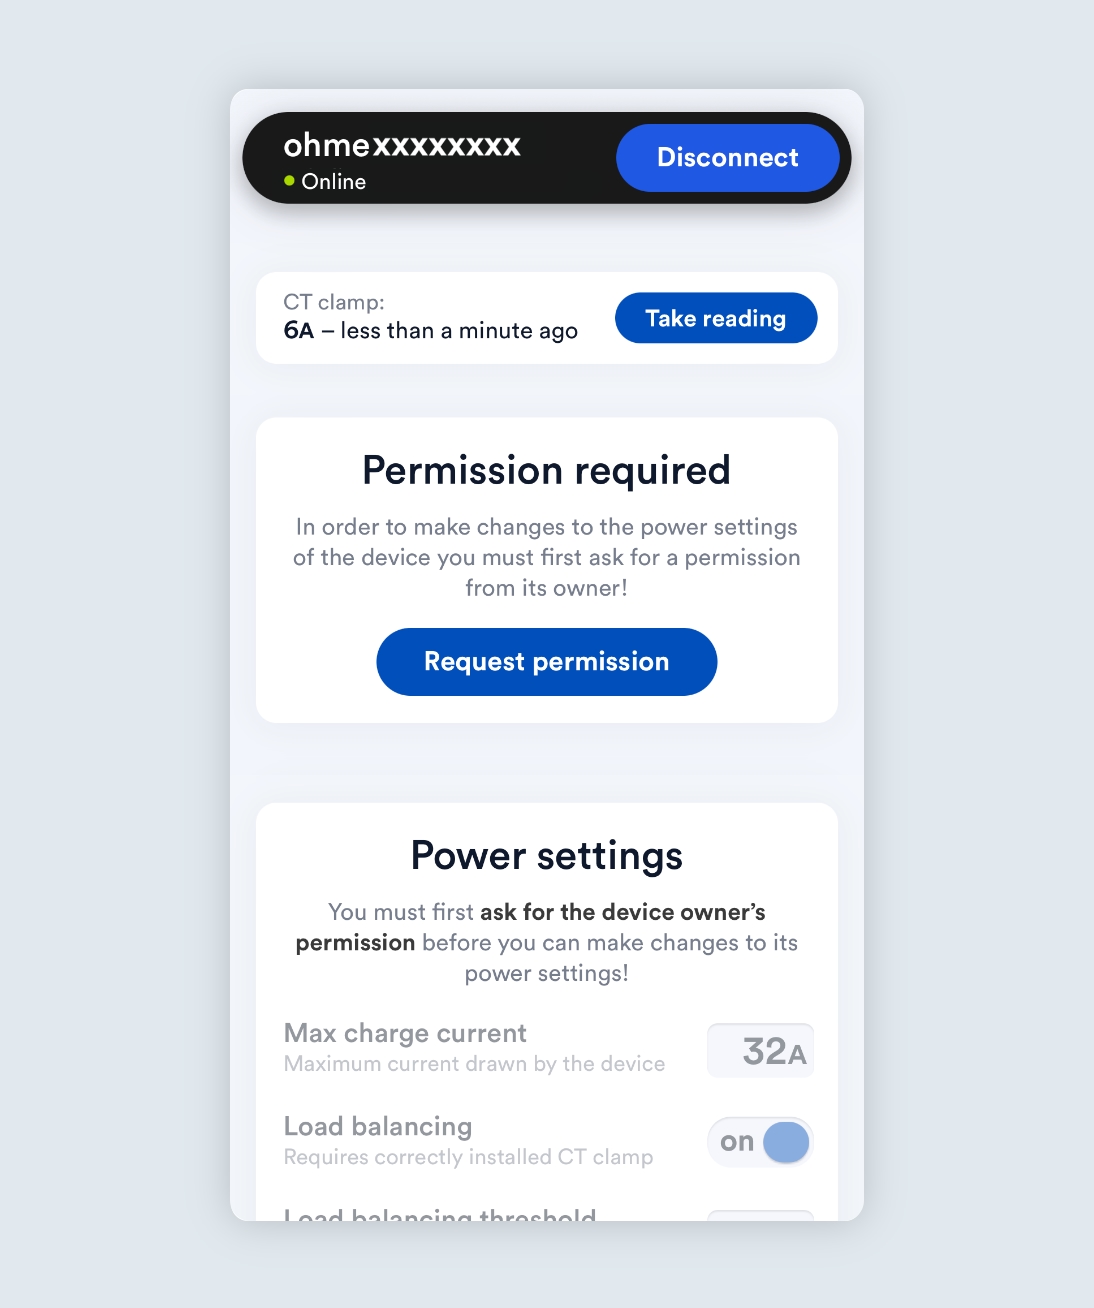
Permission required
If the customer has linked with the charger prior to install and commissioning, you will need to request permission to access the charger settings.
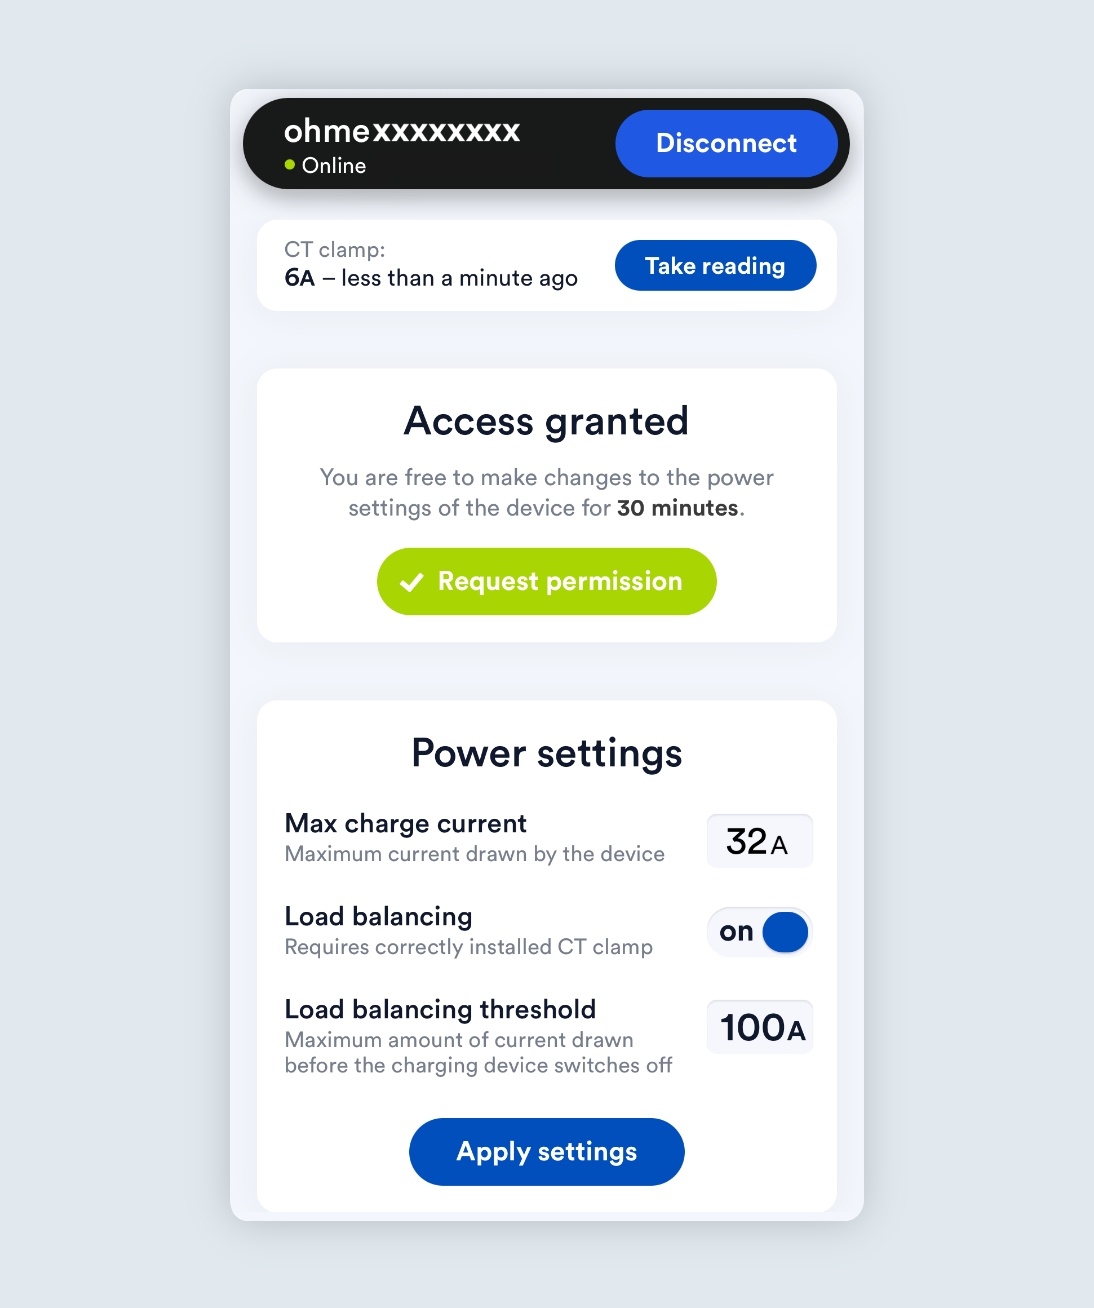
Access granted
Once permission has been approved you will have 30 minutes to make changes to the settings of the charger. Including:
-
Taking a CT clamp reading
-
Adjusting the max charge current
-
Enable or disable load balancing
-
Adjusting the load balancing threshold
Power settings minimum values
If you enter a value less than the required rate, you’ll receive an error and the ‘Apply settings’ button will be greyed out.
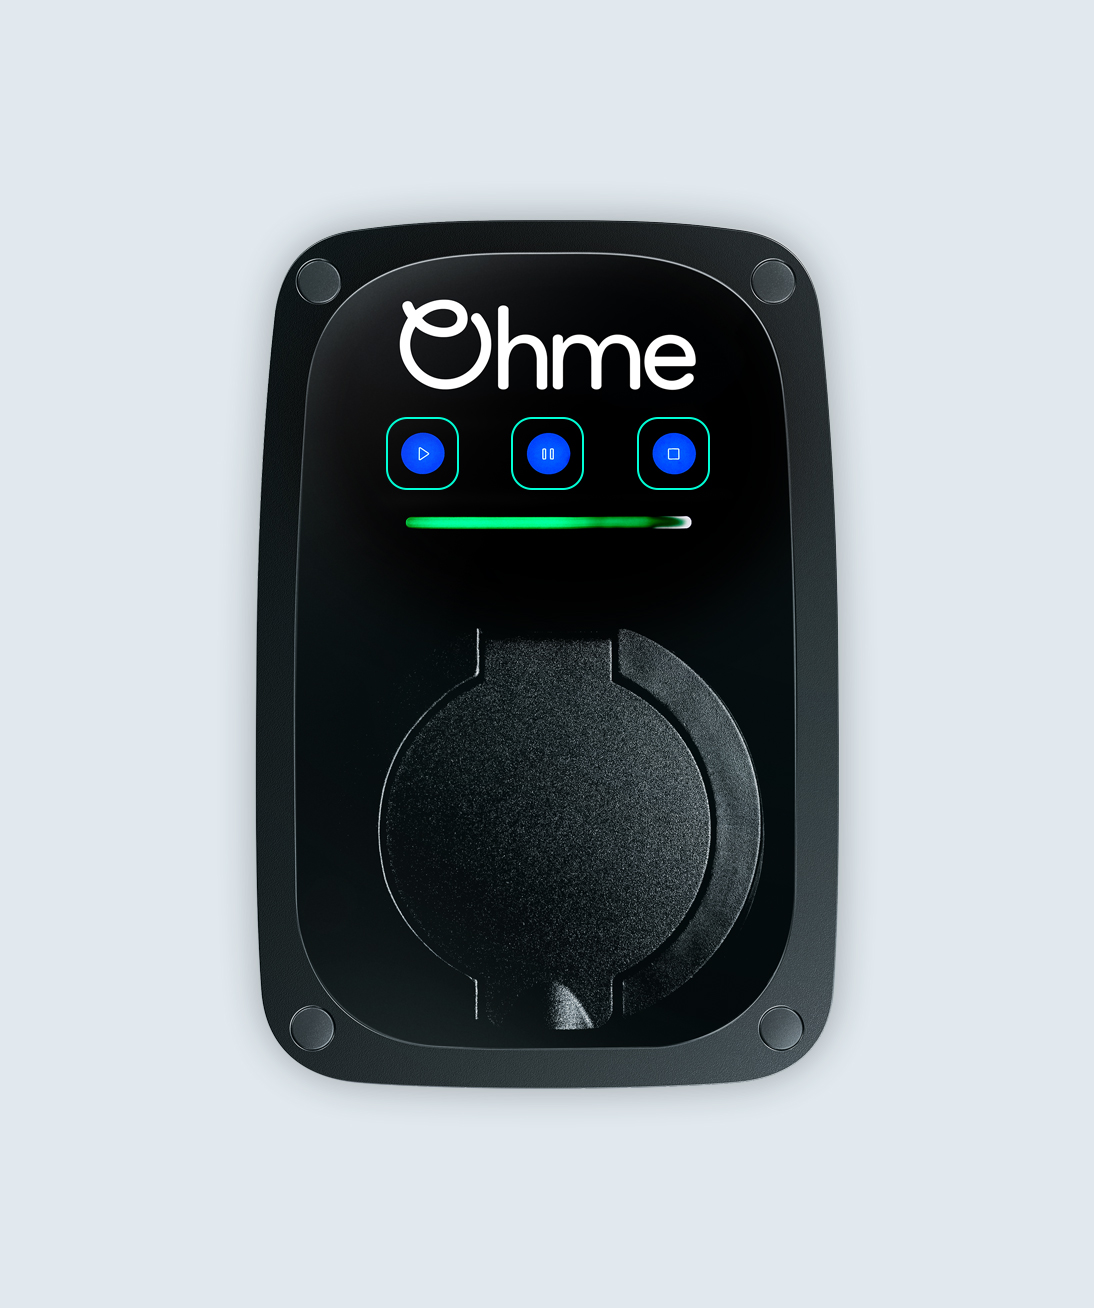
How to re-enter Installer Mode on the Ohme ePod
To make changes to charger settings, all Ohme chargers can be put into Installer Mode. Entering Installer Mode is slightly different for each Ohme charger. Follow the steps below for the Ohme ePod to get started.
Installer Mode
Once installed, the Ohme ePod will be in Installer Mode and ready to set up as soon as it powers on. When the ePod has been commissioned for the first time settings can only be adjusted in the installer portal.
You can request remote access to a customers charger from the portal in order to make changes.
If you’re with the charger you can also gain access to the charger settings in the installer portal by holding down all three touch buttons until the indicator light shows a moving white light.
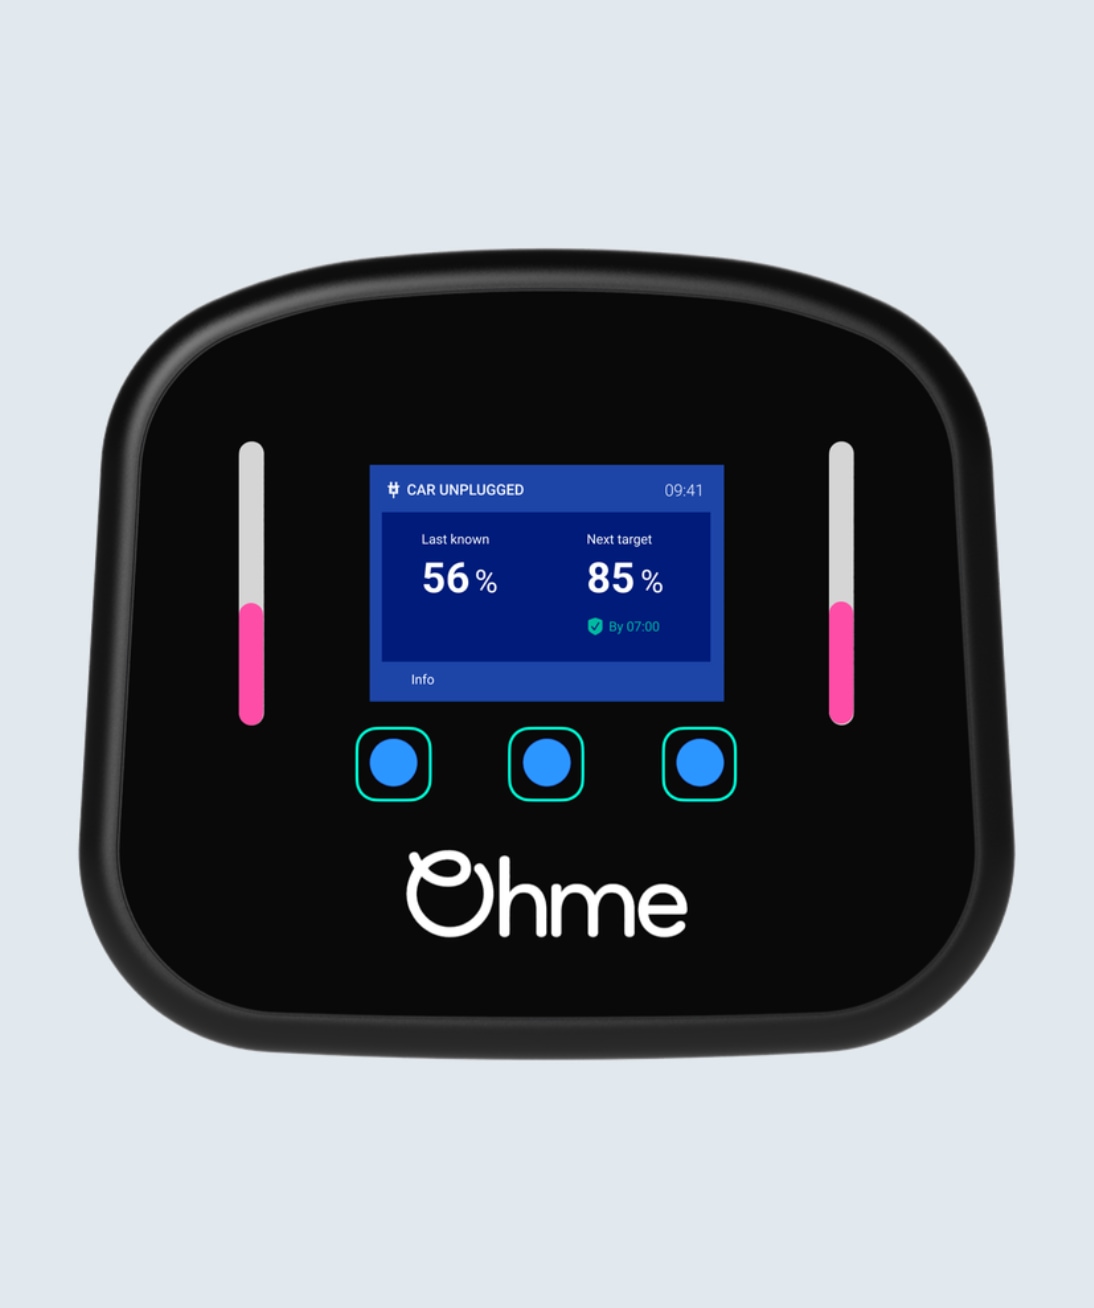
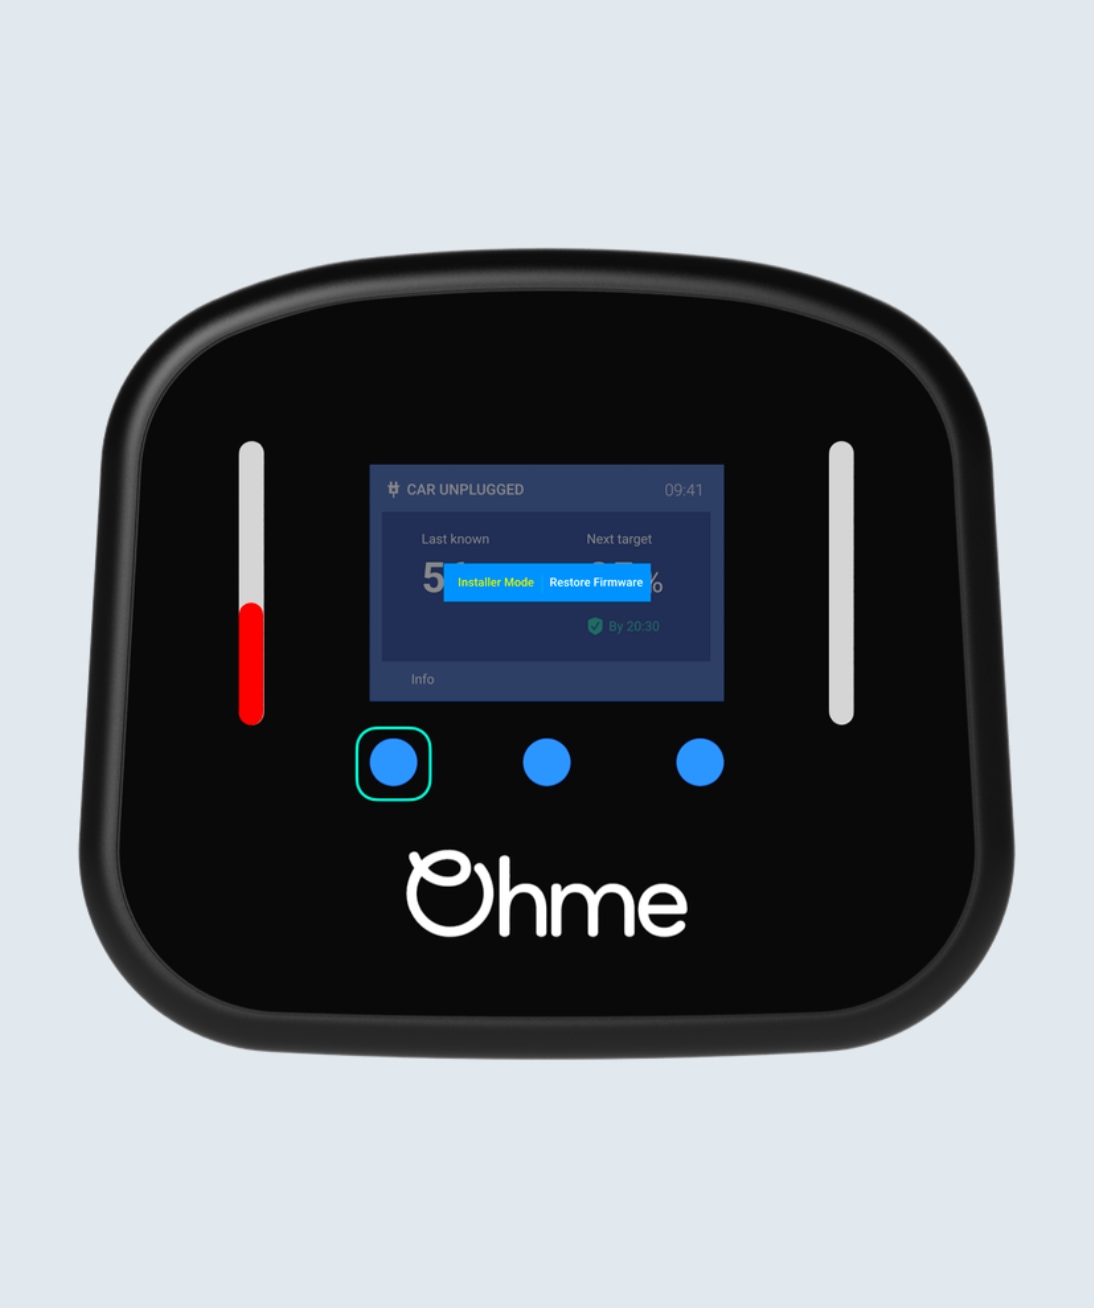
How to re-enter Installer Mode on the Ohme Home Pro
To make changes to charger settings, all Ohme chargers can be put into Installer Mode. Entering Installer Mode is slightly different for each Ohme charger. Follow the steps below for the Ohme Home Pro to get started.
Step 1
To enter Installer Mode, first ensure the charger is unplugged from the car. Then, place a finger on all three buttons at the same time for 10 seconds. Two pink lights will appear while you’re holding down.
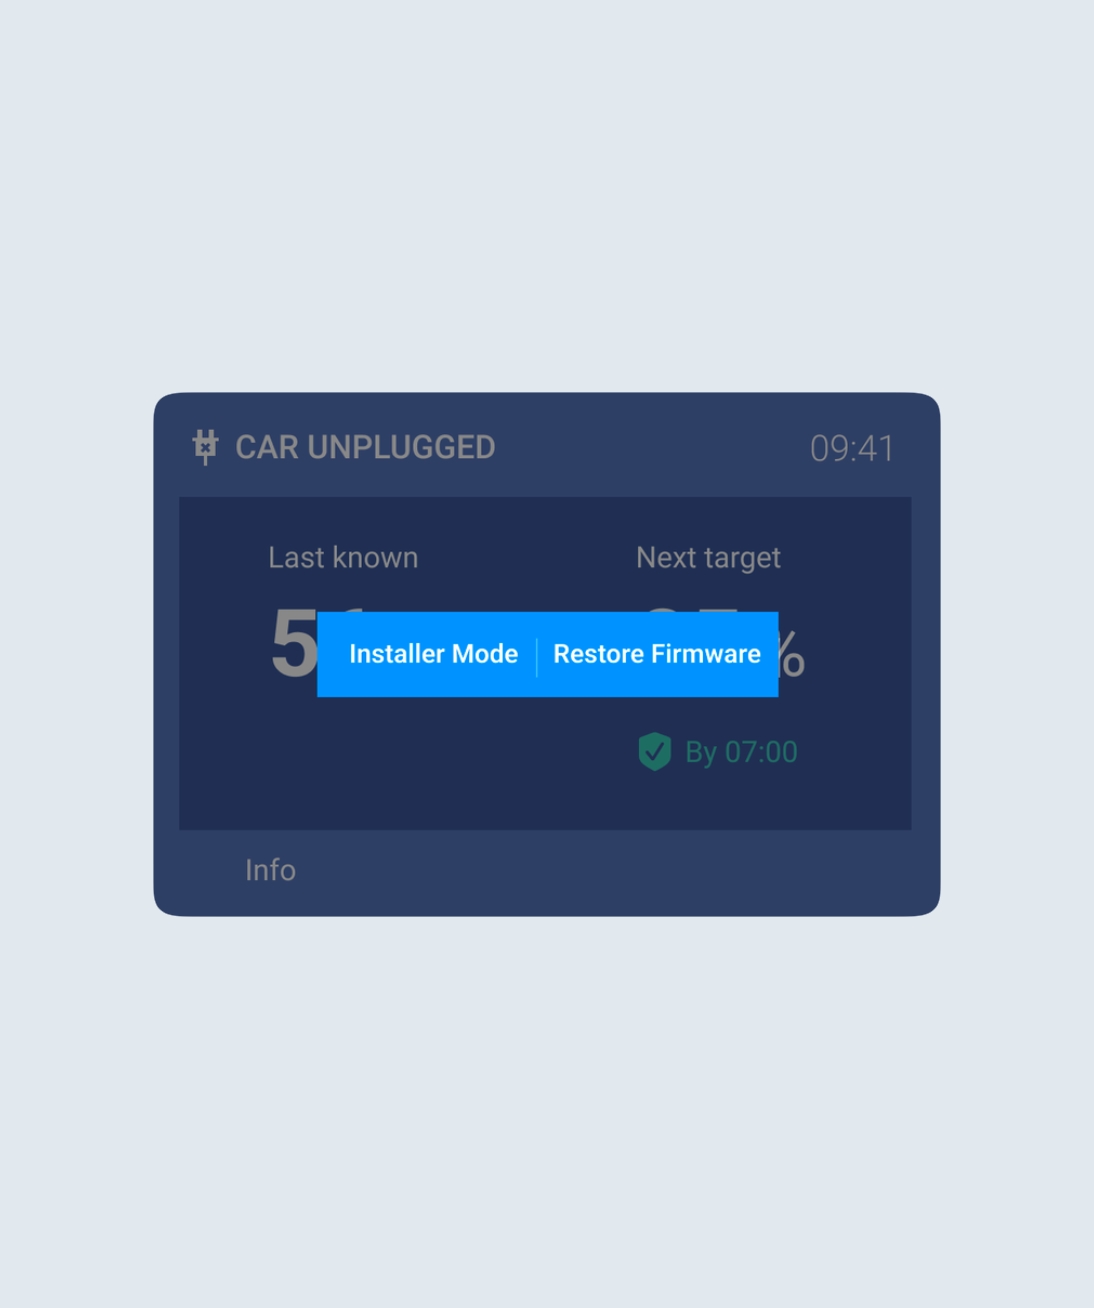
Step 2
After 10 seconds, the following options will appear. To select Installer Mode, touch and hold your finger on the far left button, corresponding to the side of the screen the option is shown.
Step 3
Hold your finger down for three seconds, the text will turn yellow to confirm the option you’ve selected and the charger will reboot.
Installer Mode
Once the charger has powered on again you will see the first screen of the installer mode. Advance through the installer mode settings and tap ‘exit setup’ to return to User Mode.