Want to find out more about our Ohme EV chargers? Download a digital copy of the product manual.
Ohme Home/Go
You’ve got one of the original Ohme chargers! Thanks for being one of the first to join our journey.
Ohme Home Pro
From product specs to new EV regs, find out everything you need to know about your Ohme Home Pro.
Ohme ePod
The latest little addition to the Ohme family. Same clever tech, new discreet design.
Ohme Charging Cable
Everything you need to know about using and storing your portable charging cable.
Details of the Ohme Product Warranty can be found in the Product Manuals, or in the Ohme Terms and Conditions , and here are the key points to note:
- Ohme provides a product warranty for a period of: (i) 24 months from the date of purchase or delivery (whichever is later) for portable charging cables purchased in and delivered to the UK (on or after 1 July 2022); and (ii) 36 months from the date of installation for home chargers purchased in and delivered to the UK, that on purchase, delivery, or installation (as applicable) it shall:
- conform with the description of the Ohme Product described on our website at the time of purchase; and
- be free from material defects in materials or workmanship under normal use.
The product warranty does not cover any issues that are caused by conditions, malfunctions or damage not resulting from defects in the Ohme Product and does not cover damage or malfunction directly caused by abuse, misuse, negligence, accident, or improper use. This includes (without limitation) the following circumstances where you will not be able to claim under the product warranty:
- You make further use of the Ohme Product after telling us that the Ohme Product does not conform with the description or is defective;
- you alter or repair the Ohme Product or there has been improper use of it;
- you do not have sufficient mobile coverage for the Ohme Product to enable intelligent charging;
- there has been incorrect or improper installation by an installer who has not been arranged and sent directly by us;
- the defect arises as a result of fair wear and tear, vandalism, bad weather, or damages to your own electricity supply, if you do not take reasonable care, you do not store the product properly or there has been exposure of the Ohme Product to environmental conditions unsuitable for its use;
- the Ohme Product differs from its description due to changes required to ensure it complies with applicable statutory or regulatory requirements; or
- electrical supply quality to your Ohme Product is not within regulated tolerances at the point of installation or there are otherwise issues with your electrical supply which impact or prevent the operation of your Ohme Product.
Finally, if a customer would like to make a formal complaint regarding the Ohme product or our processes, they can contact [email protected] via email. The complaints team will then investigate the case, and speak to the customer directly to resolve the matter.
If you are moving house, you can leave the Ohme charger fitted at the current property, or you may wish to take your Ohme charger with you to the new property.
Leaving the charger at the current property
If you no longer need your Ohme charger, or will not be taking the charger to the new property, you can leave the unit fitted where it currently is. Here’s what you need to know:
- To disconnect your Ohme charger from your Ohme account and allow the next owners to use the charger, you will need to delete your Ohme account. To do this, in the Ohme app, tap Settings > Delete Account > Delete. For more information on disconnecting your Ohme account from your charger, click here.
- Once the charger has been disconnected from its current account, the new property owners can control the charger by creating an Ohme app account and connecting this to the charger instead.
- Your Ohme warranty belongs to you under the original terms & conditions used to purchase your Ohme charger. Therefore, if you move house and choose to leave your Ohme charger at your old property, the original warranty will not transfer to the new owners of the property.
Taking your Ohme charger with you to the new property
If you would like to keep your Ohme charger when moving property, there’s a few key things you need to know:
- Your Ohme product warranty continues from the date of your original installation in line with our terms and conditions, so we recommend you use an approved Ohme installer to remove the charger and to re-install at your new property.
- If you’d like Ohme to assist in the process through our managed installation partner network; please give us as much notice as possible (at least 3 weeks) prior to your move date so that we can book your charger removal from your current property. Ideally, please let us know at least one week ahead of your move date, just in case we need to rebook the service calls, and/or anything changes with your move-date.
- We can only remove and re-install Ohme chargers; however, we can quote and move multiple chargers if you have more than one Ohme unit at your property.
- Please bear in mind that there will be an upfront cost for a standard removal and reinstallation at your property and you will be required to fill out a survey as you did initially for the new property. We would need this information as soon as possible for us to carry out the reinstallation.
- Please do note that additional costs may be incurred once we have received this information dependant on the layout of your property.
Please note: You can fully charge your electric vehicle(s) prior to removal, and then use public charging for any little top-ups until your Ohme charger is re-installed at your new property.
Finally, if you would like Ohme’s assistance with relocating your Ohme’s assistance with relocating your Ohme charger, please contact our Customer Success team for further support by emailing [email protected] or contacting us below.
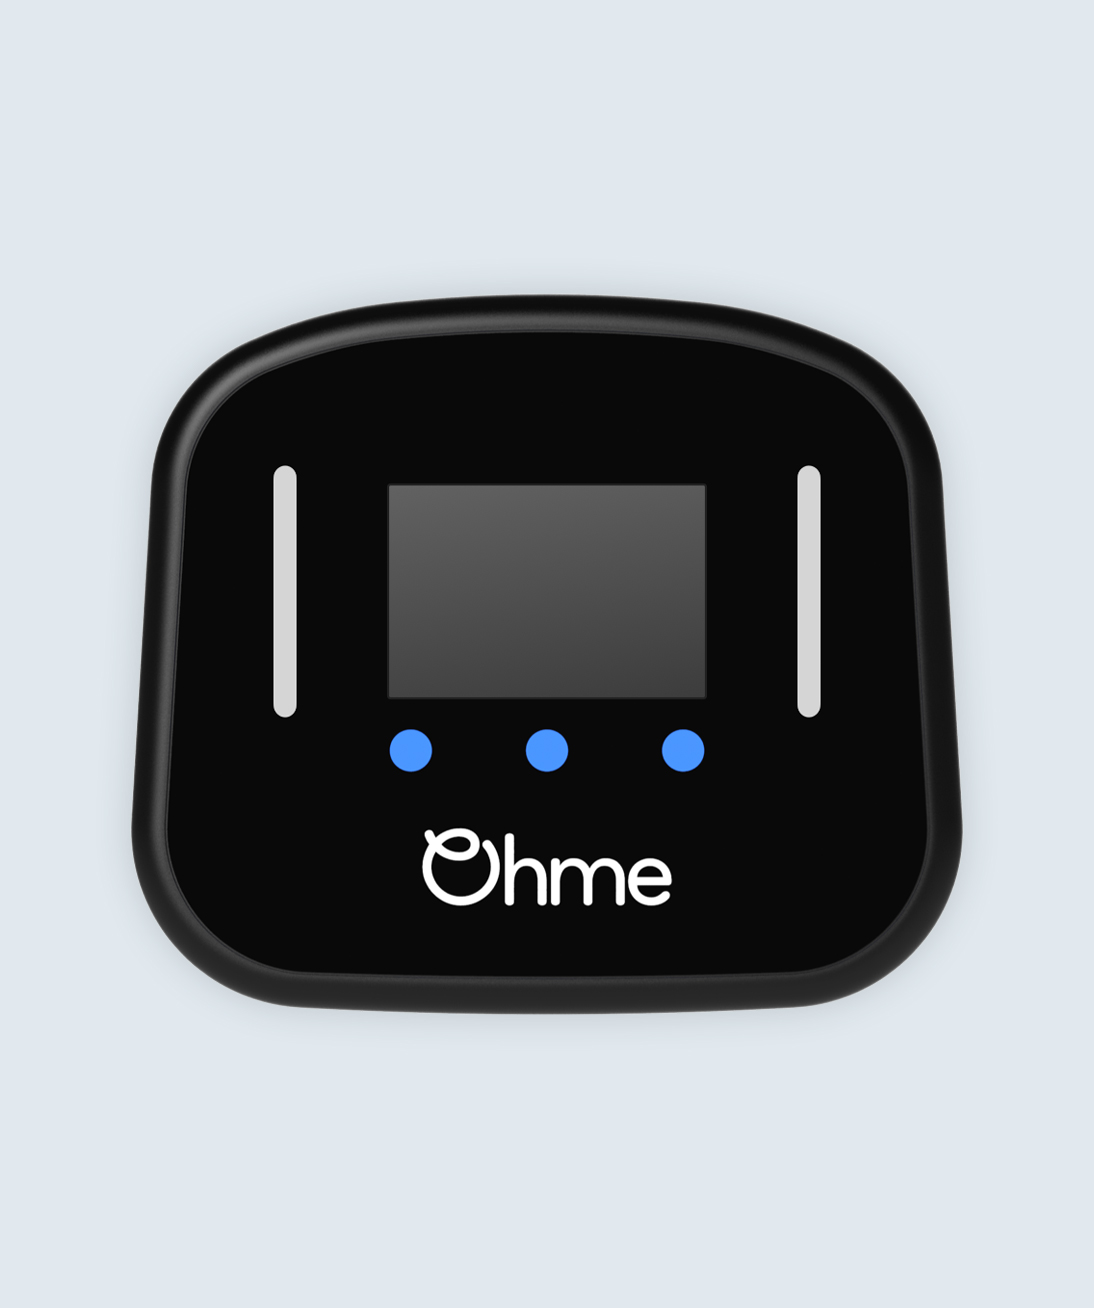
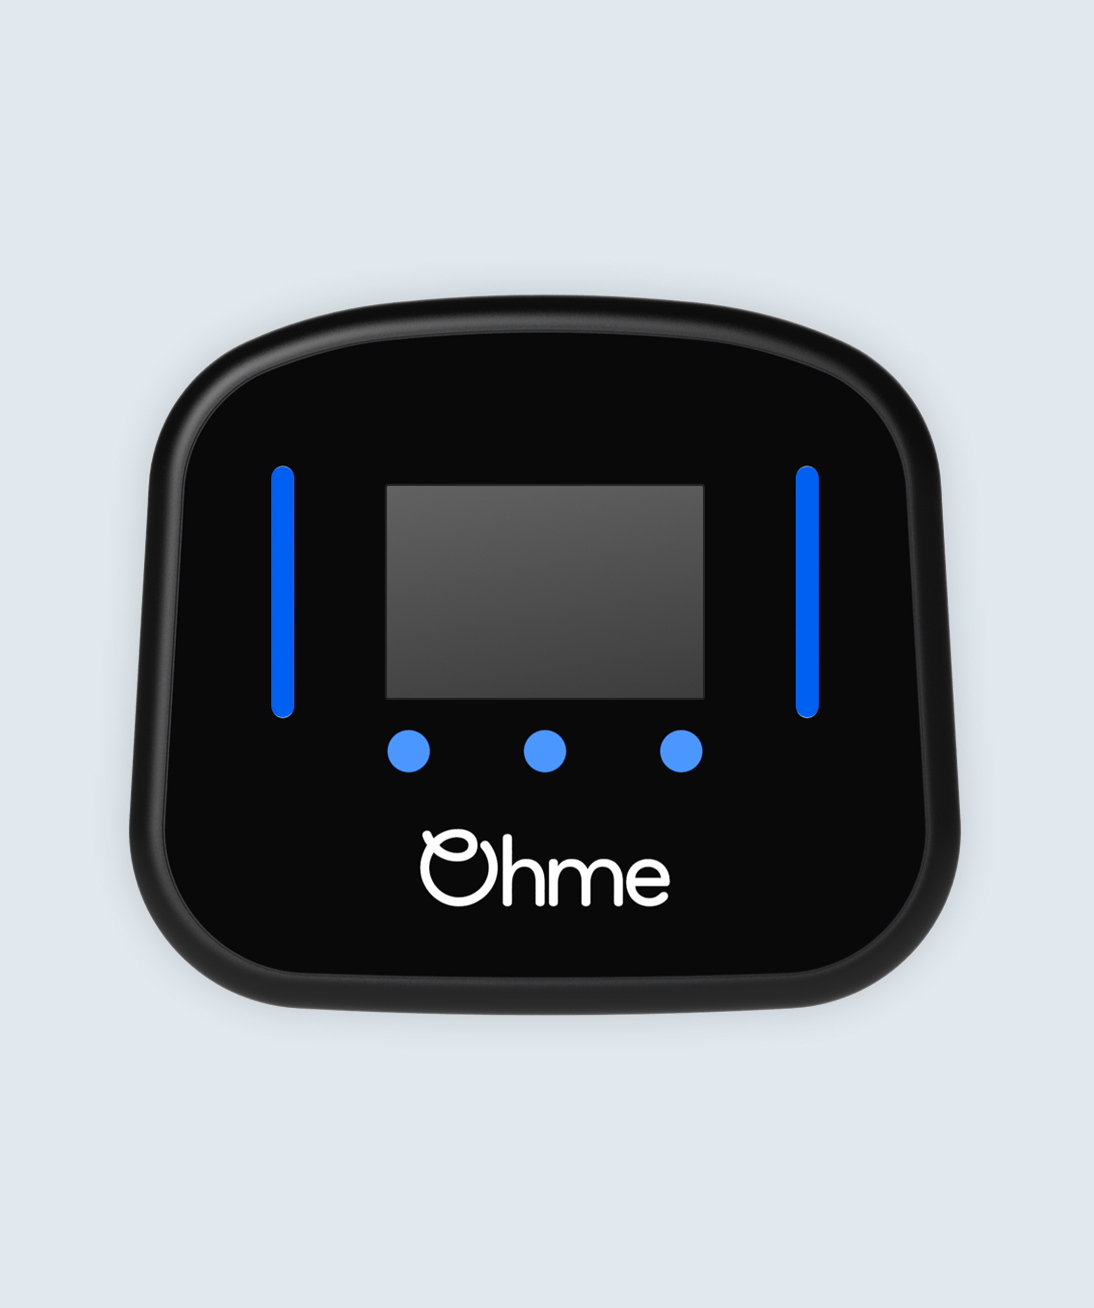
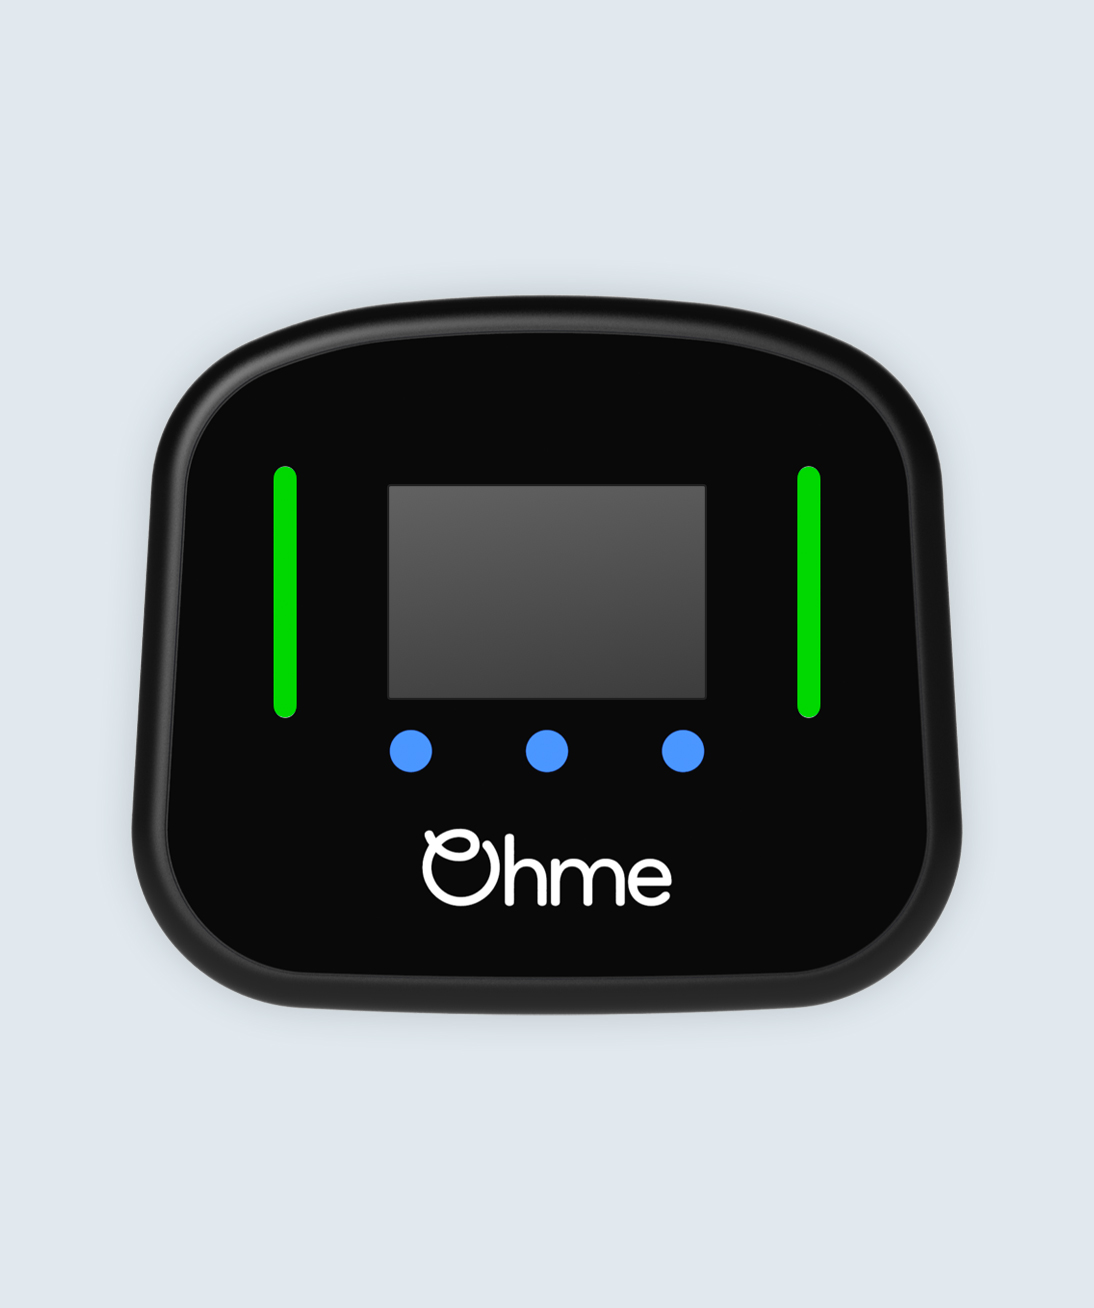
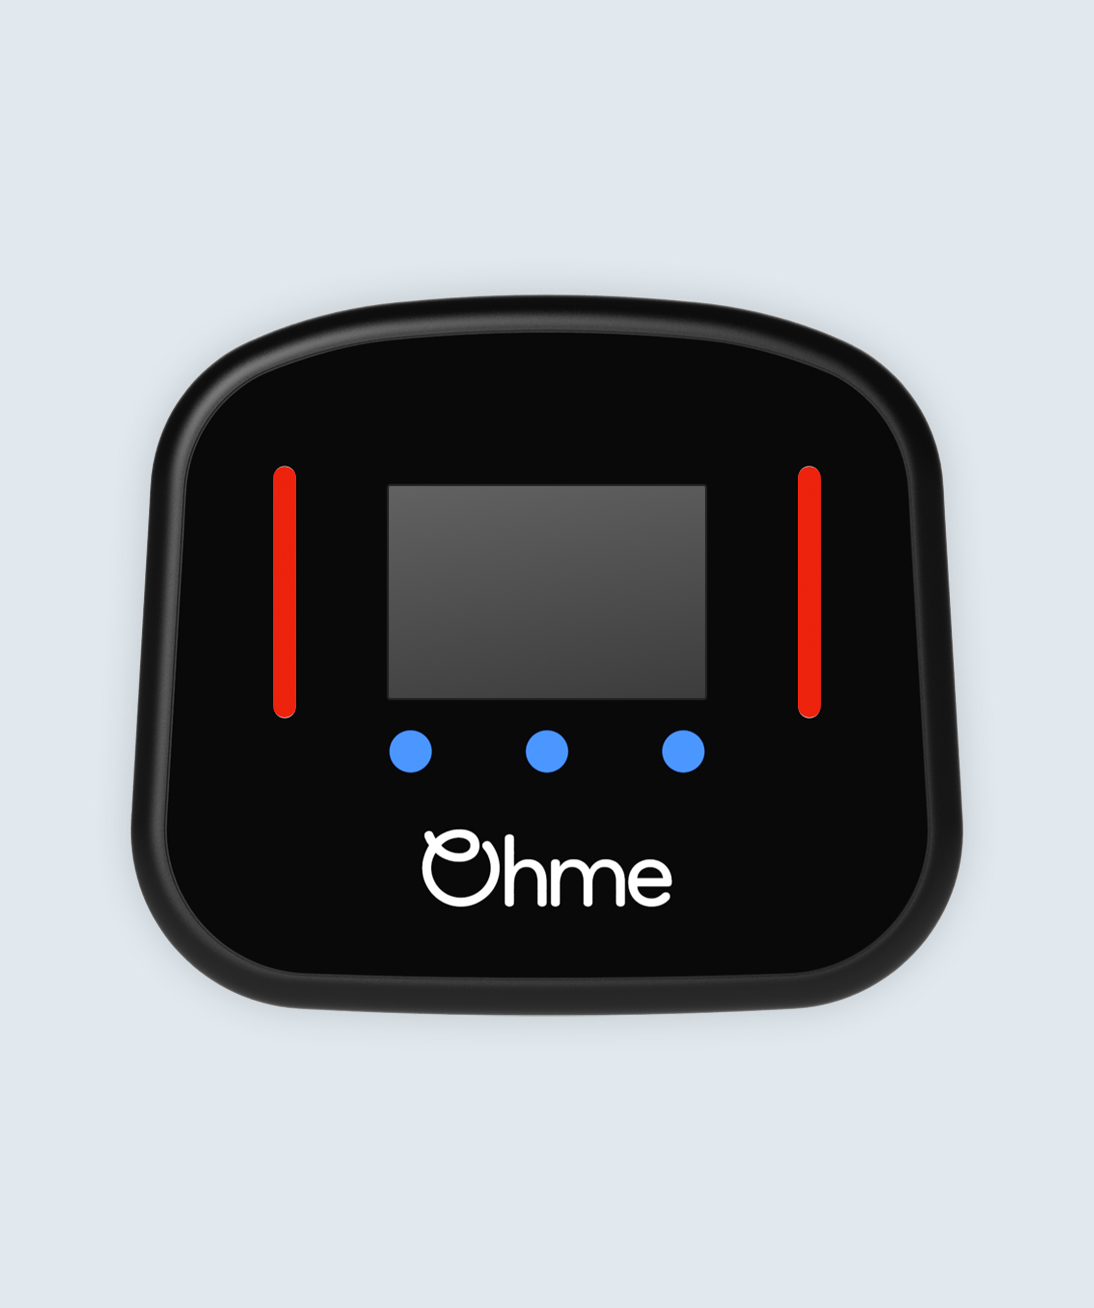
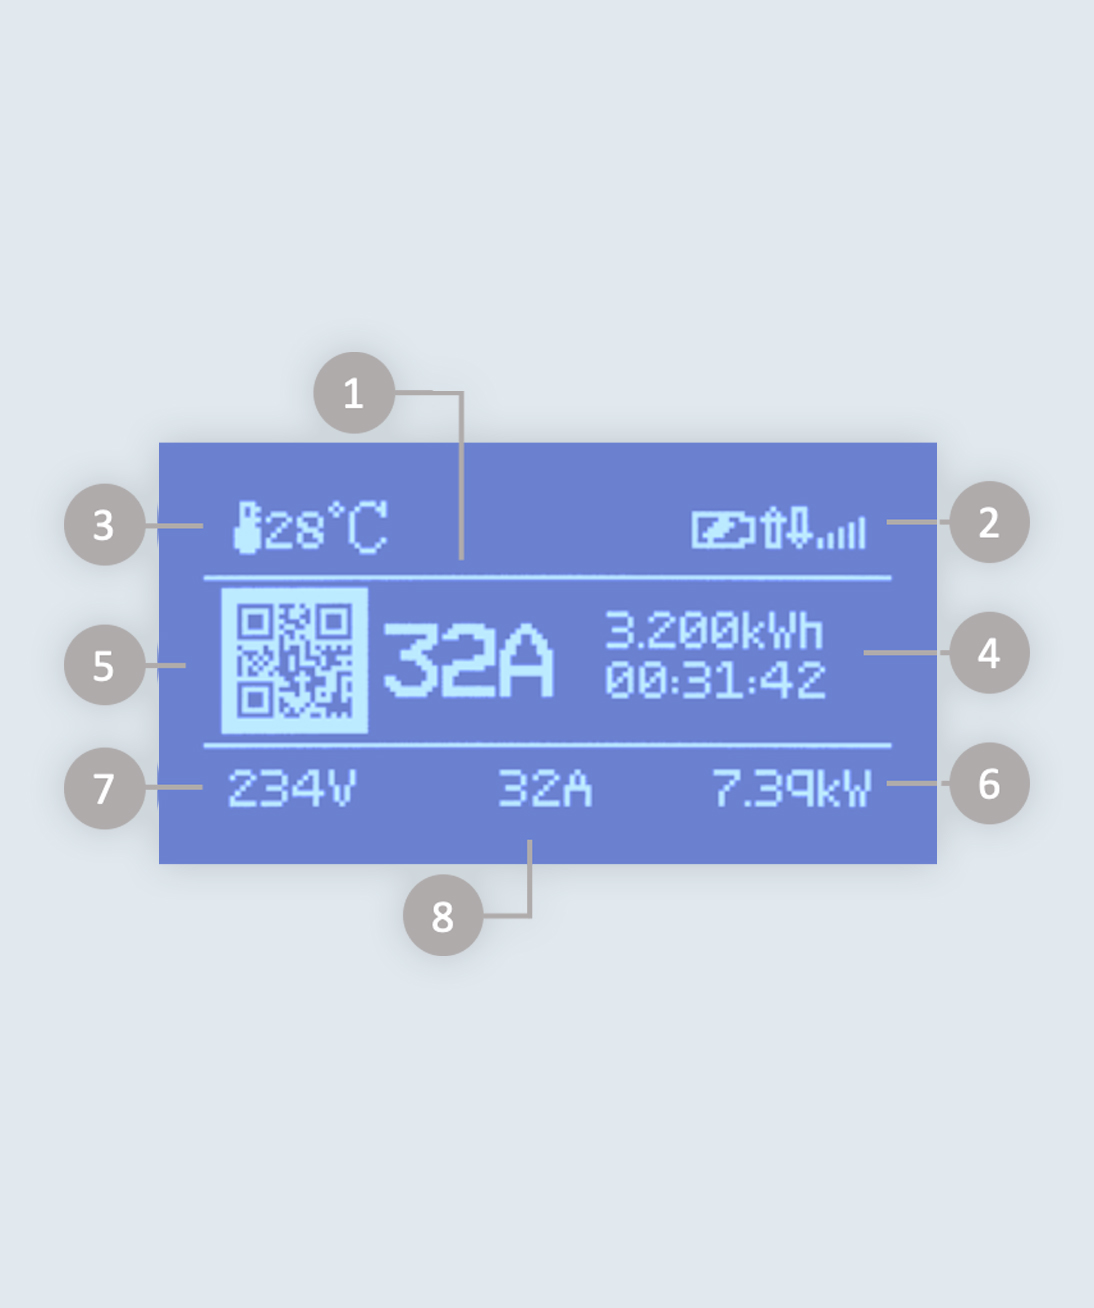
Your Ohme Home Pro features an LCD screen so that you can view key charging stats on the charger itself. The screen’s colour, and the indicator light strips, tell you about the charger’s status. You can use the blue buttons on the charger itself to change or update your current charge session. Keep reading to see how.
Jump to:
Ohme Home Pro charger display
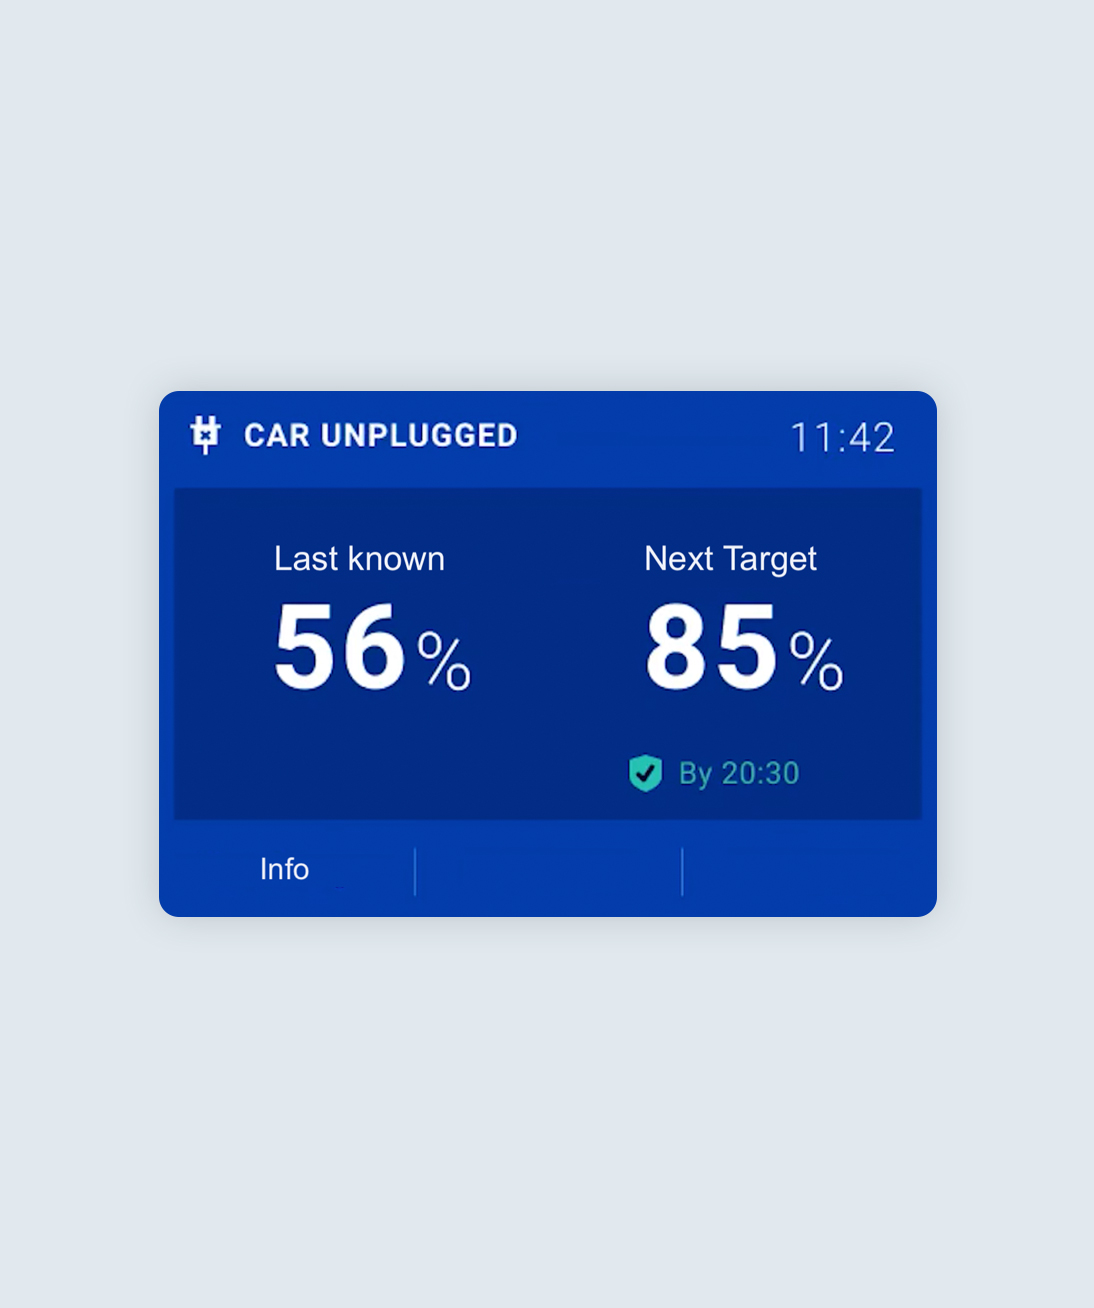
Charger unplugged
When the charger is unplugged from the car, you’ll see ‘Car Unplugged’ in the top left corner.
Charger plugged in
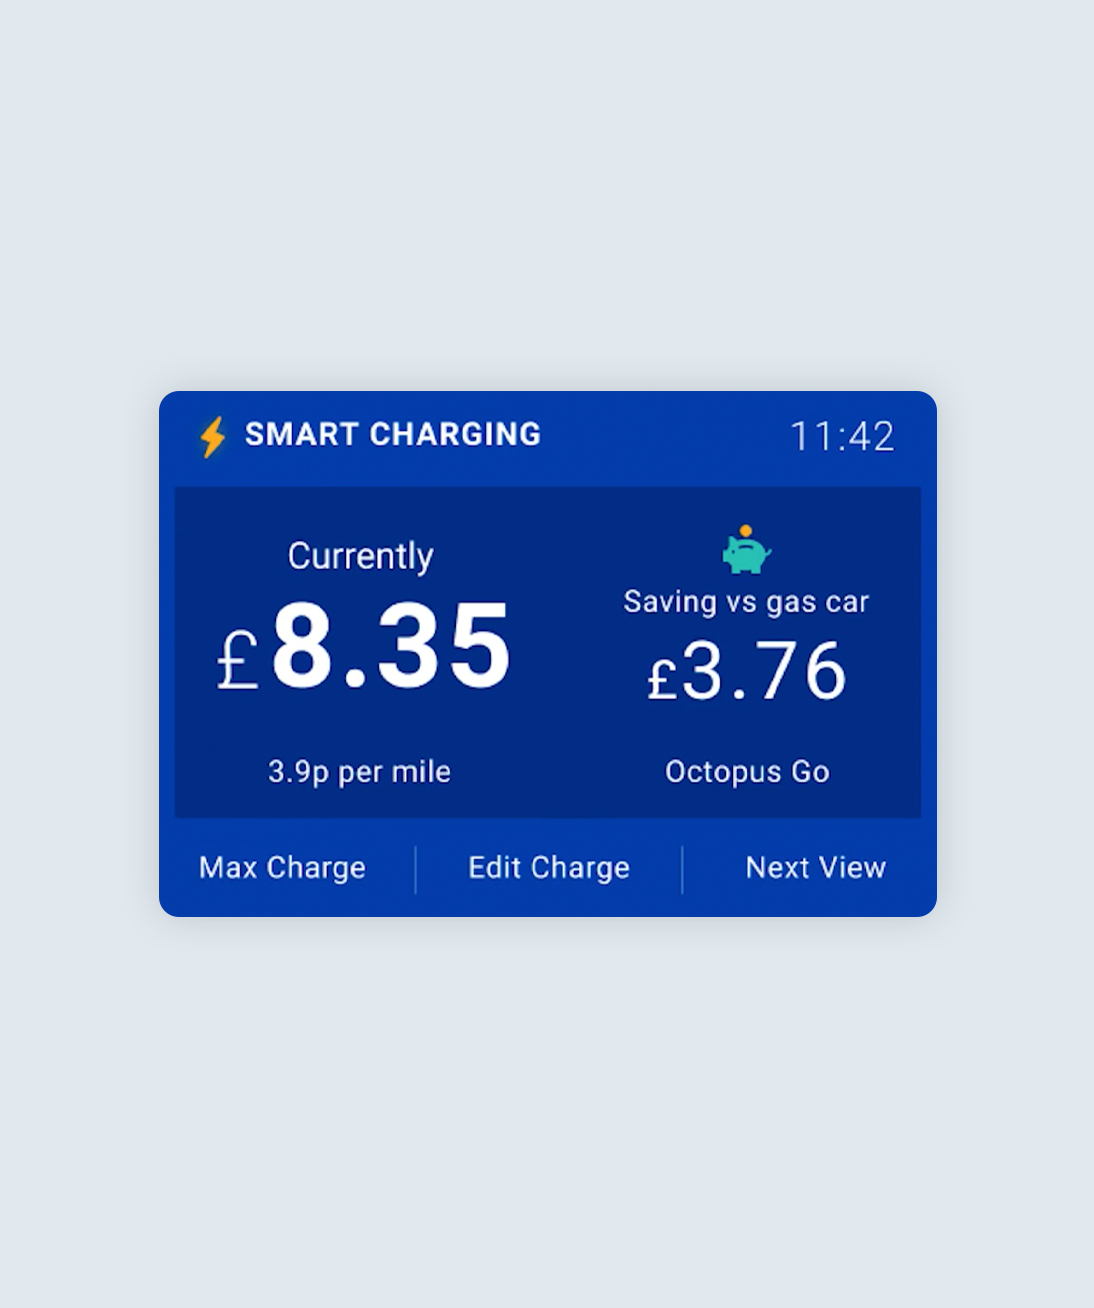
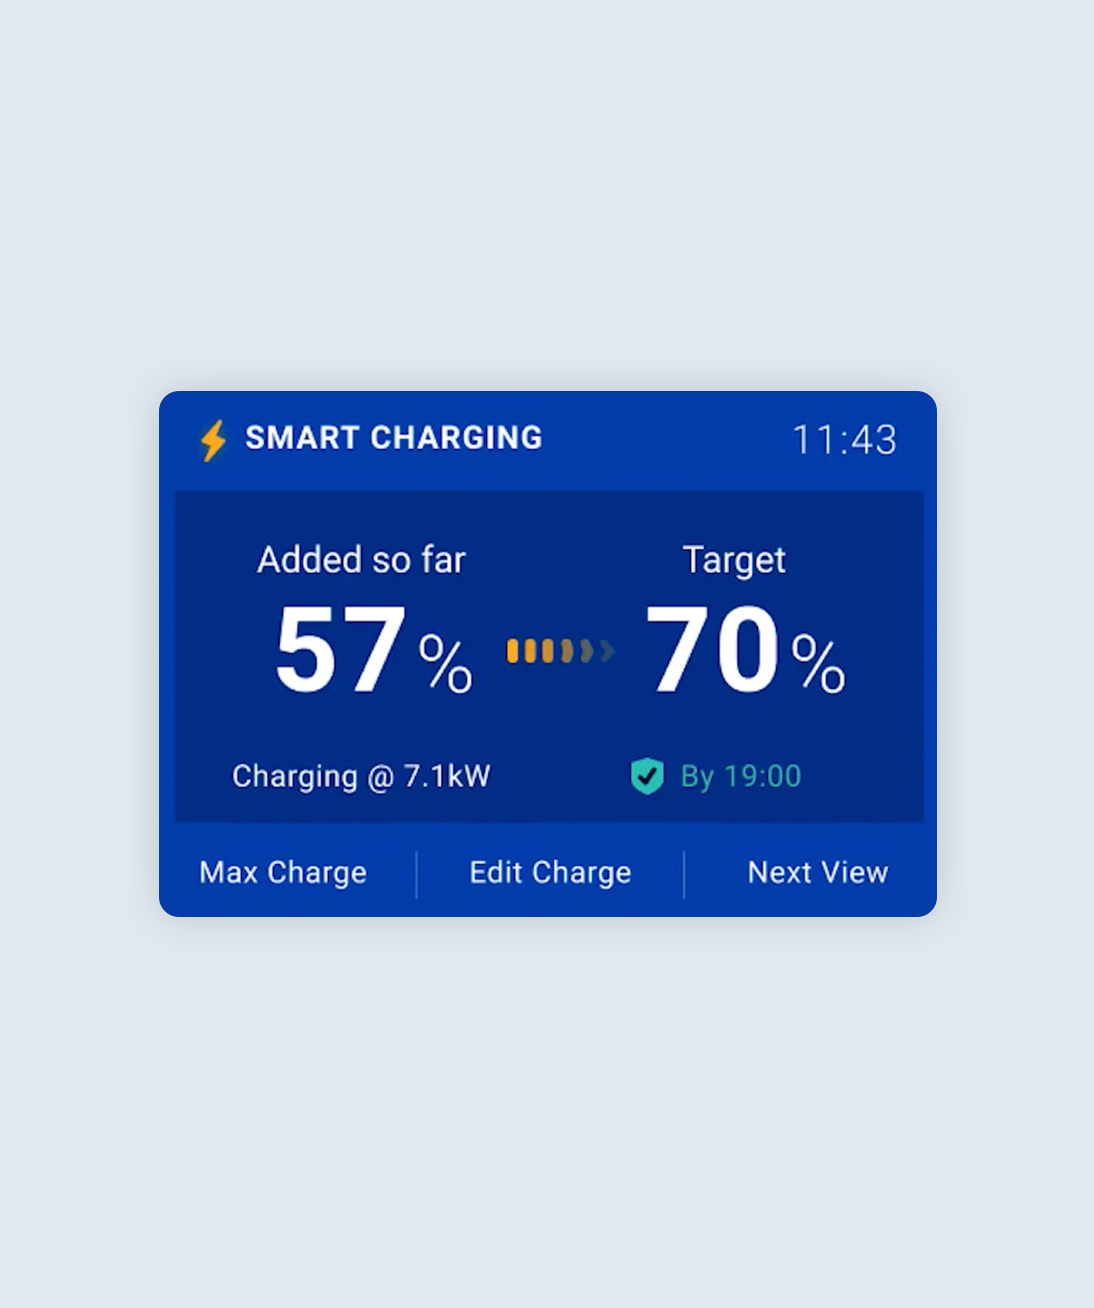
Once the charger is plugged into the car, you’ll see ‘Smart Charging’ in the top left corner. You’ll also be able to see how much charge has been added so far in this charge session, plus your charge target and end time.
Charge costs
Tap ‘Next View’ to see information about your session’s charge costs, including your cost per mile and your savings vs an ICE vehicle.
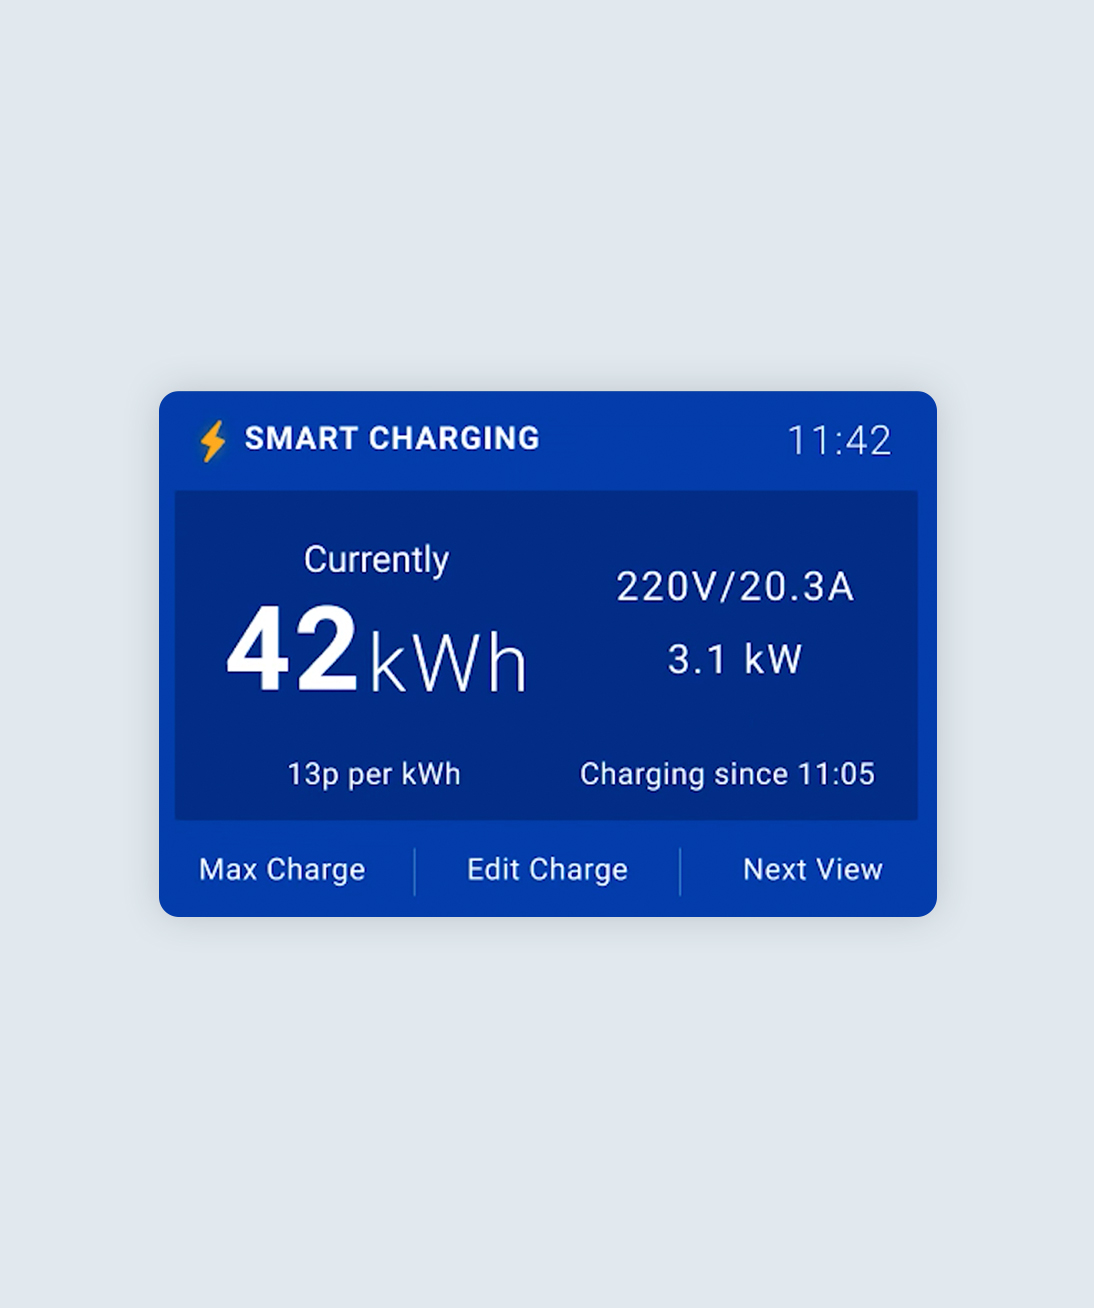
Energy usage
Tap ‘Next View’ to see information about your energy consumption. You can see the total kWh charged on the left hand side. On the right hand side, you can see the voltage, amperage, and kW.
CO2 savings
Tap ‘Next View’ to see how much CO2 you have saved vs a petrol car.
Edit charge target
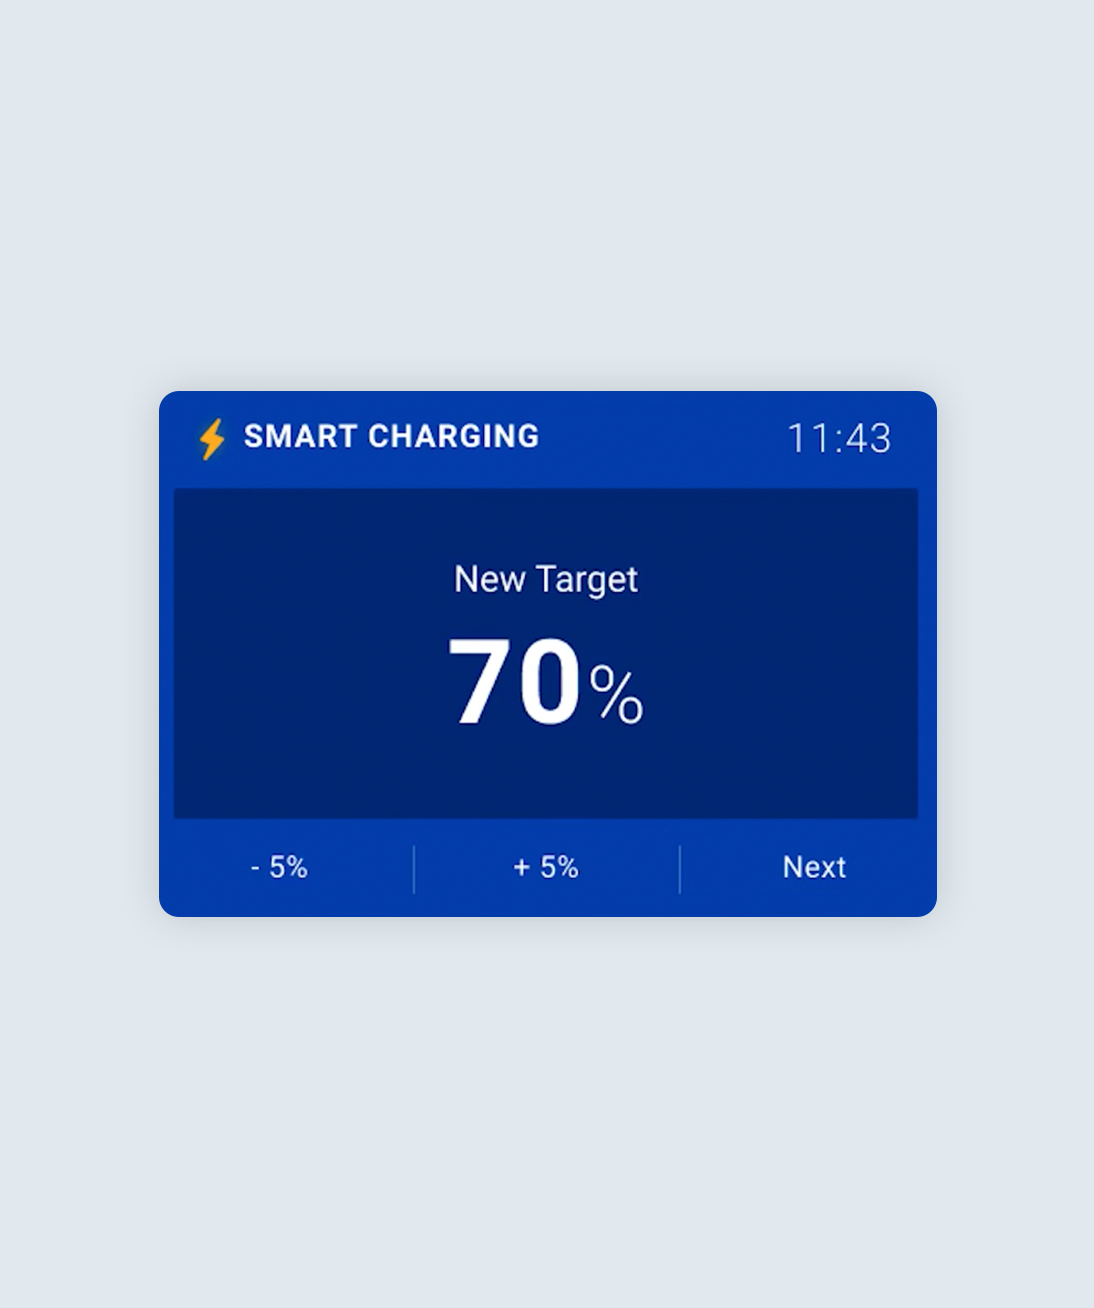
Tapping ‘Edit Charge’ allows you to make changes to your current charge session. Use the blue buttons to increase or decrease your charge target in increments of 5%. Here, we’re adjusting the charge target from 85% to 70%.
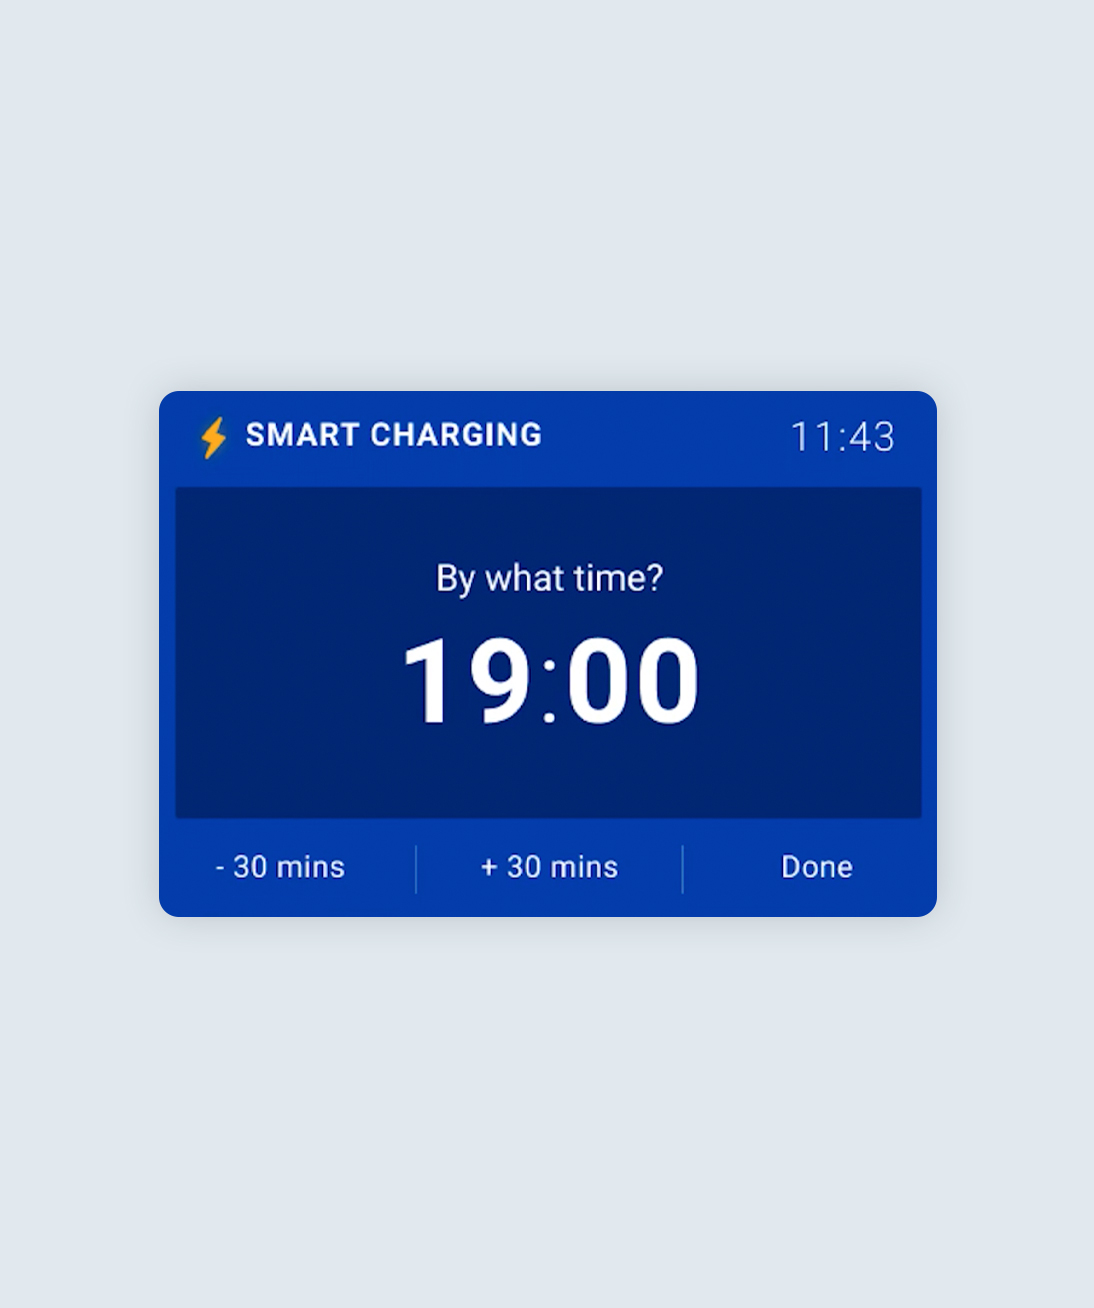
Edit charge end time
Tap ‘Next’ to change your target end time. You can adjust the end time in increments of 30 minutes, then press ‘Done’ to save your changes. Here, we’re adjusting the end time from 20:30 to 19:00.
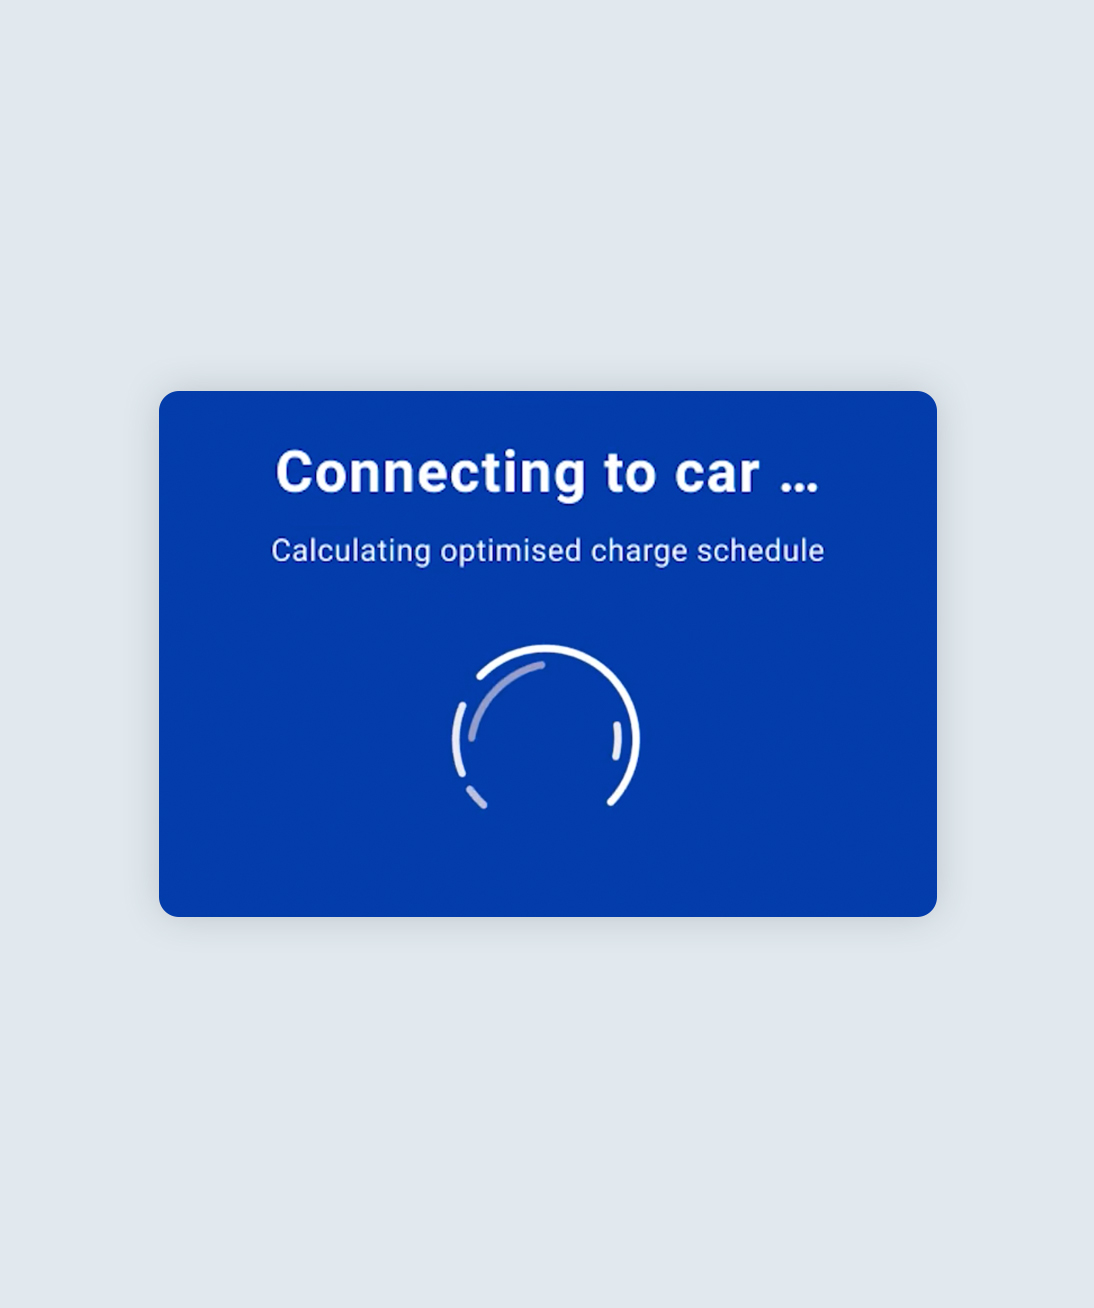
Updating your schedule
This screen let’s you know that Ohme is updating your charge schedule.
Updates complete
Once your updated schedule has been created, you’ll notice that your charge target and end time have been updated on the main screen.
Switch to Max Charge
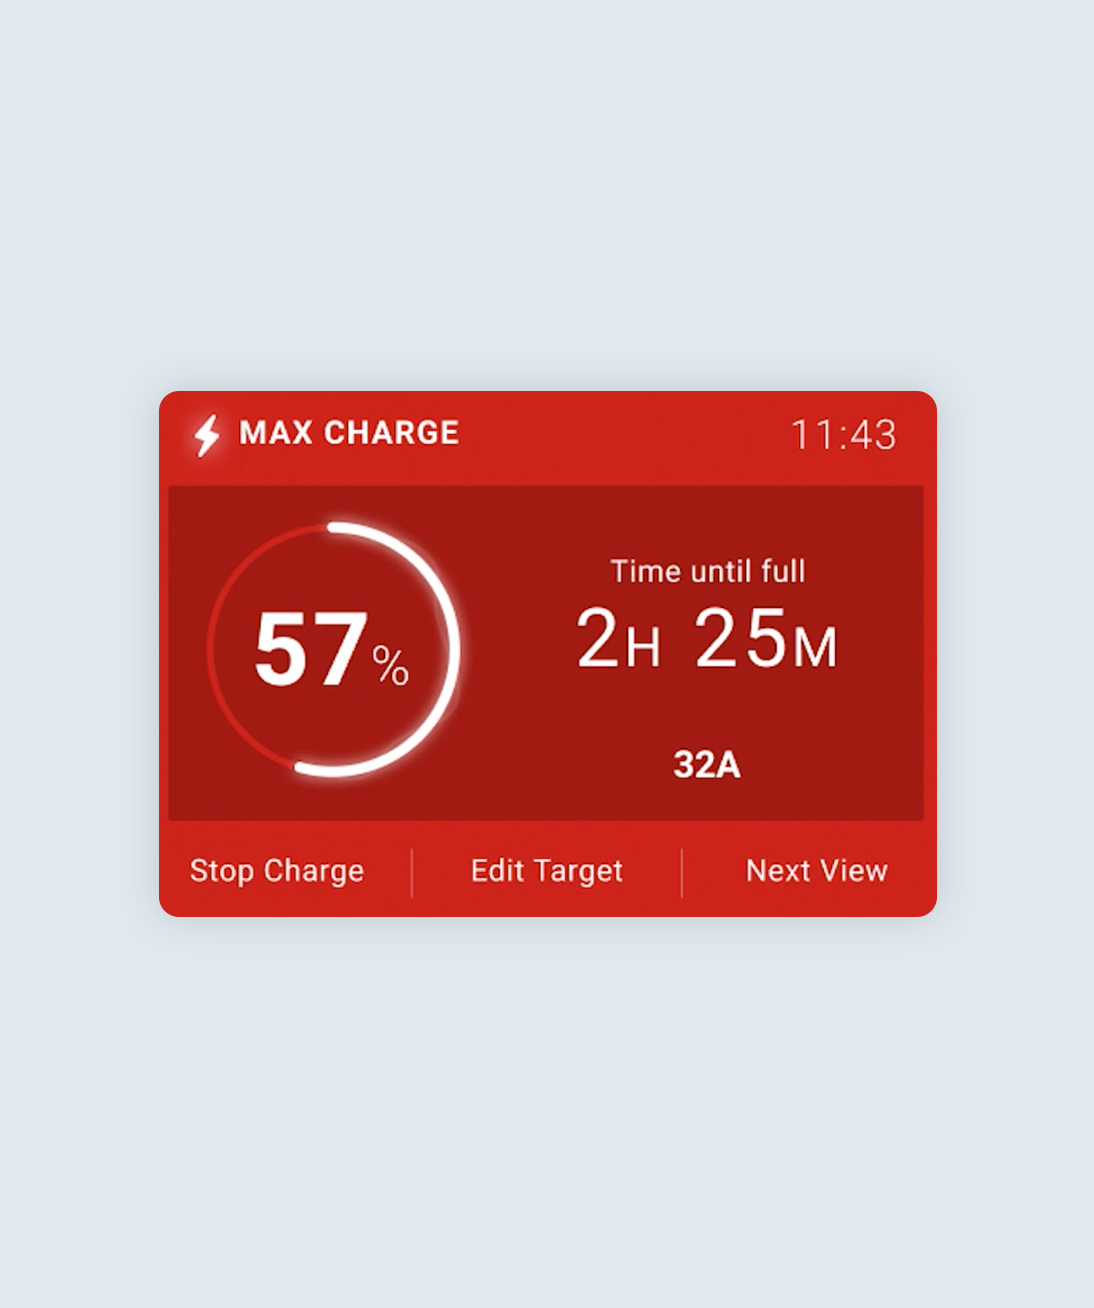
If you need to charge now, tap the Max Charge button. Once this setting has been applied, the display screen will turn from blue to red. This will charge your car as quickly as possible until it is full or you un-plug. Your estimated charge time is indicated on the right hand side under ‘Time until full’.
Ohme Home Pro indicator lights
The indicator light strips help you to understand your charger’s status at a quick glance.
No light
Finished charging / unplugged
Blue light
Delayed charging (not currently charging due to a scheduled delay e.g. waiting to make the most of your off-peak electricity)
Green light
Solid green: Car plugged in but not drawing power
Green fading in and out: Active charging, according to schedule
Red light
Error. Contact our Customer Care Team via [email protected] for further investigation.
Your Ohme Home/Go charger has a display screen and indicator lights to tell you lots of information about your charging. Here, we take a closer look at what the icons and light combinations you might notice on your charger mean.
Jump to:
Ohme Home/Go charger display
Your charger display
- Amps scheduled to be delivered upon plug-in. When a charge session has a scheduled delay, the display will show 0A.
- Activity and connectivity status.
- Internal temperature of the unit.
- Total kWh charged and time elapsed in a session.
QR code to link charger with Ohme app.
- Real time kW being delivered to the car.
- Mains voltage.
- Real time amps being delivered to the car.
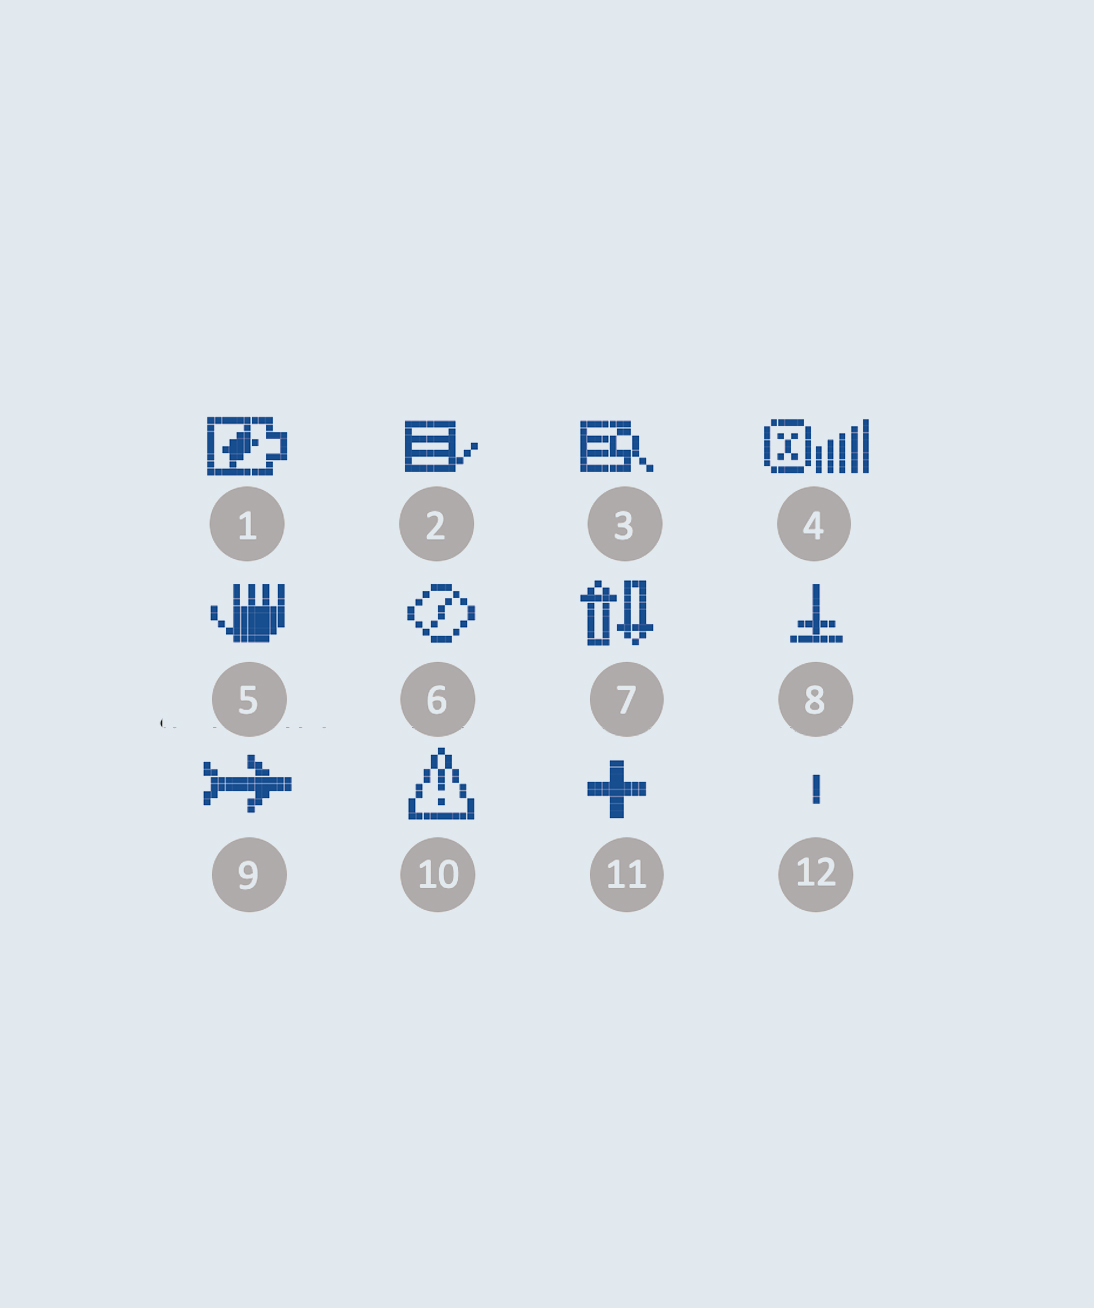
Icons you might see
Part 1
- Charging
- Checking server for firmware
- Attempting to download new firmware
- Connected to network but unable to send or receive data
- Charging suspended due to vehicle communications error
- Connection to network denied
- Connected to server
- Downloading new firmware
- EV Supply Equipment (EVSE) connected, but not ready to charge
- Fault
- GPS has secured a location fix
- Level 1 signal strength
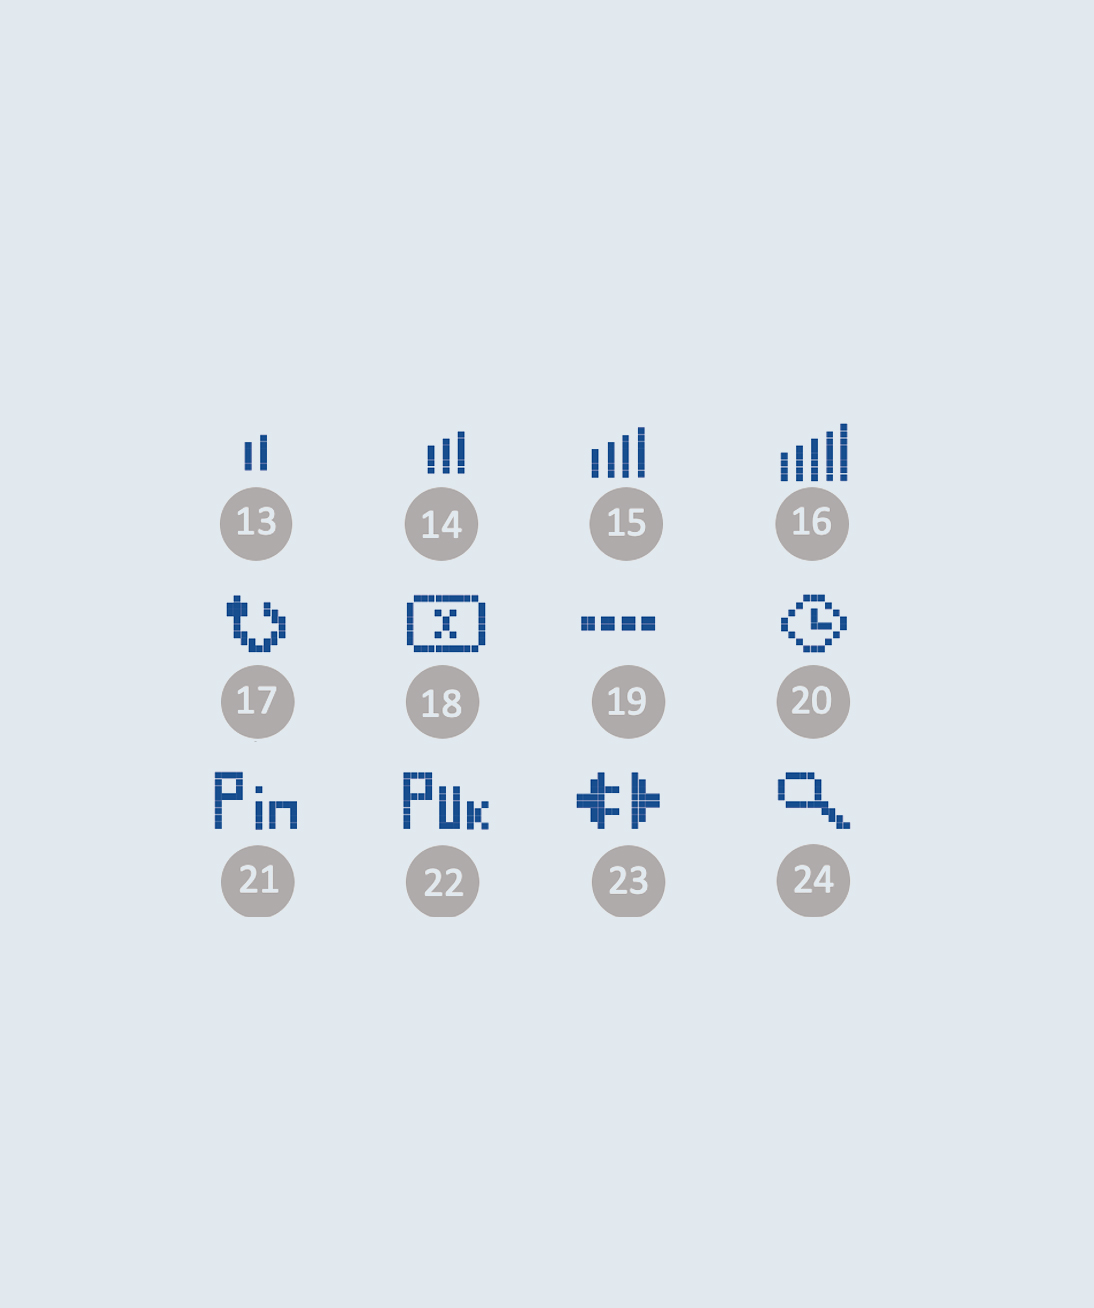
Icons you might see
Part 2
13. Level 2 signal strength
14. Level 3 signal strength
15. Level 4 signal strength
16. Level 5 signal strength
17. New firmware will be installed on device, awaiting reboot
18. No network
19. No SIM
20. Not charging due to schedule
21. PIN number needed
22. PUK code needed
23. Ready to charge
24. Searching for network
Ohme Home/Go indicator lights
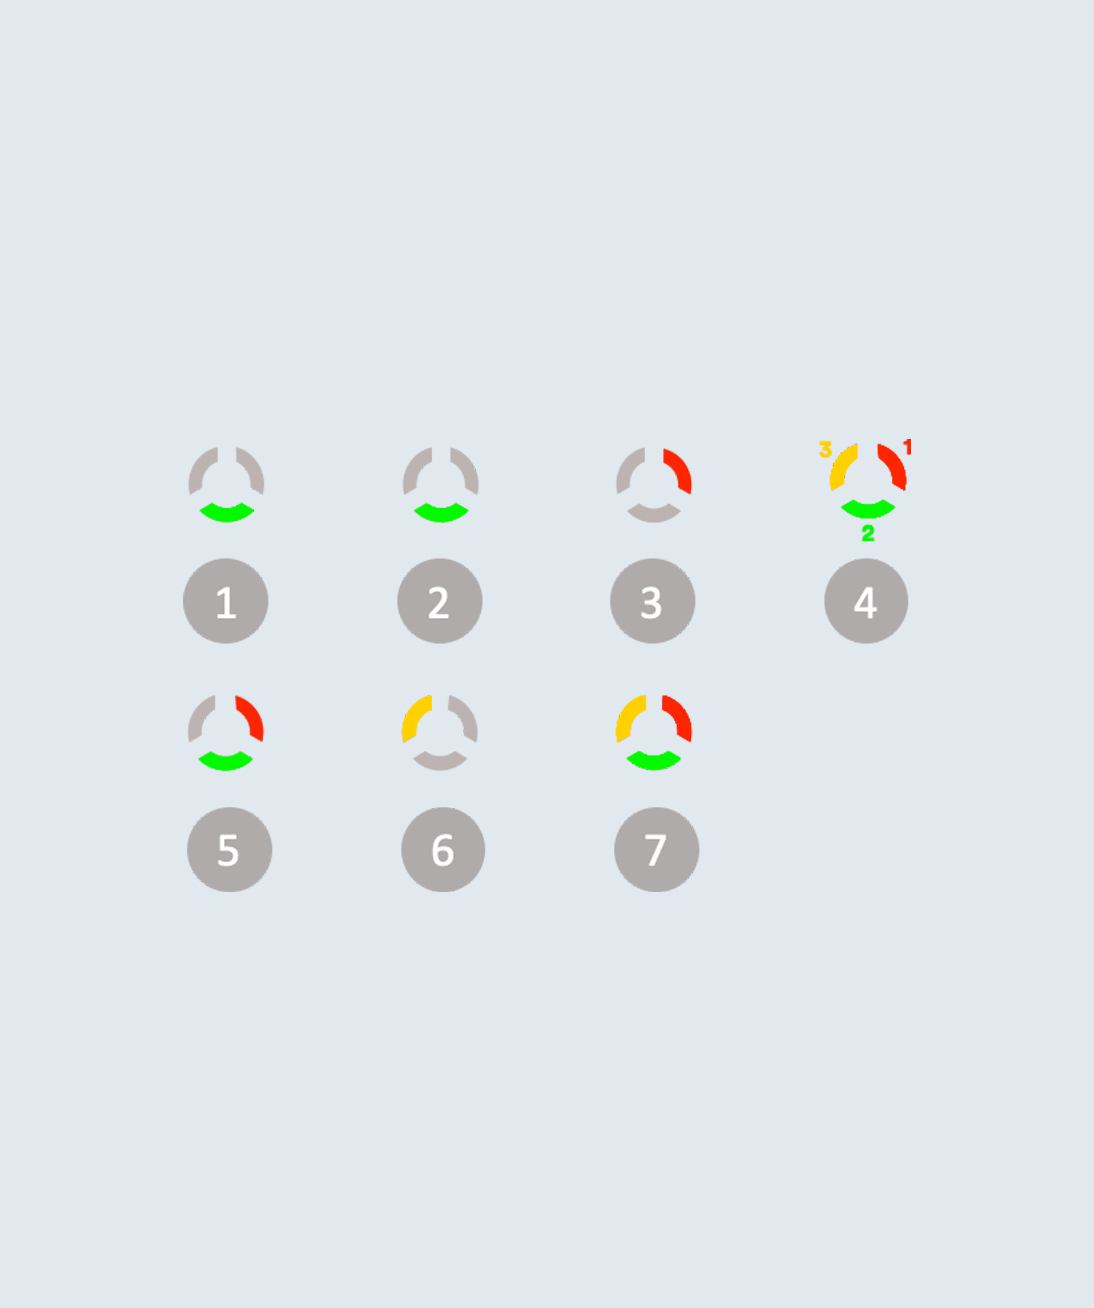
The indicator lights on the front of the Ohme Charger can be used to tell you about the charger’s status at a quick glance. The ring of lights comprises three segments: red, green, and yellow. The different combinations of lights that you will see are shown below.
If the indicator lights display an Electrical or EV fault, contact Ohme Customer Care Team via [email protected].
Indicator light combinations
- Waiting, ready to plug into the vehicle.
(Steady green light)
- Plugged into vehicle, waiting to connect to vehicle.
(Flashing green light)
- Connected to vehicle, waiting for vehicle to accept charge.
(Steady red light)
- Waiting for schedule to start charging.
(Lights flash in sequence)
- Charging.
(Steady red light, flashing green light)
- Electrical fault.
(Flashing yellow light)
- EV fault.
(Lights flash simultaneously)
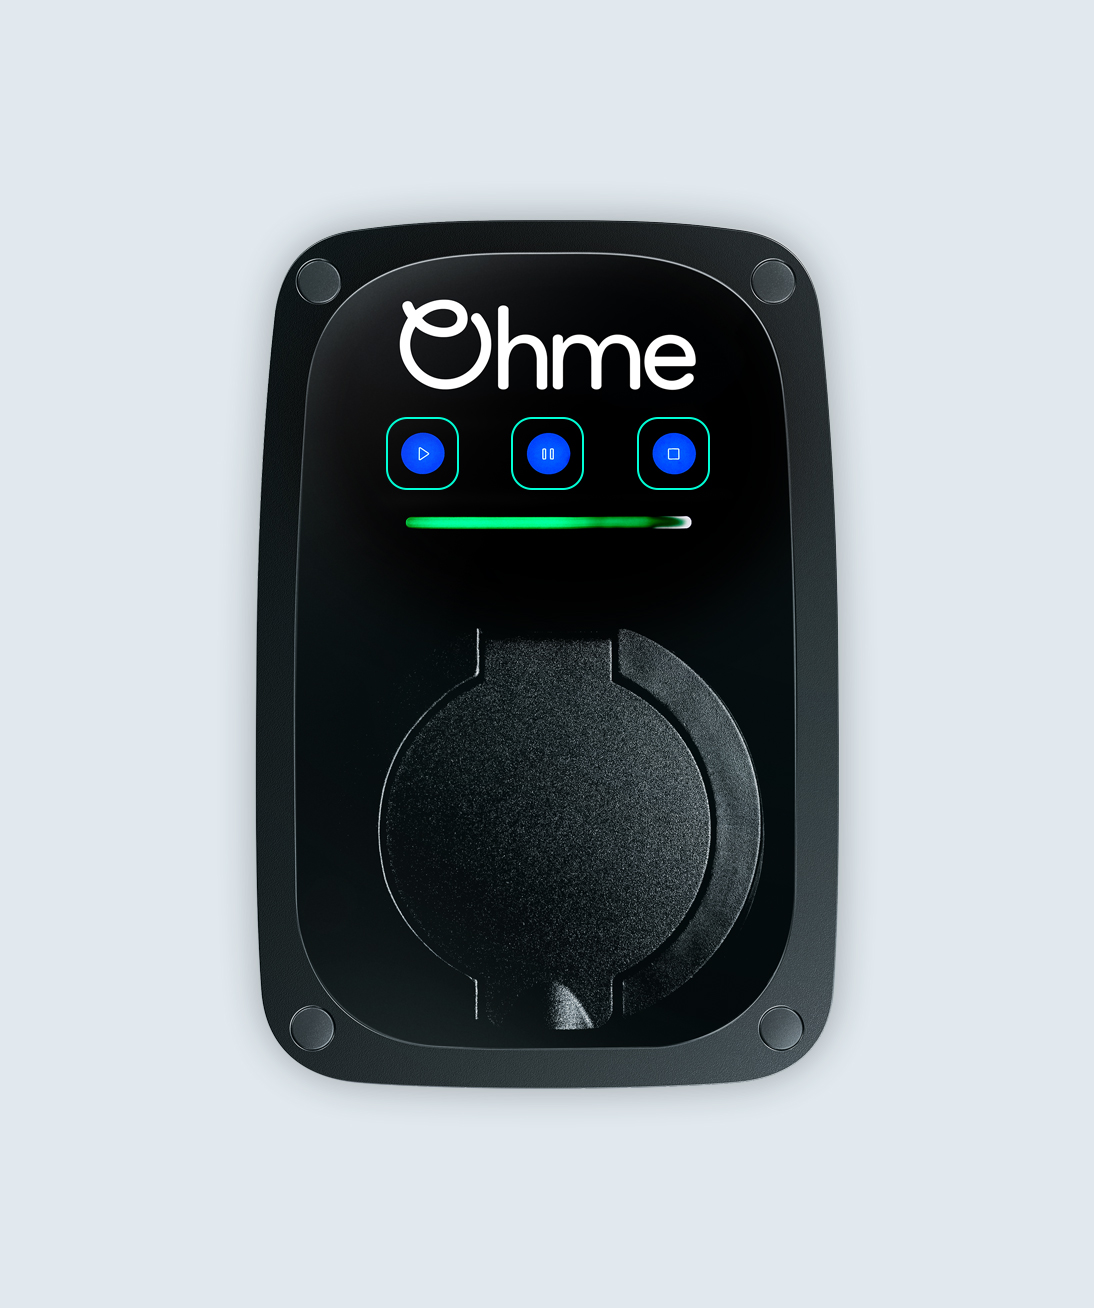
Your Ohme ePod features three buttons so that you can control your charging via the charger itself. Unlike the Ohme Home and the Ohme Home Pro, the Ohme ePod doesn’t have a display screen, instead the indicator lights help you to understand what your charger is doing (or planning on doing).
Jump to:
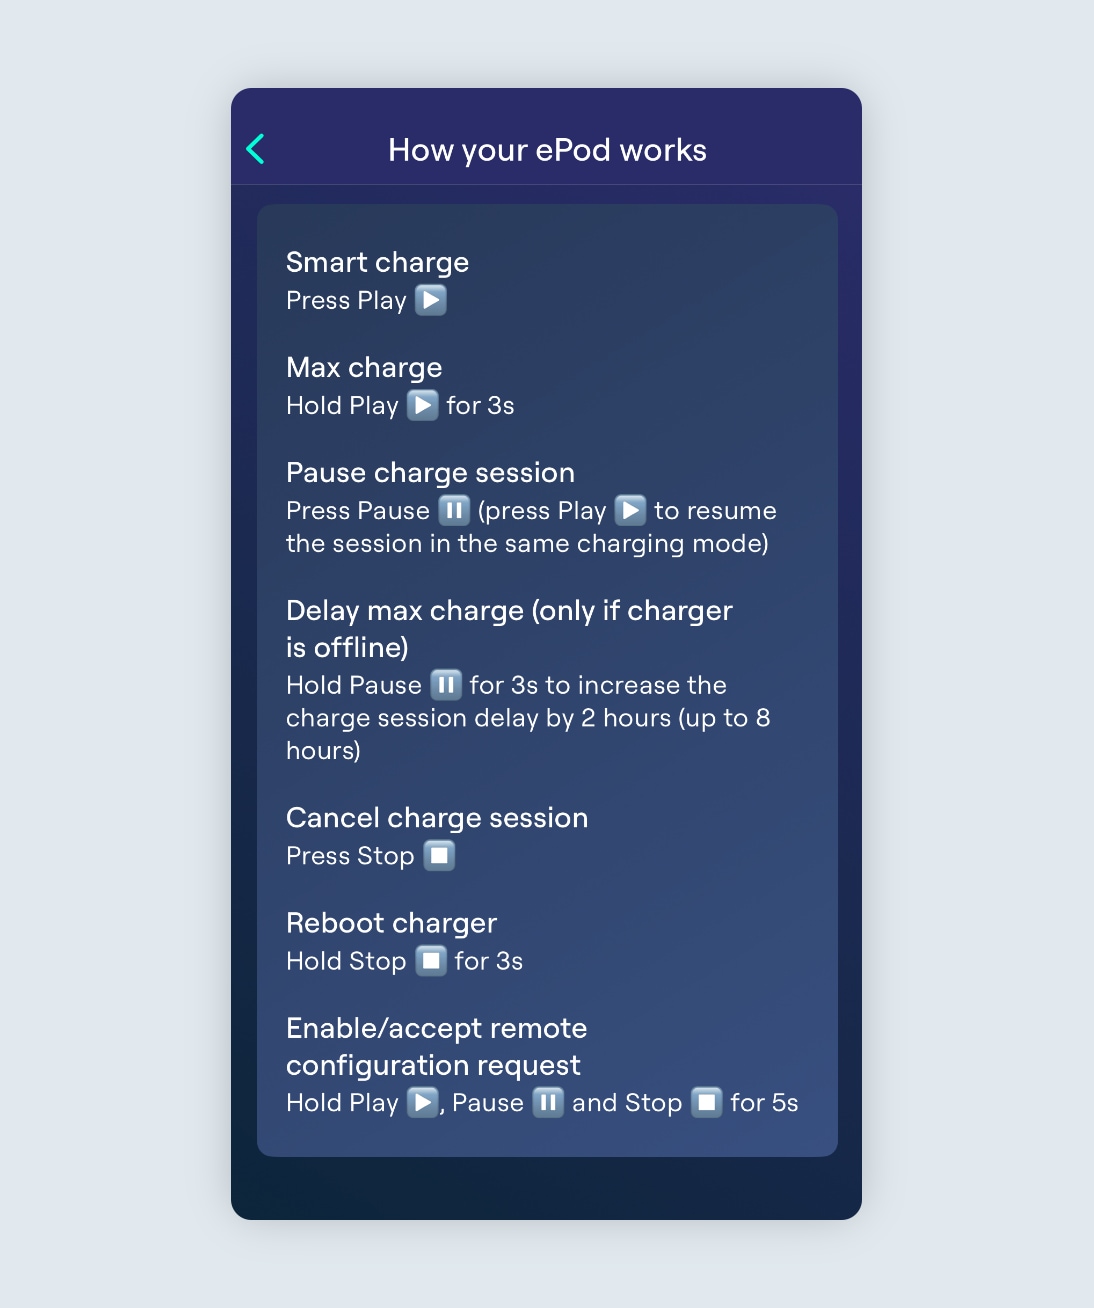
Play, pause, stop
There are three touch sensitive buttons on the front of the ePod.
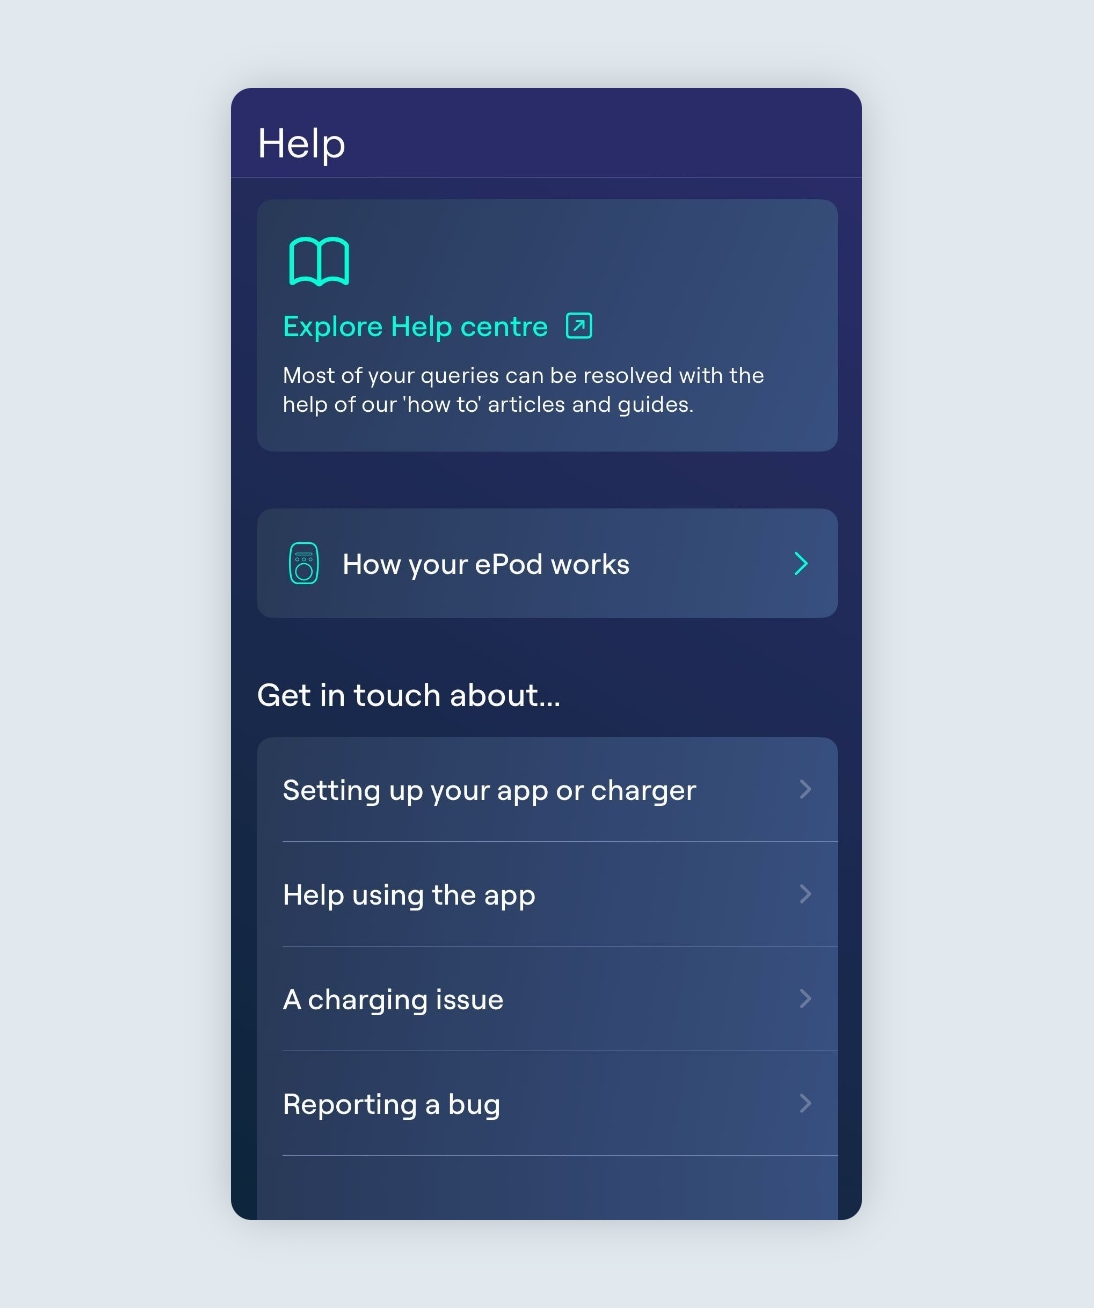
Learn more on the Help screen
To learn how to use your ePod buttons, tap the Help screen and ‘How your ePod works’.
See how to control your ePod
Here you will see a description of what each of the buttons does on the front of the charger.
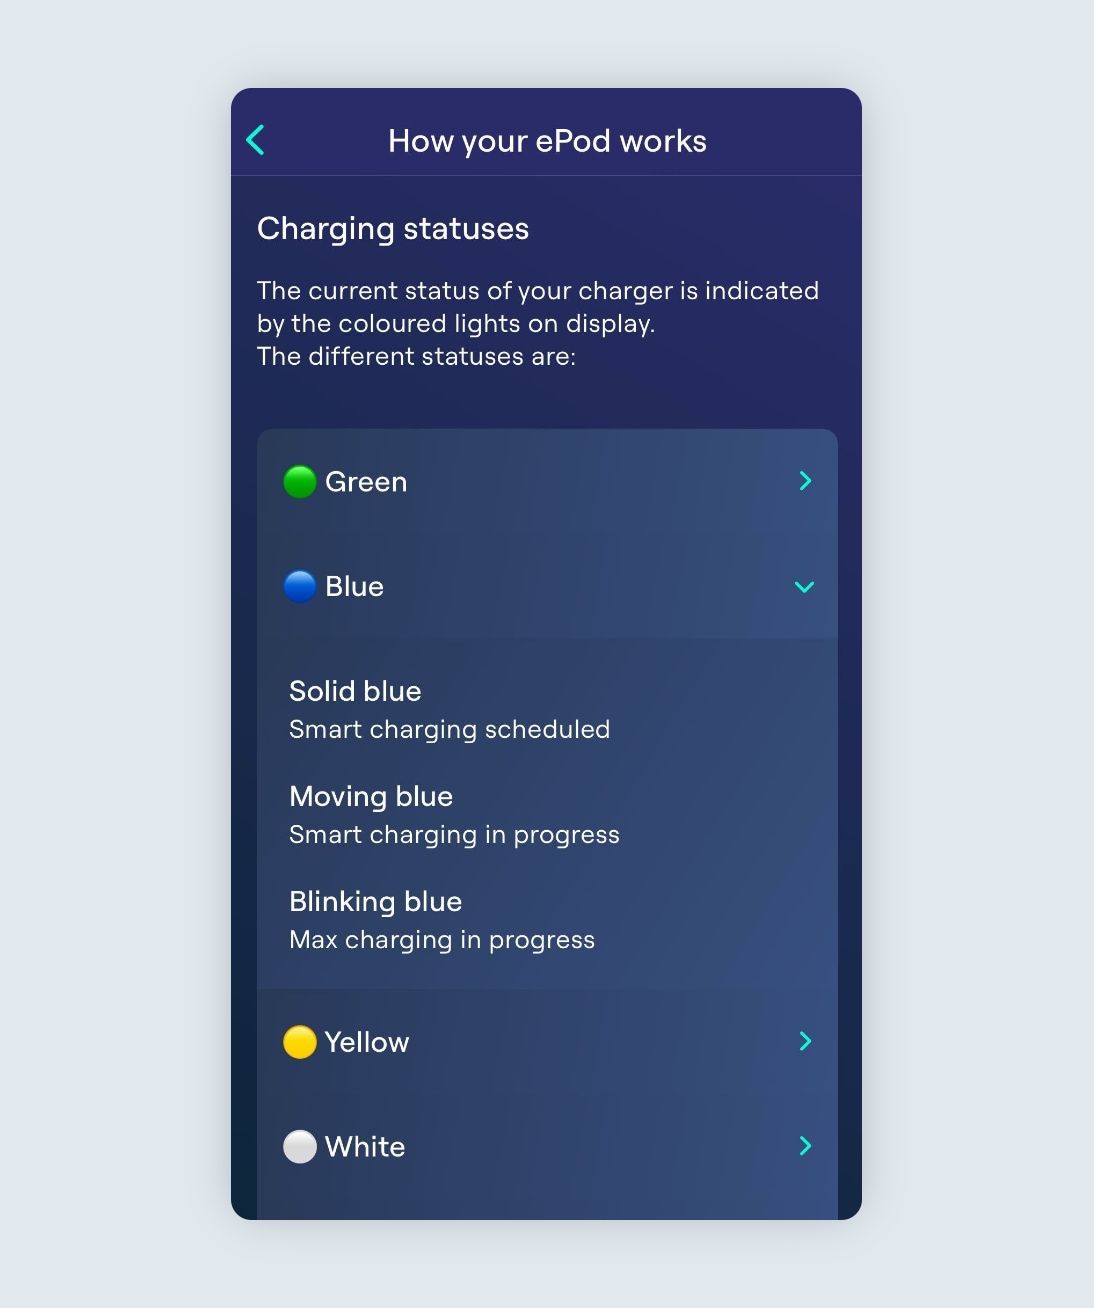
Ohme ePod indicator lights
Charging statuses
As well as the ePod buttons, My Charger also includes a reference to what the different colours and light sequences mean.
You can also check the meaning of the ePod indicator lights via this key. The following lights show the charging statuses for the ePod.
The following images show some common troubleshooting lights.