Charging your EV for the first time might seem daunting if it’s something you’ve never done before. Don’t worry, you’ll be an EV charging pro in no time at all. Here’s everything you need to know about your first charge:
Downloading the Ohme app
To get the most out of your new charger, you’ll need to download the Ohme app. Visit the App Store or Playstore to download the Ohme app and create your account.
Please note, Ohme requires a strong 3G/4G mobile phone signal to work as a smart charger. You’ll still be able to use your charger without mobile signal, but you won’t be able to benefit from Ohme’s smart charging capabilities.
Creating your account
Step 1
When you first open the Ohme app you may be asked to select which country you’re in. Once you’ve made your selection tap Continue.
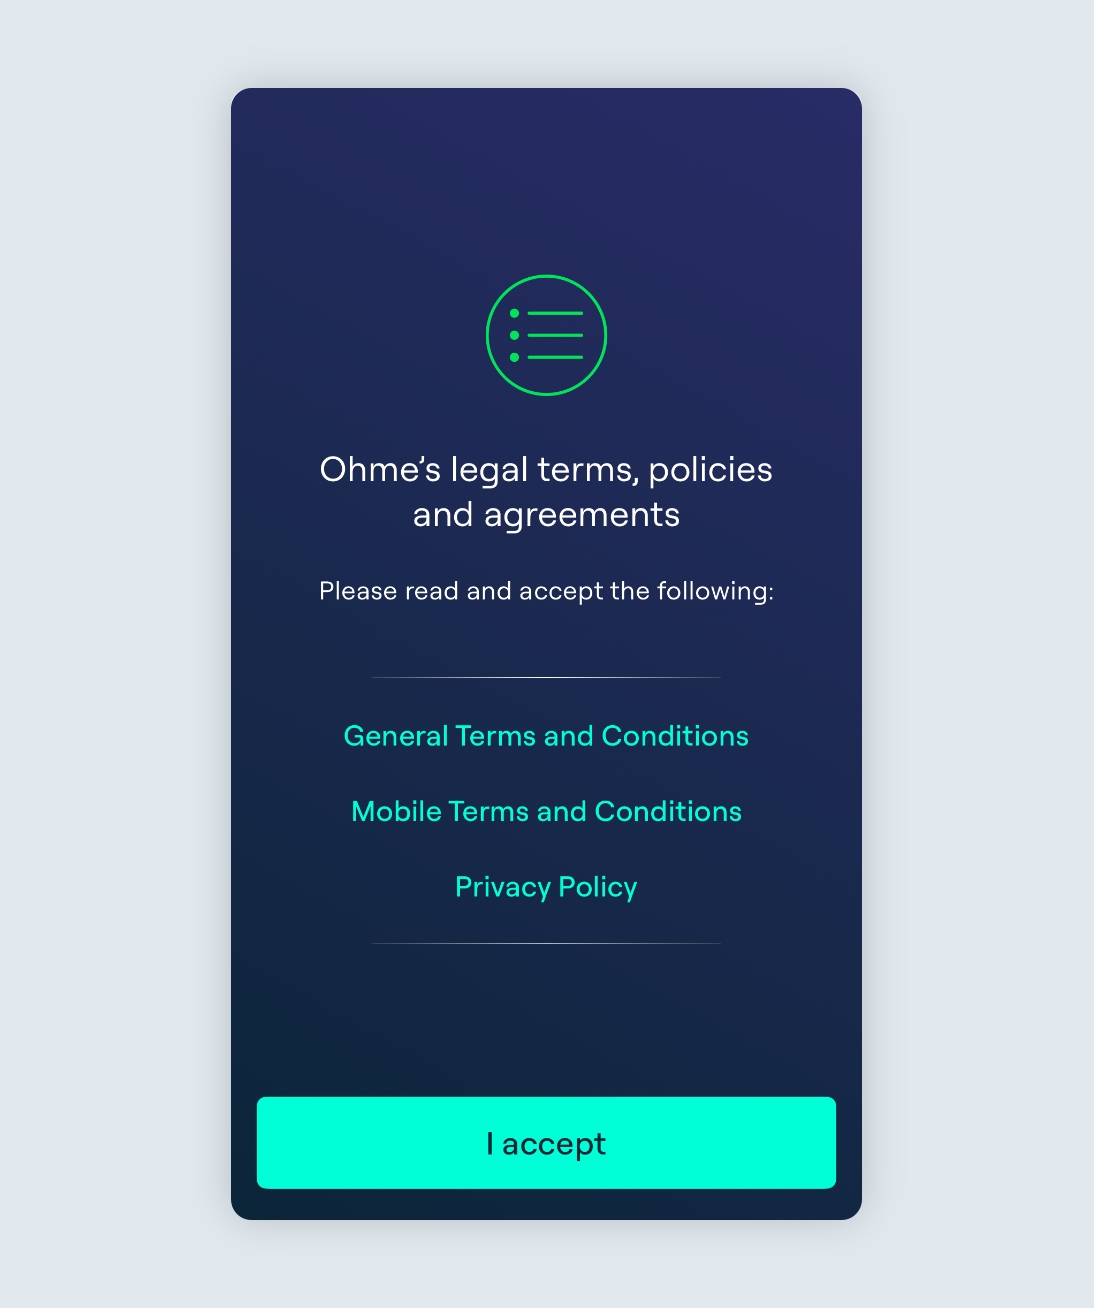
Step 2
Next, you may need to accept the Ohme Terms and Conditions. You can tap each of the links to read the terms and conditions and privacy policy. Tap I accept to move on to the next step.
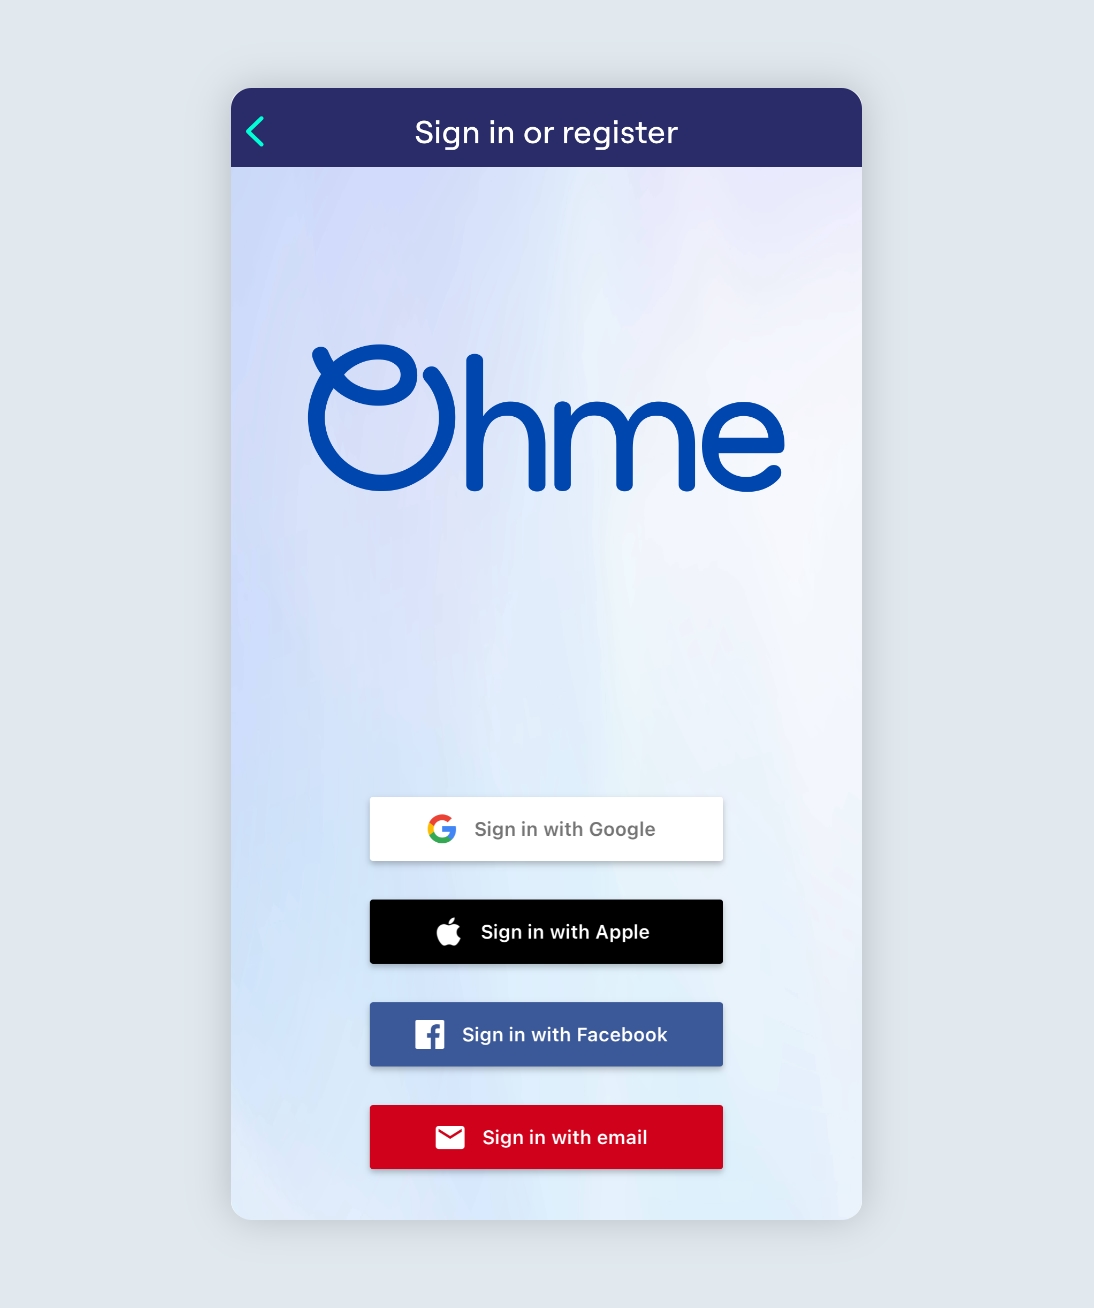
Step 3
When you first open the Ohme app, you’ll see four options to create an Ohme account. The first three allow you to create an account using an existing social account such as Google, Apple ID, or Facebook.
Tip: If you’d like to access your Ohme account on multiple devices, or share the account with other users, we recommend creating an account with email.
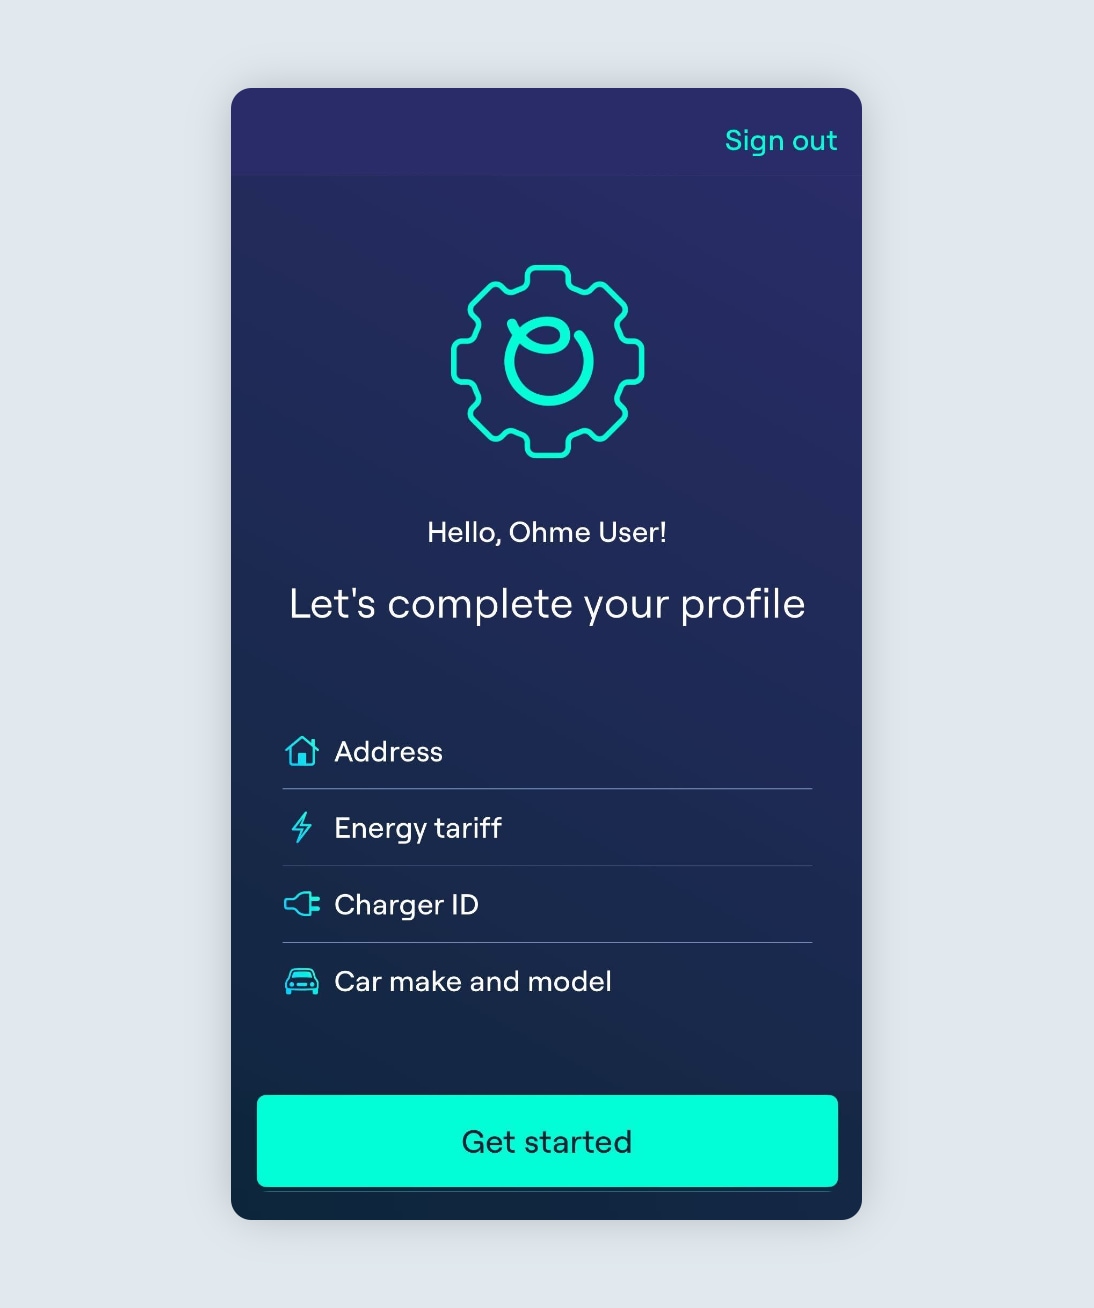
Step 4
Finally, you’ll see a checklist of the information needed to complete your Ohme account set up.
-
Address
-
Energy tariff
-
Charger ID
-
Car make and model
Setting your tariff
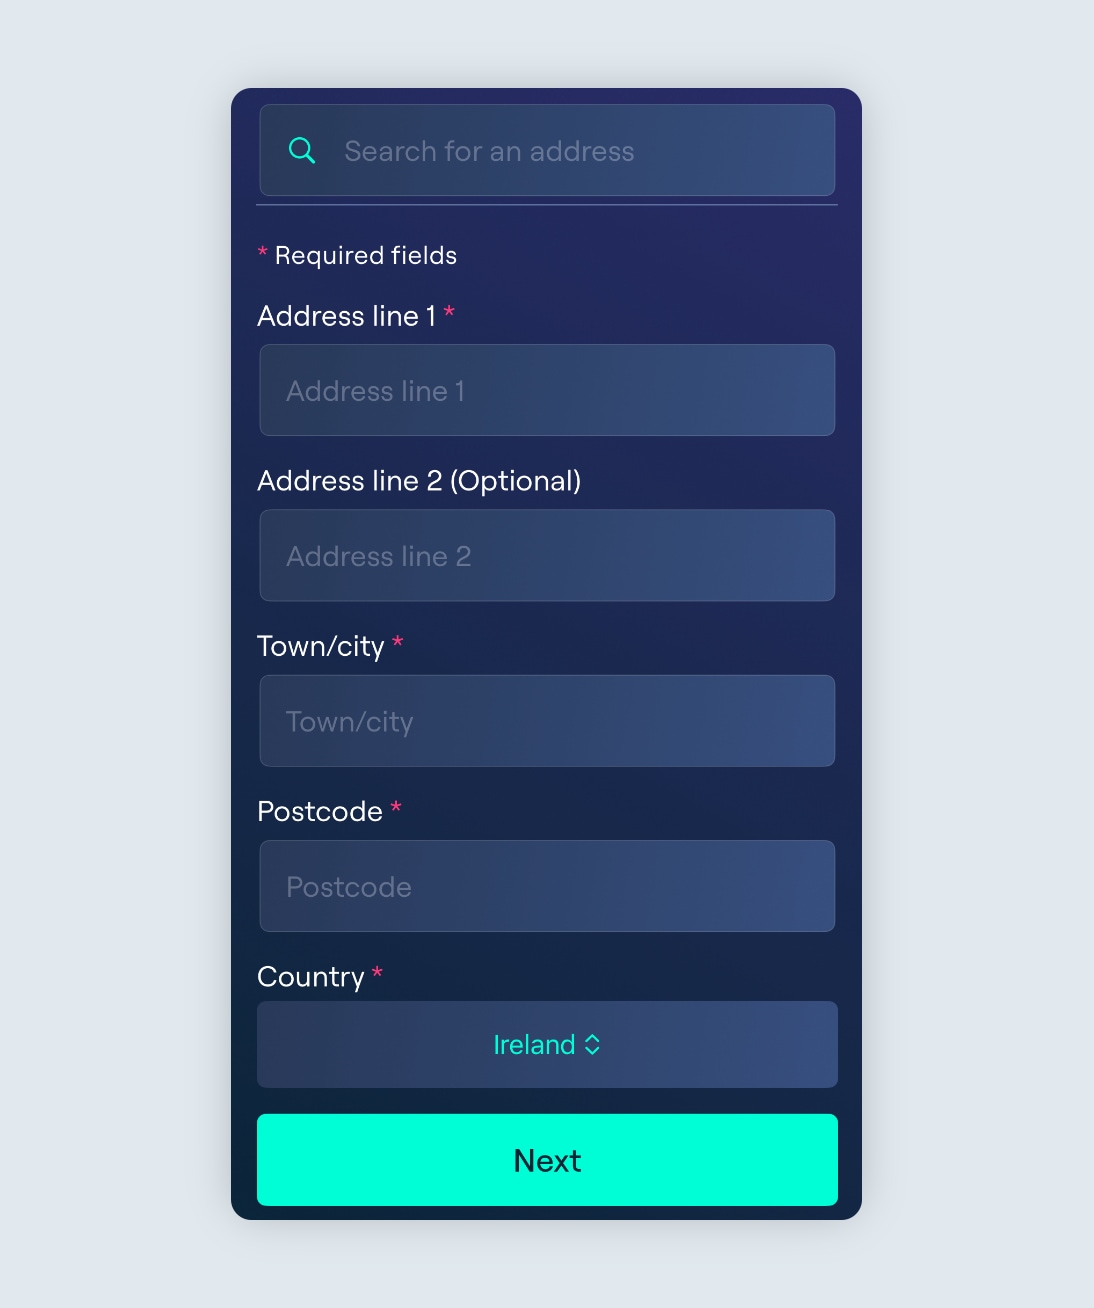
Setting your home address
You’ll be prompted to fill in your home address details. This is to ensure the pre-set tariffs available in the Ohme app are filtered to show those appropriate for your location.
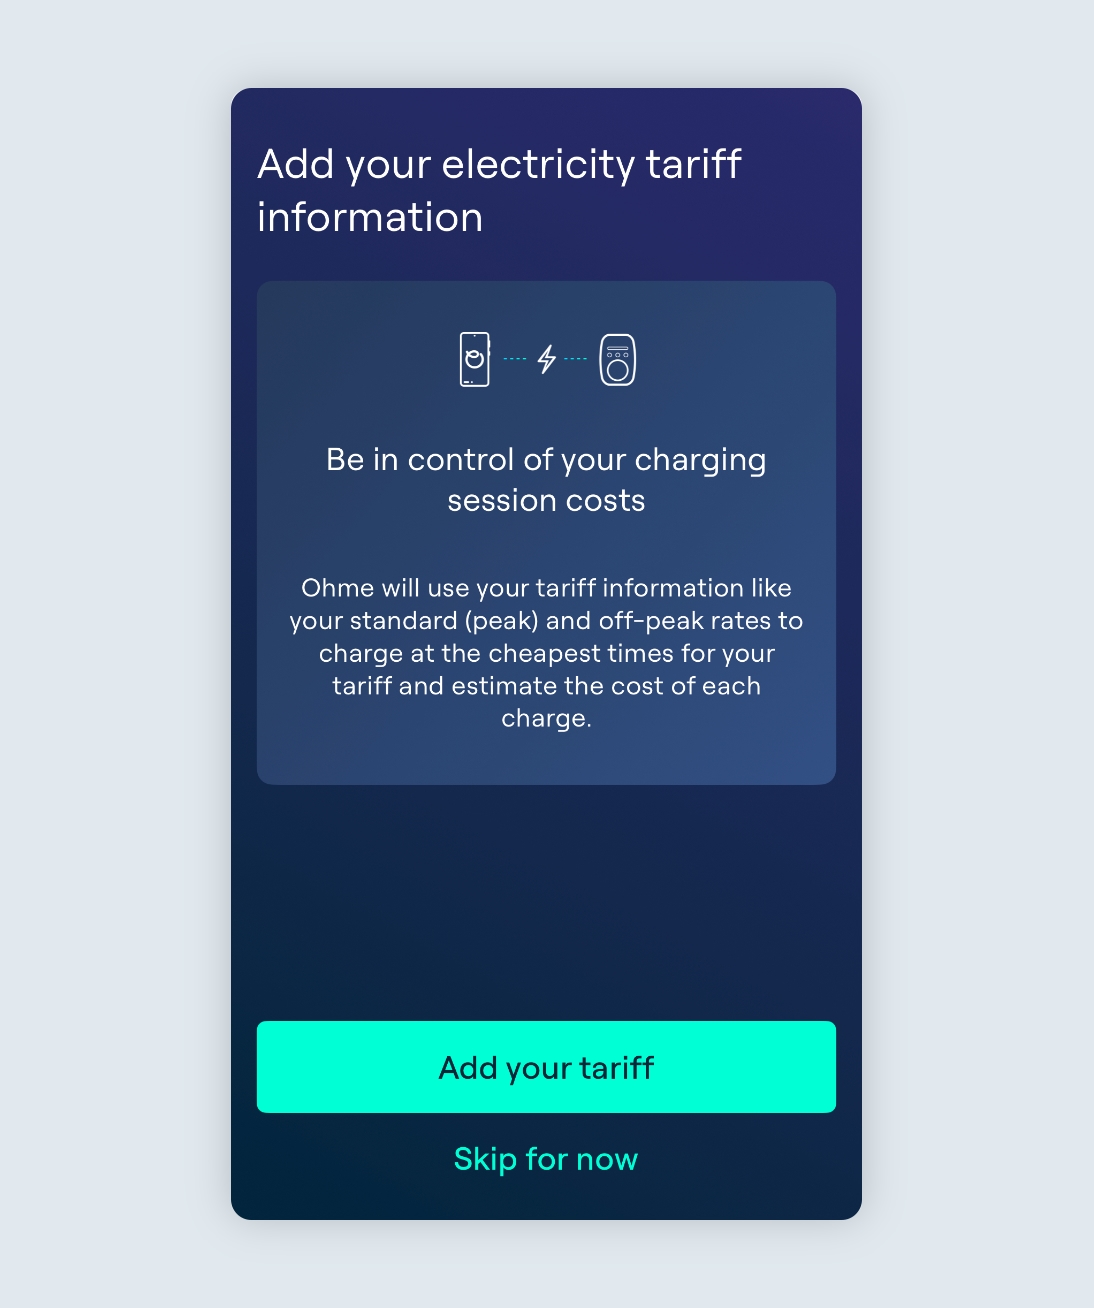
Adding your electricity tariff information
Next, you’ll be directed to enter your tariff information. Ohme uses this information to estimate the cost of your charging sessions and will allow you to schedule your charging in line with the cheapest times of your tariff. To start, tap Add your tariff.
If you’re unsure of who your energy supplier is, or which tariff you are on, you can find this information on your most recent energy bill.
Note: Ohme will never bill you directly for the energy used to charge the car. We only use the tariff information to work out when it’s cheaper to charge and estimate your charge costs.
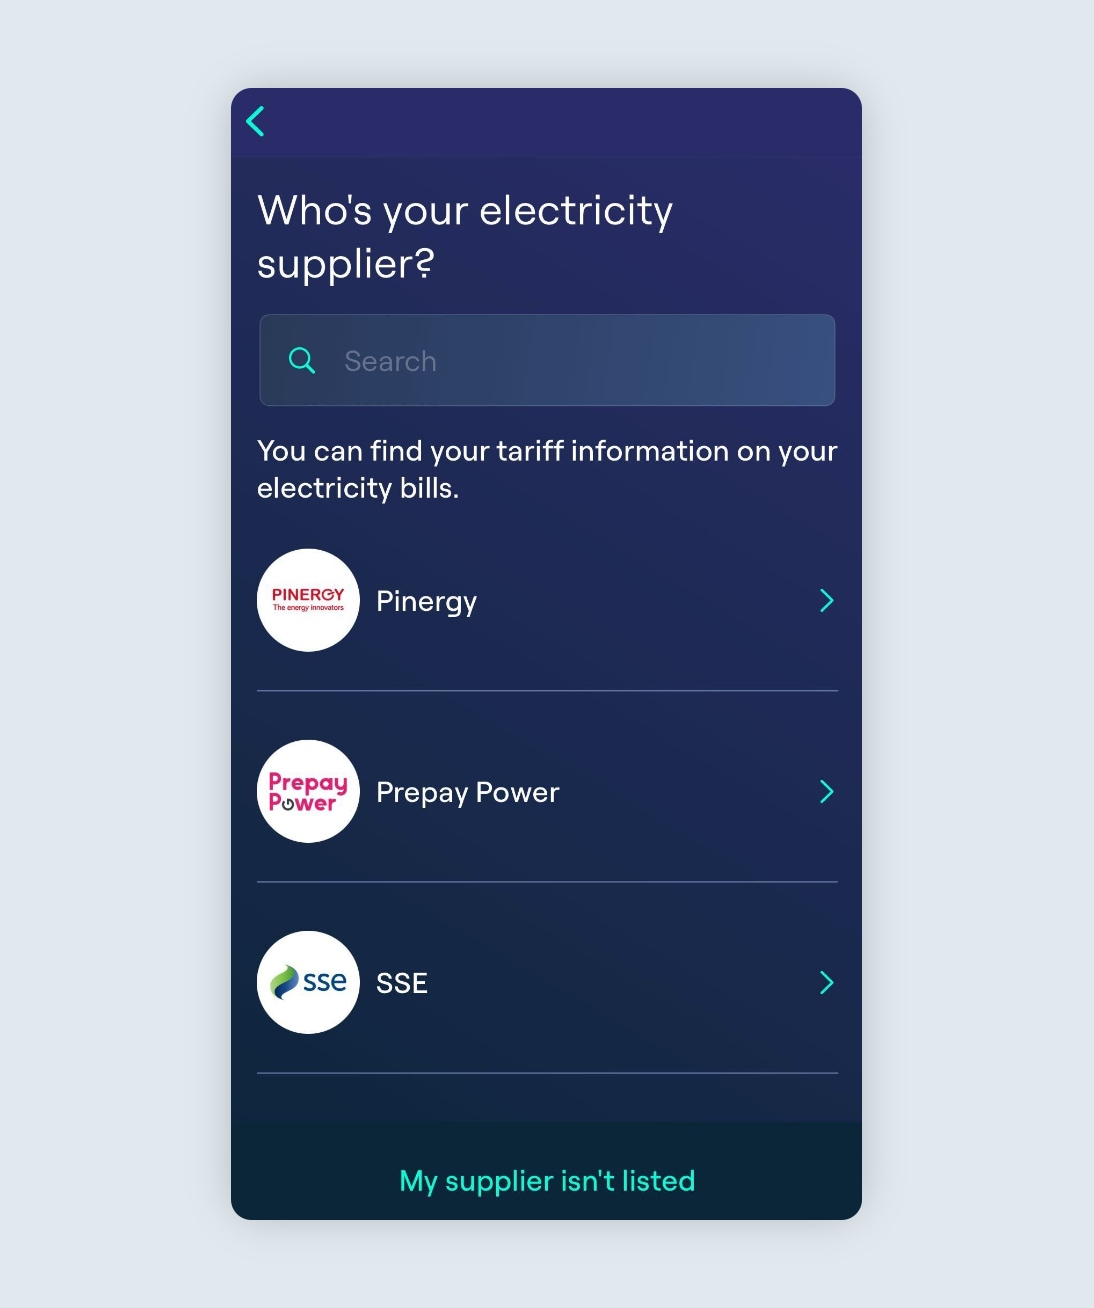
Step 1
Ohme provides a number of pre-set electricity suppliers for you to choose from. You can use the search bar at the top or scroll through the options to find and select your energy supplier.
Note: if your energy supplier is not listed, tap ‘My supplier isn’t listed’ and see below for further instructions on how to add a custom tariff.
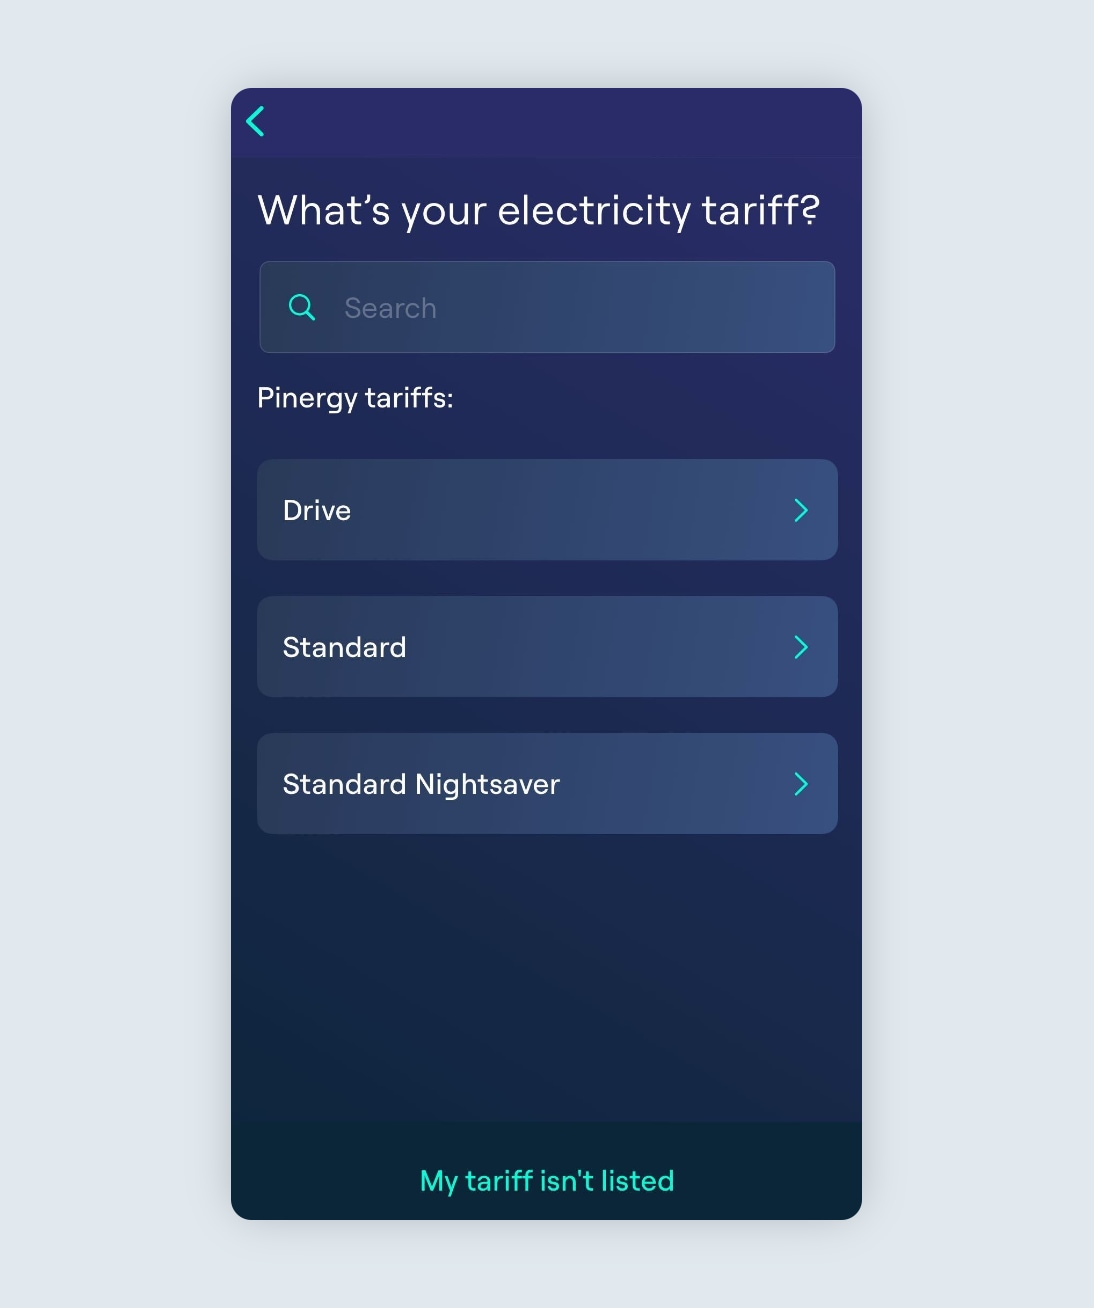
Step 2
Next, you’ll need to select the specific tariff you’re on. You can use the search bar at the top or scroll through the options provided to select your energy tariff.
Note: if your tariff is not listed, tap ‘My tariff isn’t listed’ and see below for further instructions on how to add a custom tariff.
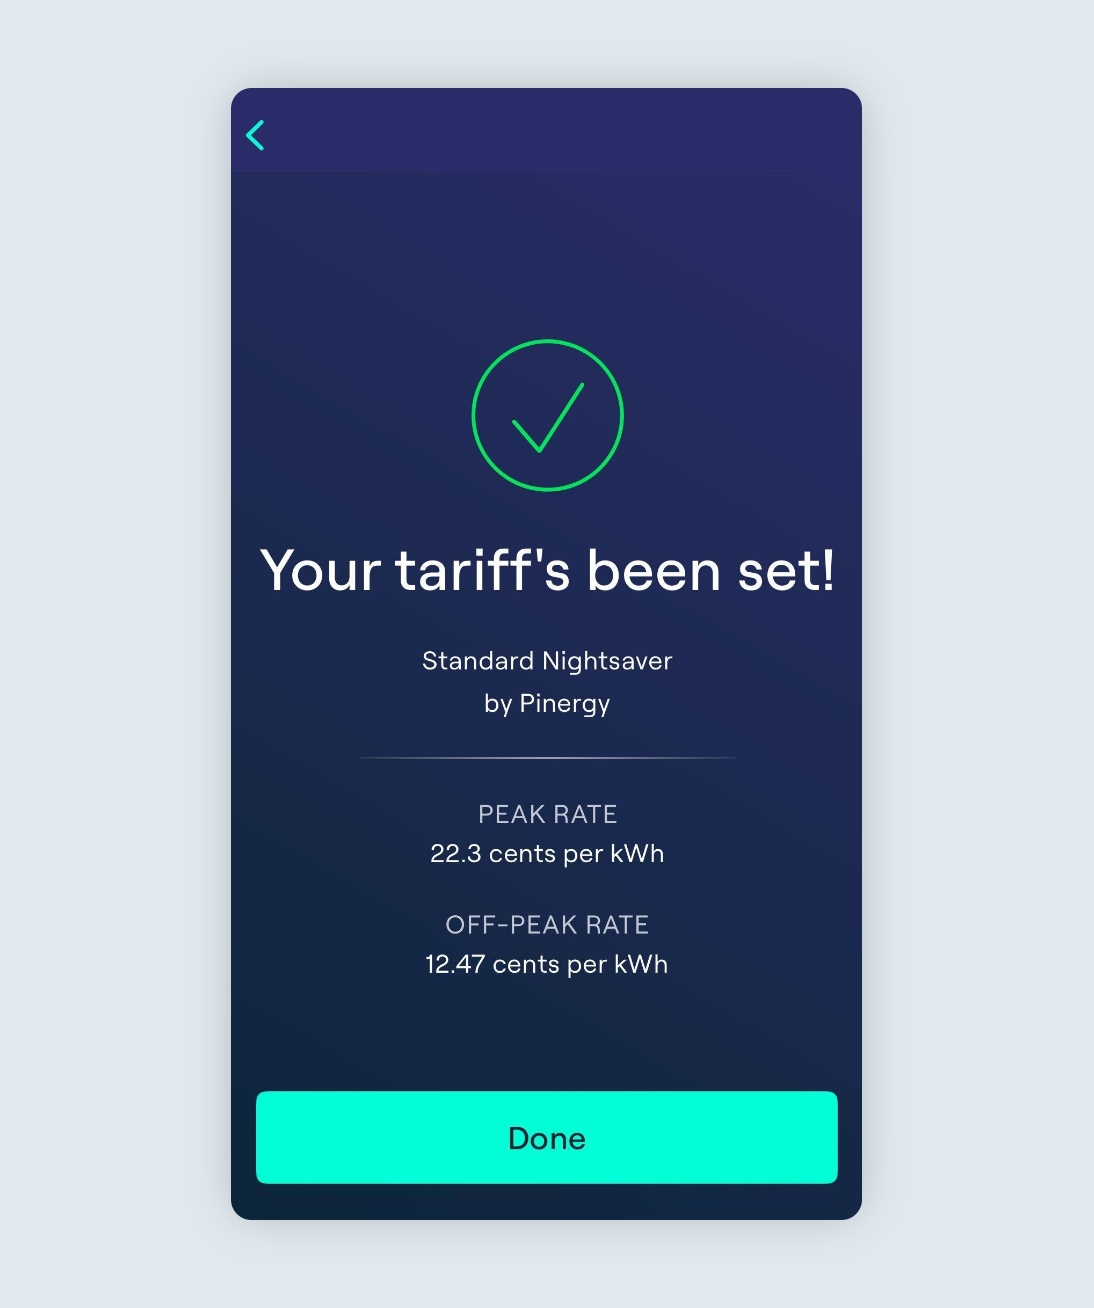
Tariff setup complete
You should then see that your tariff has been set! You can also confirm the rates for your chosen tariff, before tapping Done to return to the Charging screen.
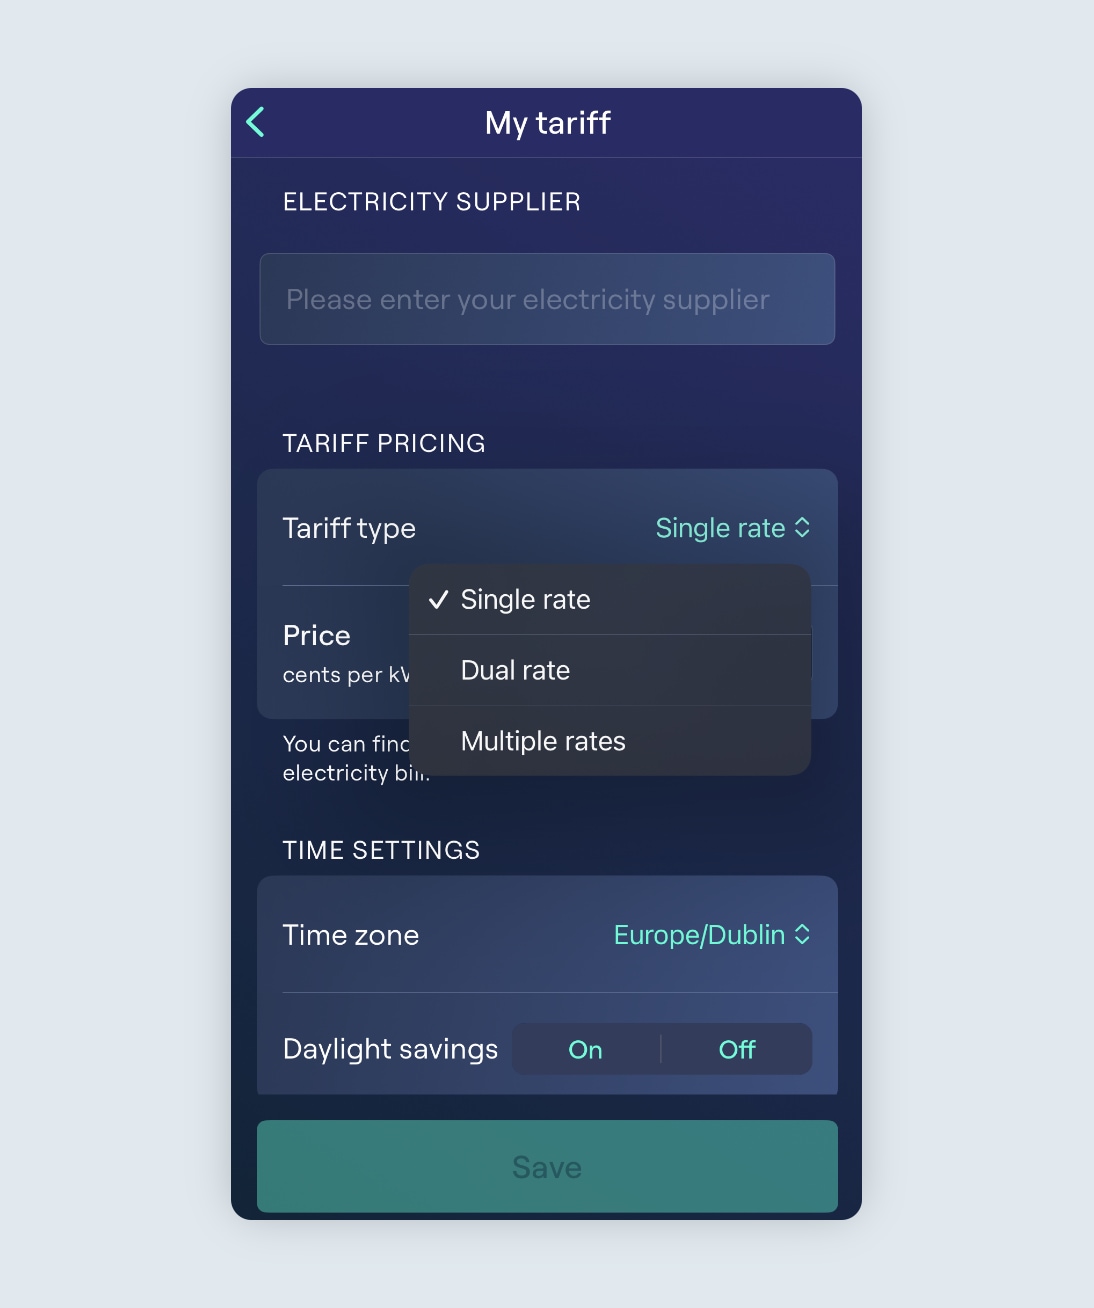
Adding a custom tariff
If your supplier or tariff is not available as a pre-set option, you can create a custom tariff. Ohme supports single rate, dual rate, and multiple rate tariffs.
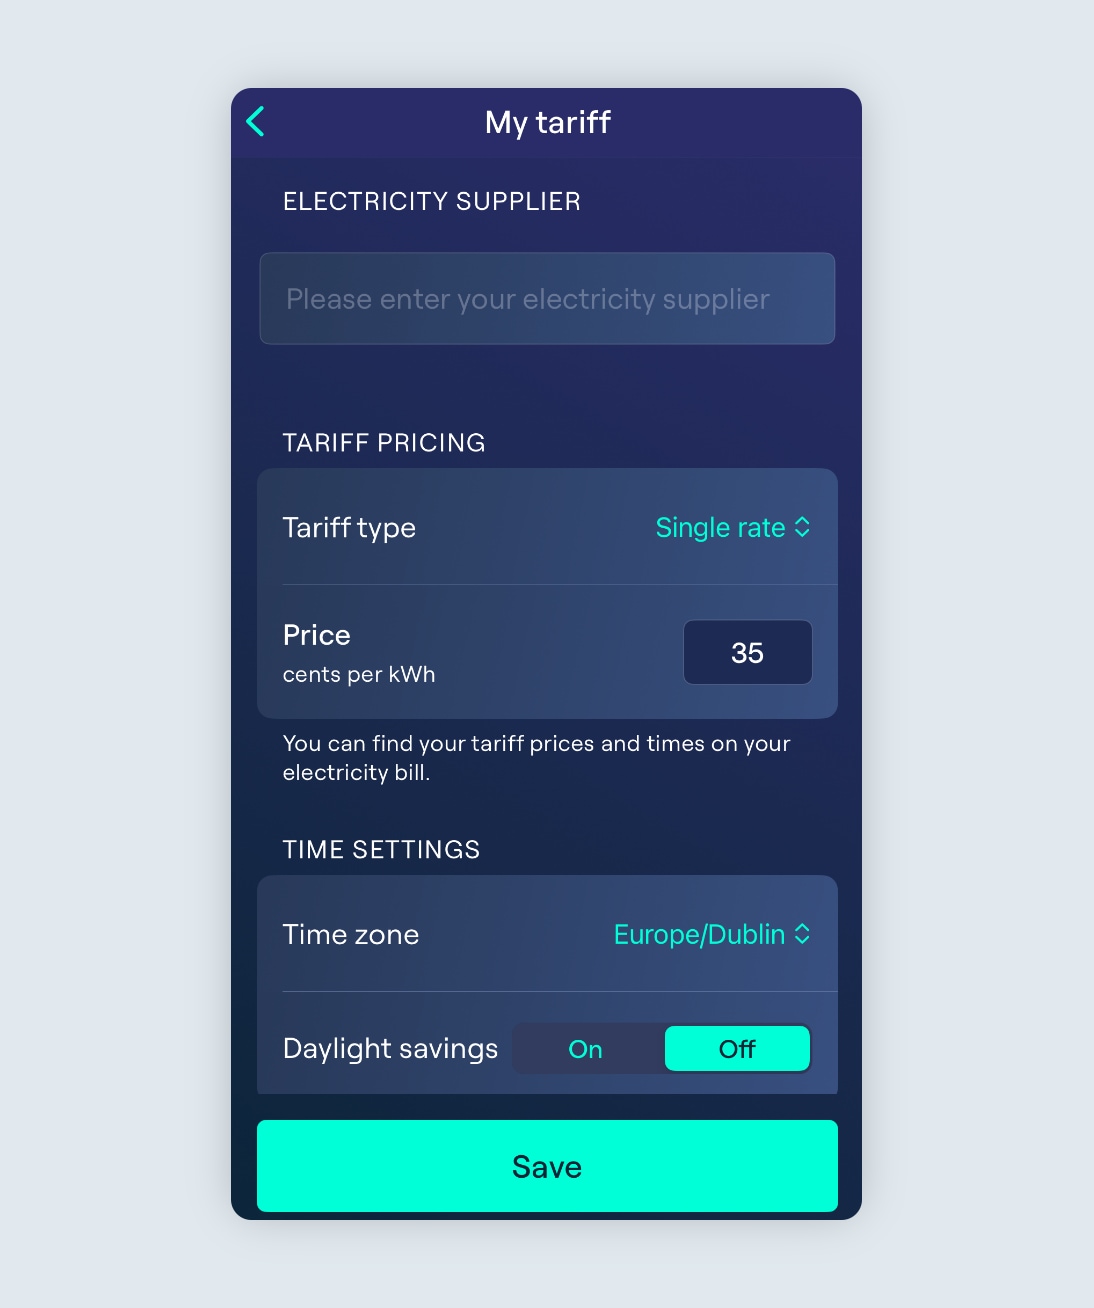
Single rate
The single rate option is suitable for tariffs where the price of electricity is the same throughout the day and night.
Here we’ve created a single rate tariff where the rate is 35c/kWh.
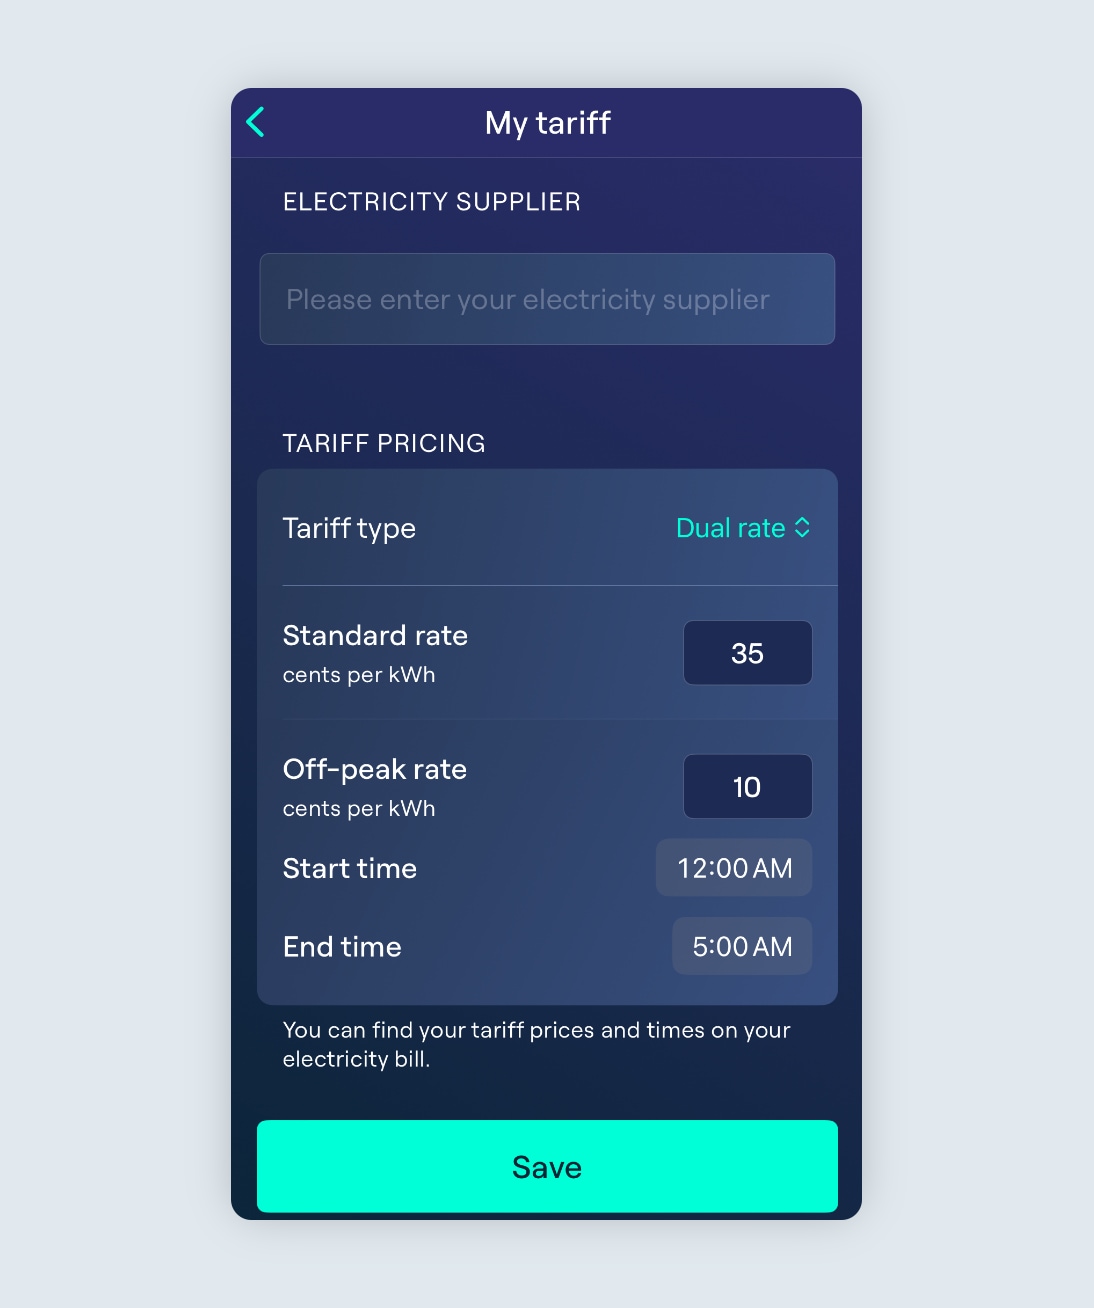
Dual rate
The dual rate option is suitable for tariffs where the price of electricity is different depending on the time of day.
Here we’ve created a dual rate tariff where the price of electricity is 35c/kWh during the daytime hours and 10c/kWh between 12:00am and 05:00am.
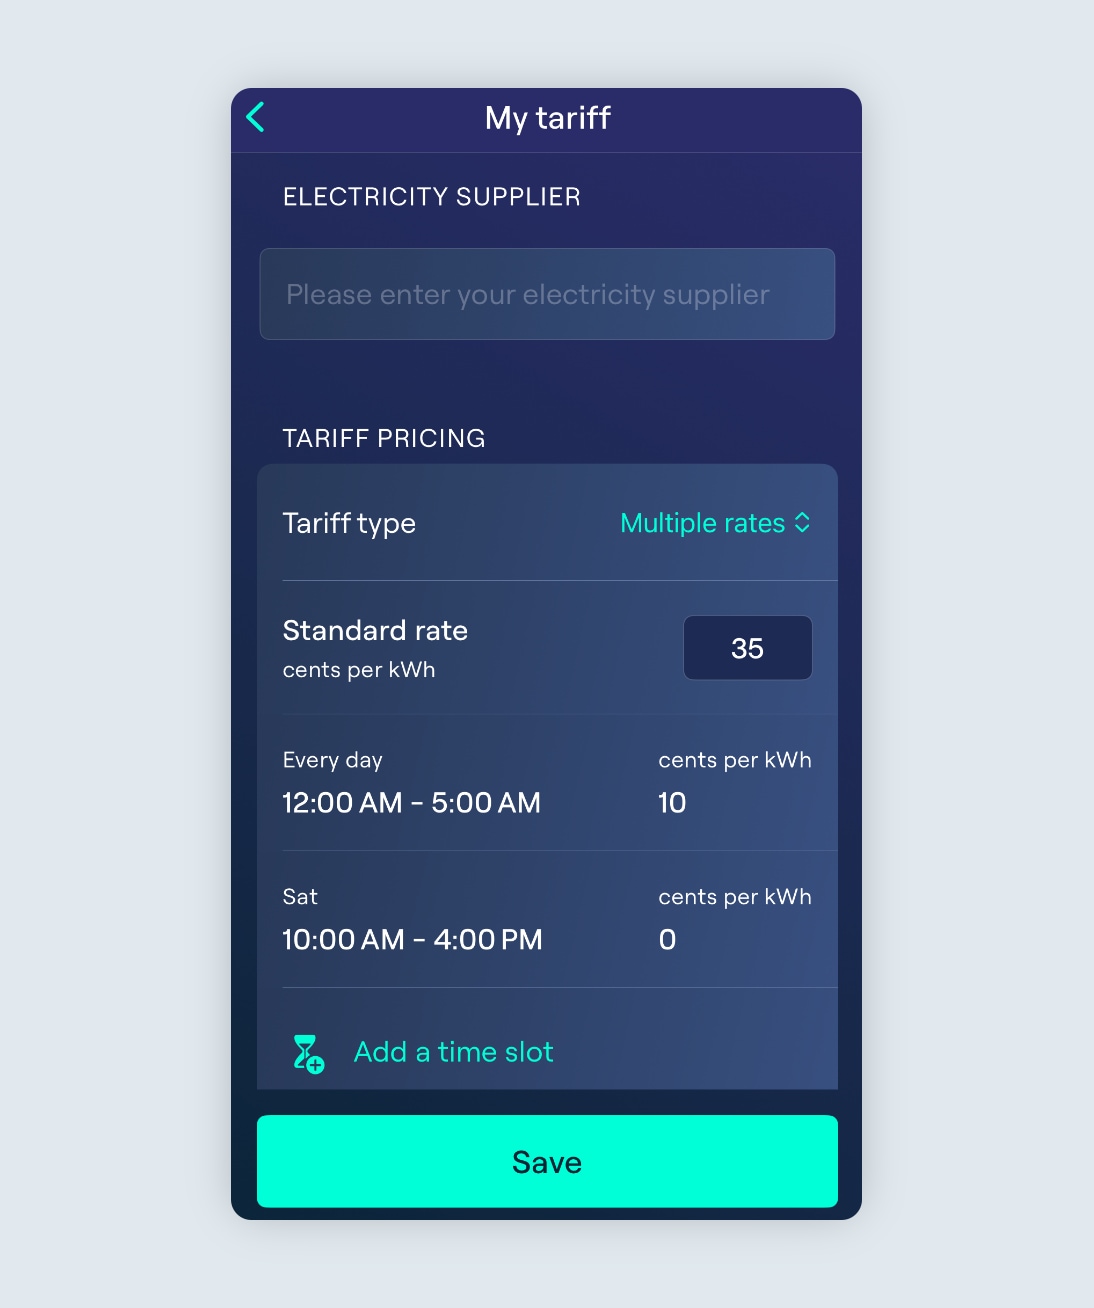
Multi rate
The multiple rates option is suitable for tariffs where the price of electricity is different depending on the time of day or the day of the week.
Here we’ve created a multi-rate tariff where the price of electricity is 35c/kWh during the daytime Monday – Friday and Sunday, 10c/kWh between 12:00am and 05:00am each morning, and 0c/kWh between the hours of 10:00am and 04:00pm on Saturdays.
Once we’ve set up this type of tariff, we could enable a price cap for 0p if we only want Ohme to charge on Saturdays, or 10c if we want Ohme to charge on Saturdays and between 12:00am – 05:00am every day.
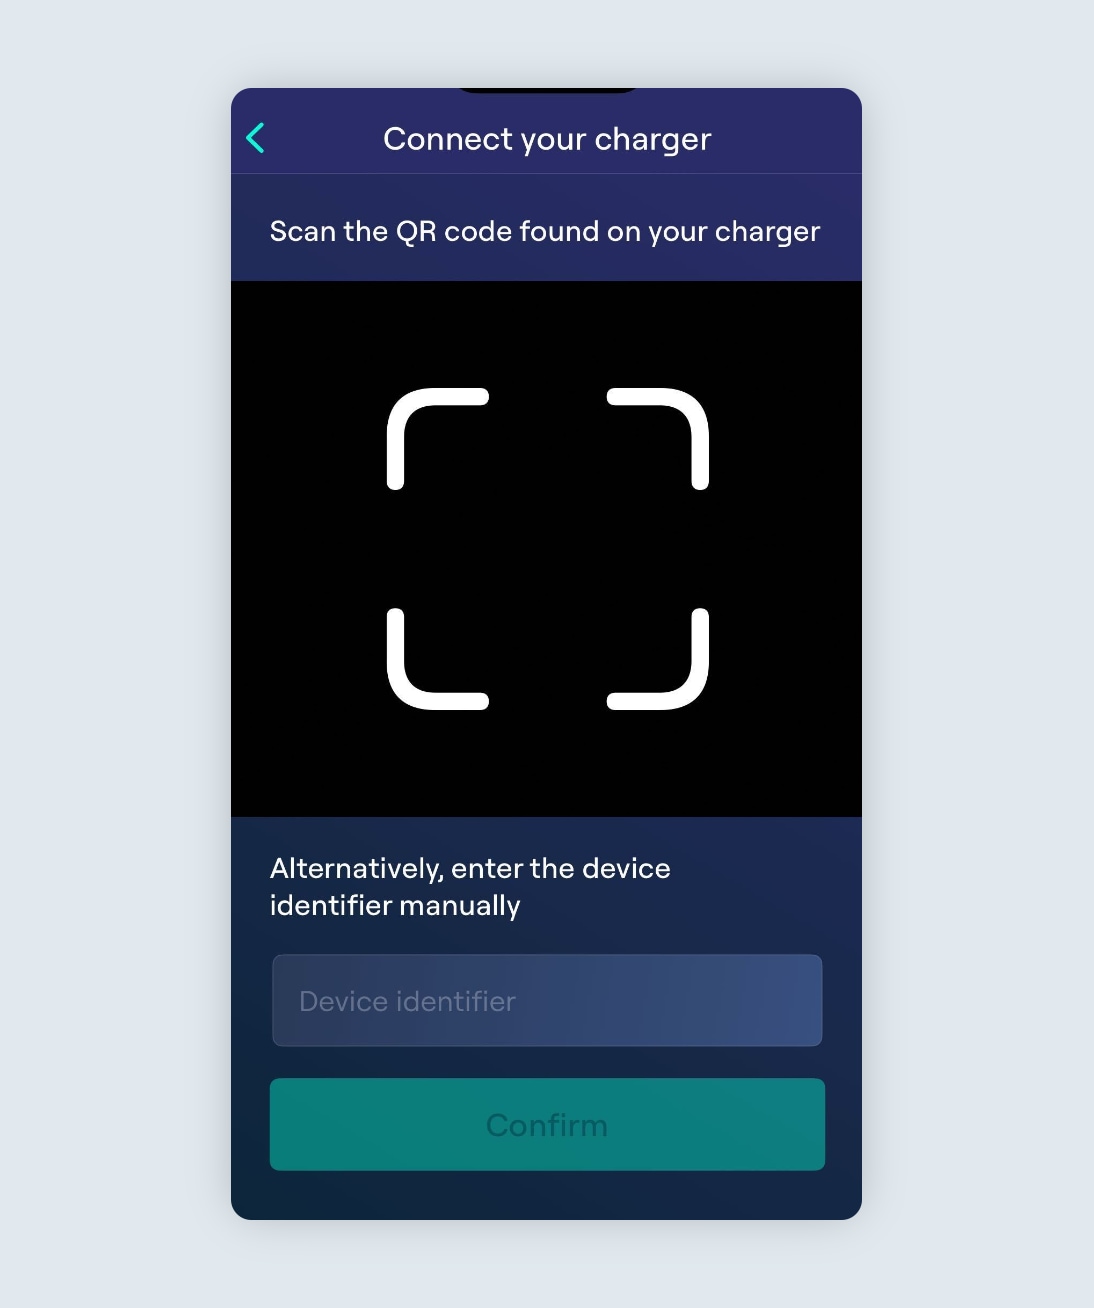
Pairing your charger
Next, you’ll be prompted to pair your charger to your Ohme app account. You can do so by scanning the QR code or typing in the code manually.
When prompted, scan the QR code. This will be shown on Home Pro display or the sticker on the underside of both the Home Pro and ePod charger.
Note: You’ll need to allow Ohme access to your camera to scan the QR code.
If you’re unable to scan the QR code, you can enter the serial number manually in the text box at the bottom of the screen.
Once you’ve tapped ‘Enter Manually’, you’ll be able to type your serial number as it appears underneath the QR code. It will look like ‘ohmea********’.
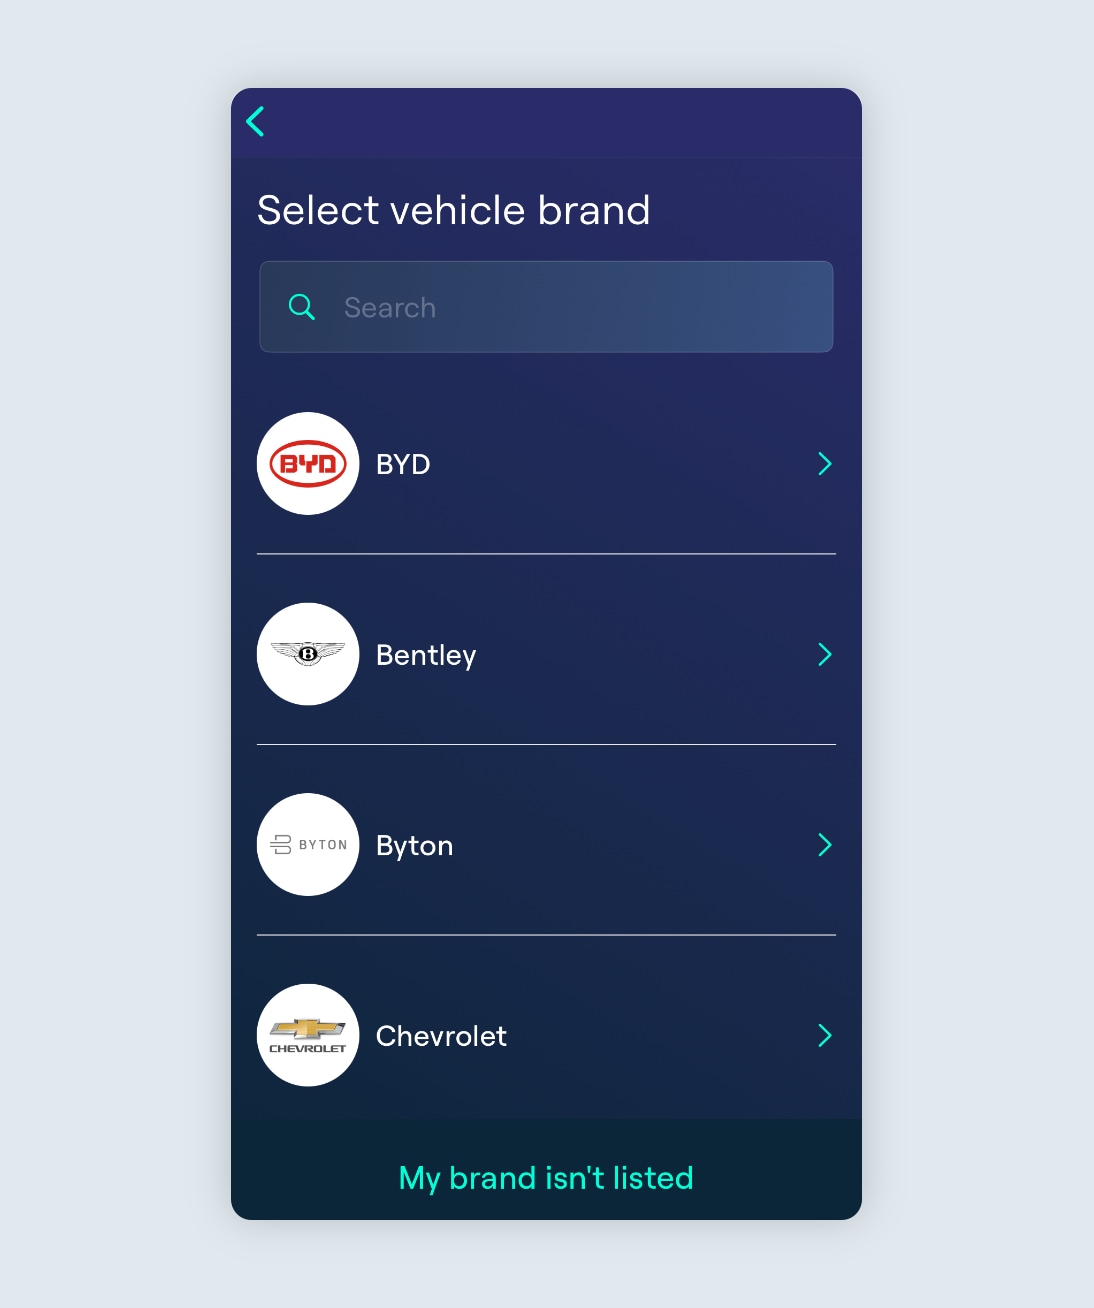
Selecting your Vehicle
Selecting your vehicle in the Ohme app lets us know which EV is charging, as well as the battery size, range, and maximum speed at which your EV can charge. All of this information is important to make sure that Ohme charges your EV correctly.
Step 1
First, you’ll be prompted to select your EV make from the list.
Note: if your EV brand is not listed, see below for further instructions on how to add a custom vehicle profile.
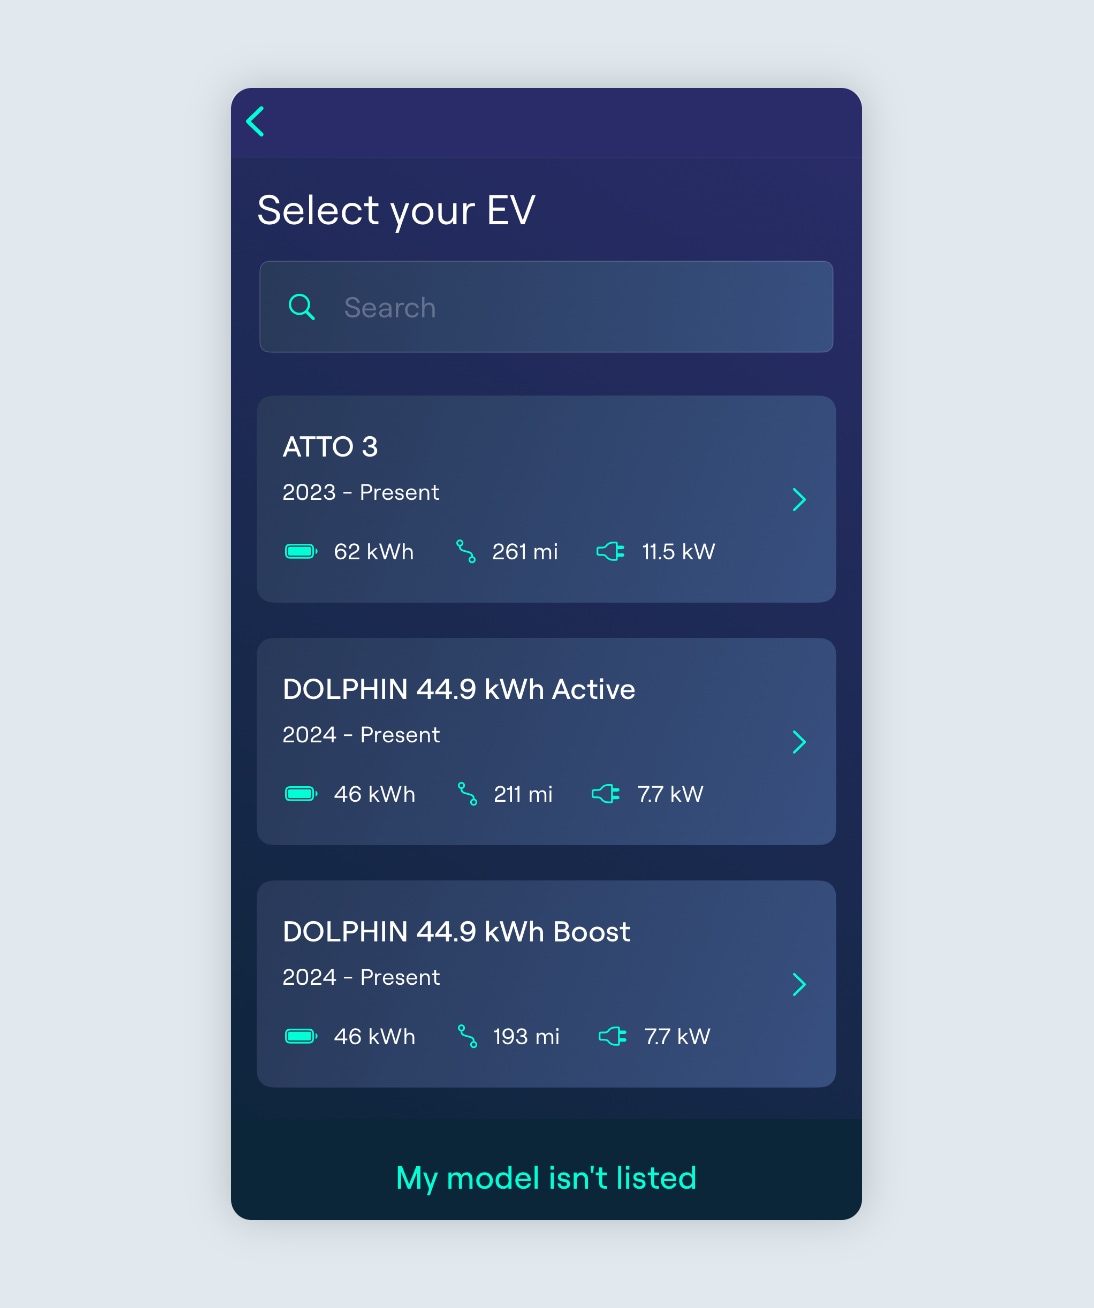
Step 2
Once you’ve selected your brand, you’ll see a list of vehicles to choose from with a preview of the specifications for each vehicle profile. You can use the search bar at the top of the screen to help find your vehicle.
Note: if your EV model is not listed, see below for further instructions on how to add a custom vehicle profile.
Vehicle setup complete
Once you have selected your car you’ve finished setting up your Ohme account. Tap ‘Done’ to continue to the Charging page.
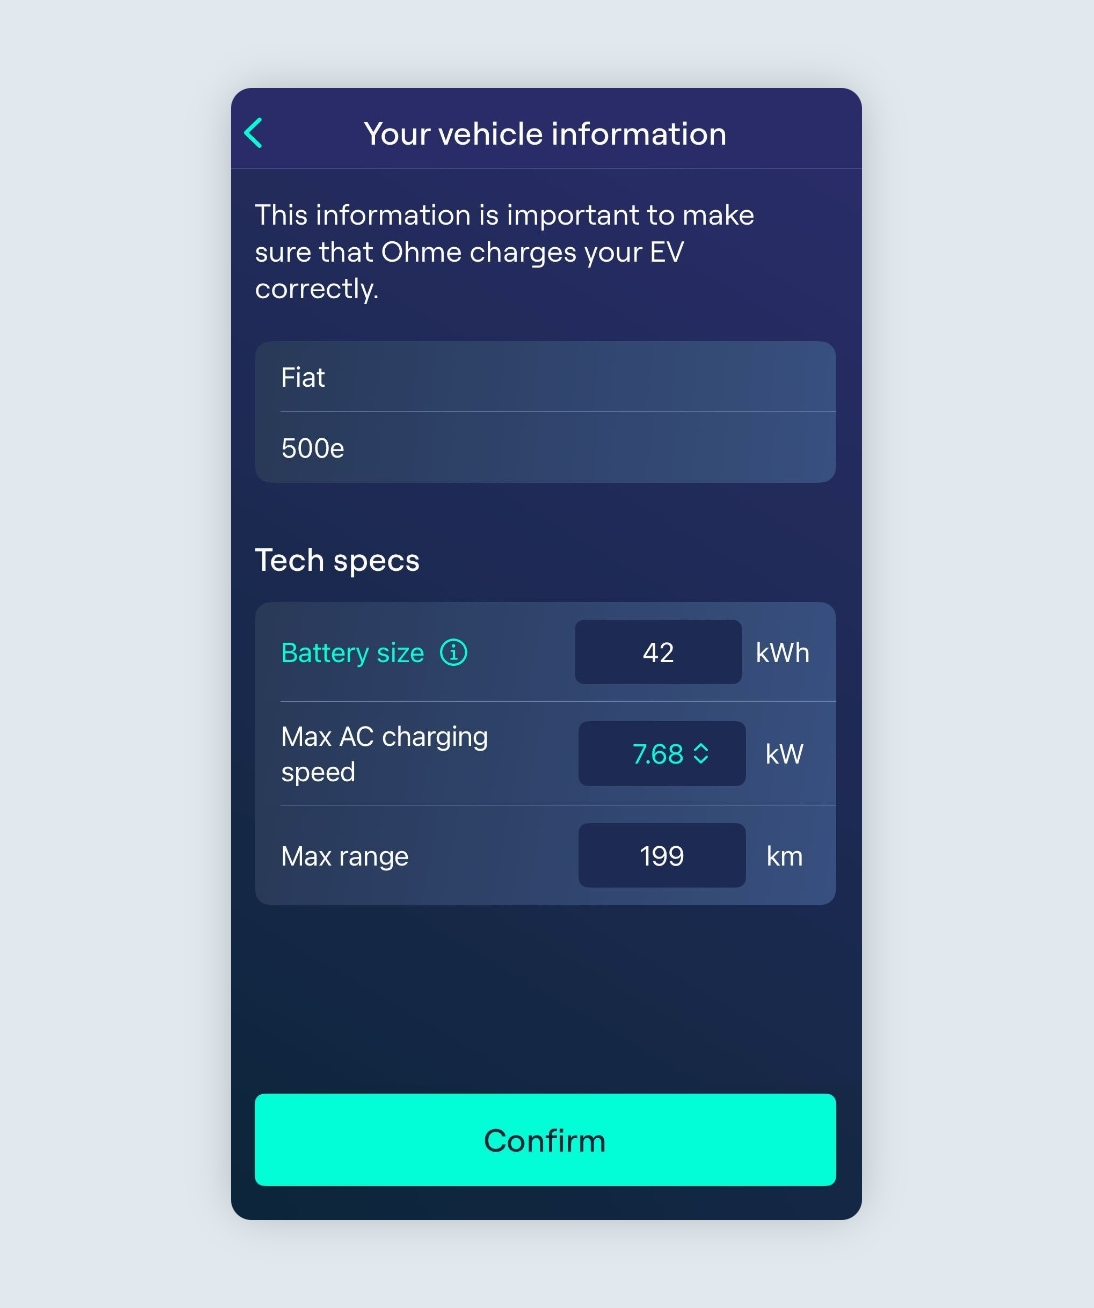
My EV brand and model isn’t listed
If your EV make or model isn’t available as a pre-set option, you can manually add your car. By setting the battery size, charge rate, and maximum range, you can customise the profile to match your vehicle’s specifications. This allows for a more personalised and accurate representation of your car’s capabilities and charging needs. Let’s dive in and explore how you can make the most of this feature.
Step 1
Tap the My brand isn’t listed button at the bottom of the screen.
Step 2
You’ll then need to add the specifications of your car. If you’re unsure, refer to your paperwork from your original purchase or the car handbook. We will require the following information:
- Brand and car model name (e.g. Fiat 500e) This will be shown as the title of the car on the My EV page.
- The battery size in kWh (e.g. 42kWh) The battery size is important for Ohme to know how much time it will need to schedule to fill the battery.
- The maximum AC charging speed in kW (e.g. 7.68kW) The rate of charge is also important to help Ohme understand how much time it will need to schedule to fill the battery.
- The maximum range in miles (e.g. 199 miles) The range will help to provide an estimation of how much range the car may achieve by the end of the session.
Once you have added all of the specifications, tap Confirm to finish.
Note: Only the car itself (or car app) will be able to show the true range the car can achieve.
Custom Vehicle Setup complete
Once you have added your vehicle details and tapped confirm, you are all set up! Tap done to continue to the My EV page.
Pairing your Ohme account with your car account
Some car manufacturers provide an API (Application Programming Interface) which allows access to information about your car via your manufacturer’s app. Providing your login details in the Ohme app allows Ohme to see your car’s current state of charge, which is then used to work out how much charge you need. This feature is currently available for a limited number of brands. If your brand isn’t listed, Ohme won’t be able to see your car’s state of charge. API support is currently available for the following brands:
Audi
Cupra
Nissan
Porsche
Renault
Skoda
Tesla
Volkswagen
Volvo
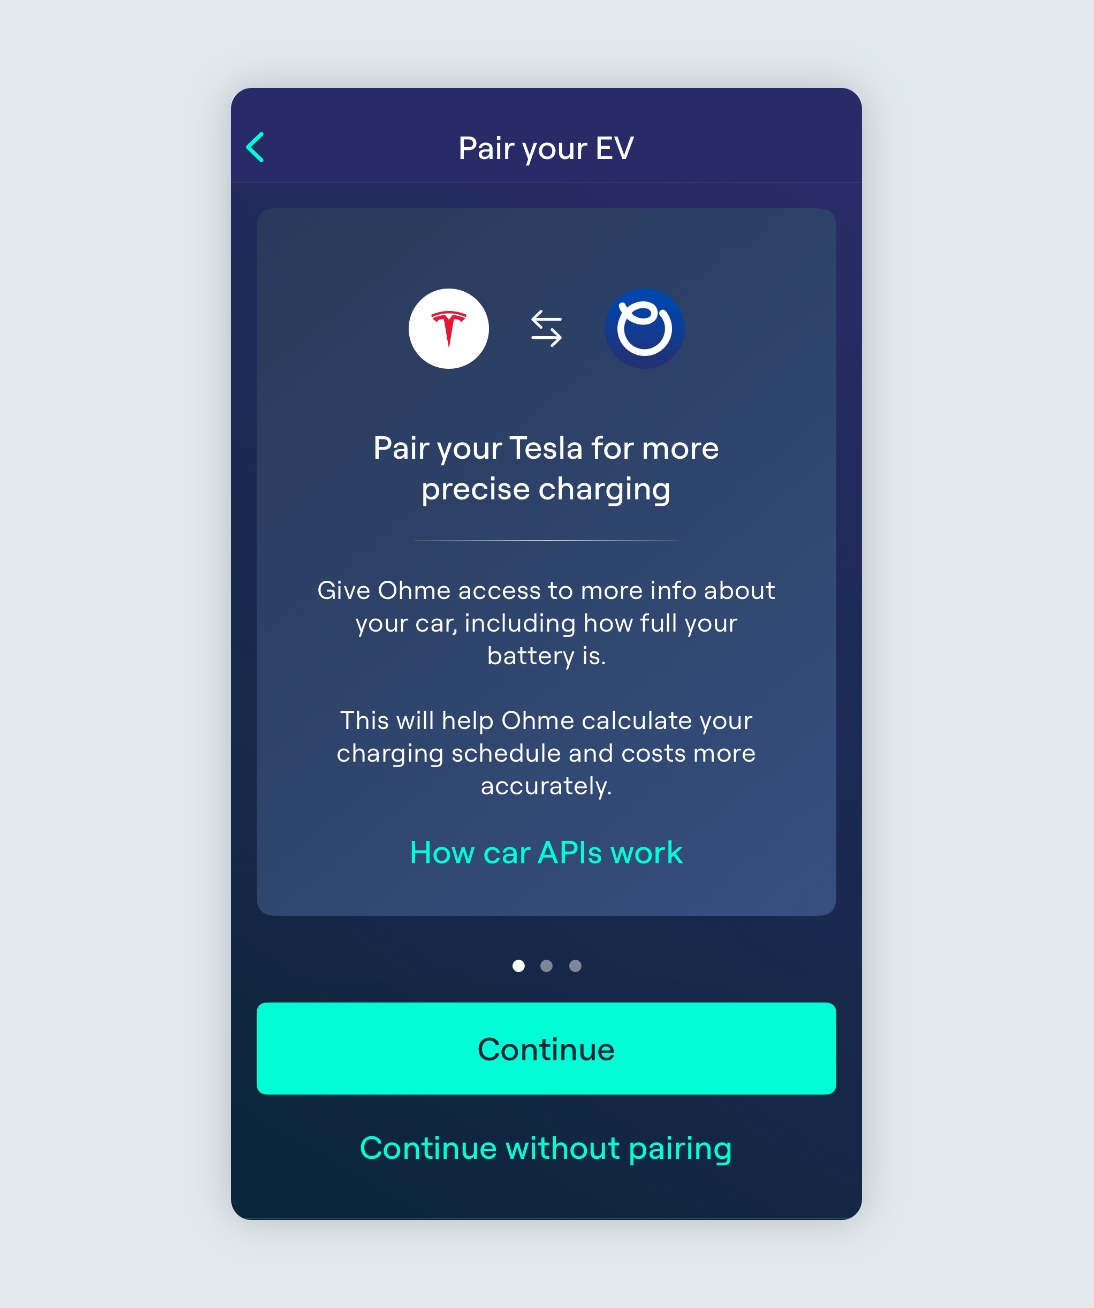
Pair your EV
When you choose your EV in the Ohme app, for every brand supported you’ll be invited to ‘Pair your EV’. Tap continue and read through the introduction screens until you reach the login screen and enter your car app account details.
Unpair your EV
Once you have logged in, you’ll be able to see the battery level of your EV shown on the My EV page.
If for any reason you would like to stop Ohme from being able to retrieve the battery level inside the vehicle, you can choose to ‘Unpair your EV’. This will mean Ohme assumes the battery is 0% each time you plug in.
We’re always working to offer the latest in technology to our customers. As a part of Ohme Labs, we’re continuously improving this feature and, from time to time, it may not work as intended. Please note, that certain functionality may also be limited based on manufacturer-specific API restrictions or limitations.
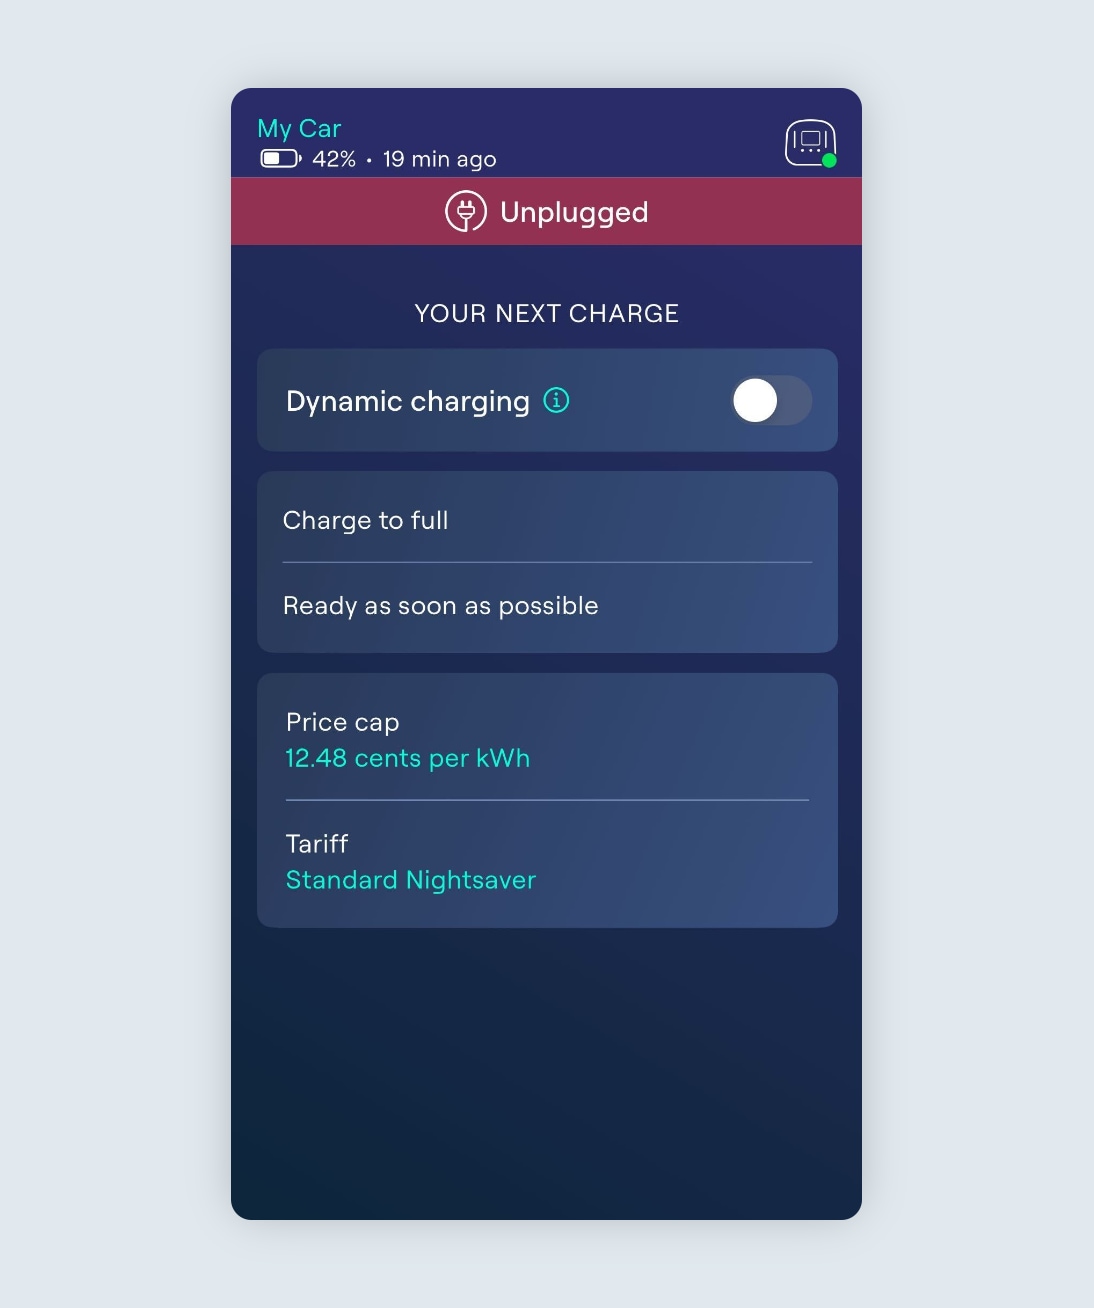
Dynamic charging
Enabling Dynamic charging allows you to choose how much you want to charge your EV and when you’d like it to be ready. You can customise the charging requirements to suit your driving needs on the Charging page directly, or through Routines. Keep reading to see how.
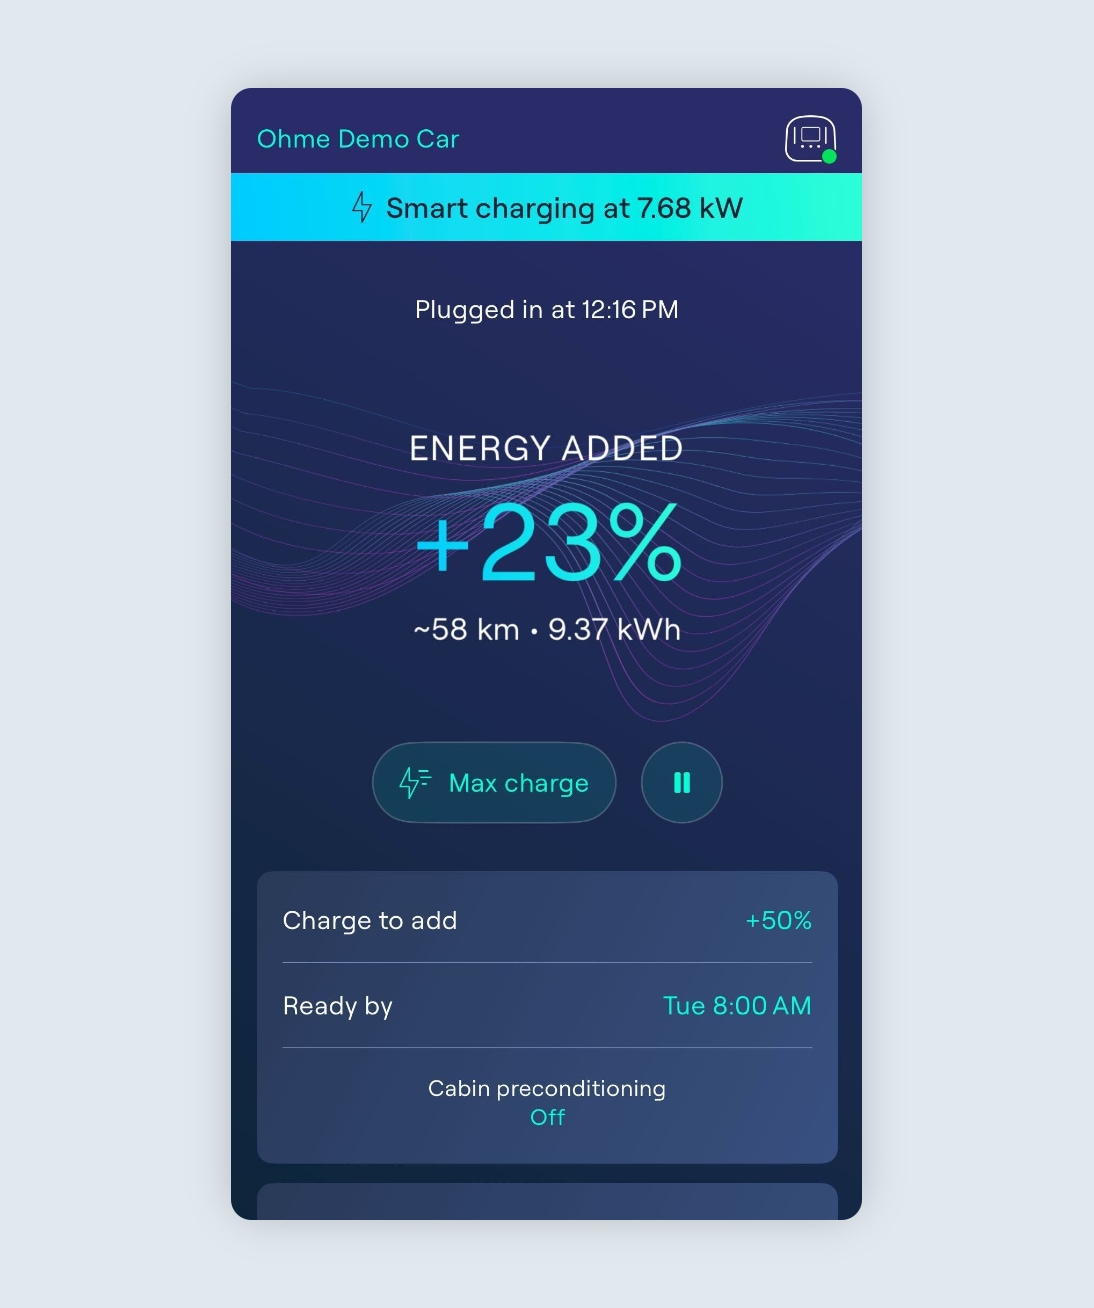
Setting an amount of Charge to add
Once you’ve completed the account set up, you’ll see the Charging screen. Here, you can control all aspects of charging. Enabling Dynamic Charging will allow you to set an amount of charge you would like to add to your car and a Ready by time (this is when you’d like the car to be charged up by).
For example, set the Charge to add amount to 50% and Ohme will add 50% of the known battery capacity of your car during the session. When you plug in, Ohme will assume the battery is 0%, however if your car already has 30% battery you will have 80% charge by the end of the session.
You can keep these settings the same each time you plug in, or you can adjust them for each session depending on how much charge you want and what time you need your car to be ready.
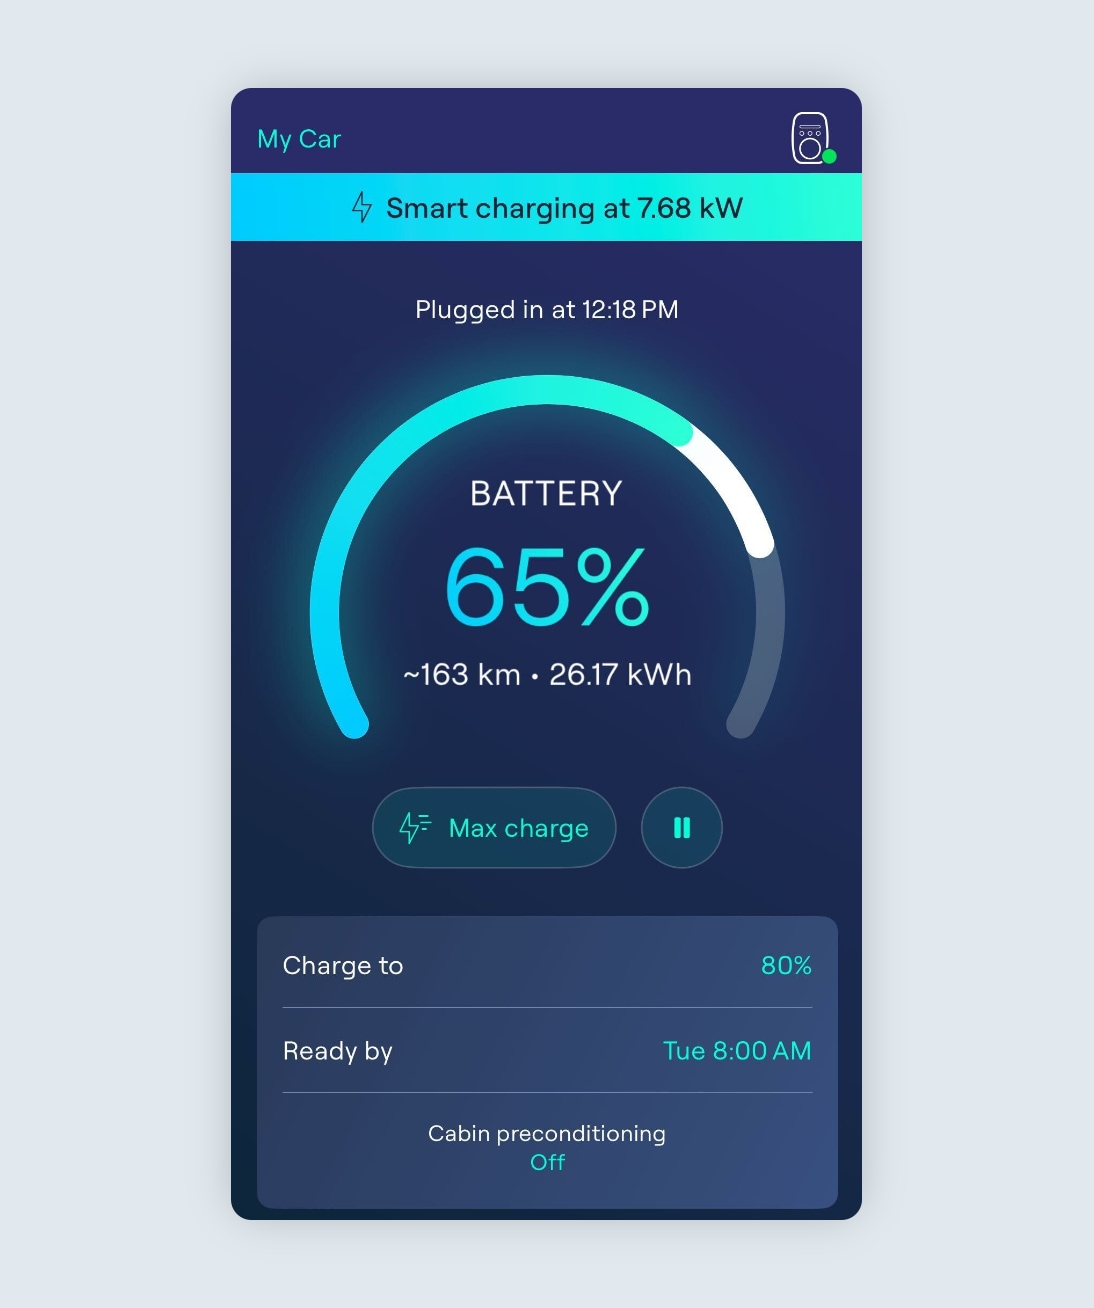
Setting a ‘Target’ amount to Charge to
If you have signed in to your vehicle API, this will allow you to specify a ‘target’ you would like Ohme to reach and allows for more precise charging.
Ohme will check in with your car at regular intervals during the session to achieve the target and adjust accordingly.
You can then set a target amount to charge to. For example, if you set your target to 80% and you already have 30% charge in your vehicle, Ohme will communicate with your vehicle brand’s app to detect this, and adjust the schedule to add a further 50% to take you up to 80% charge.
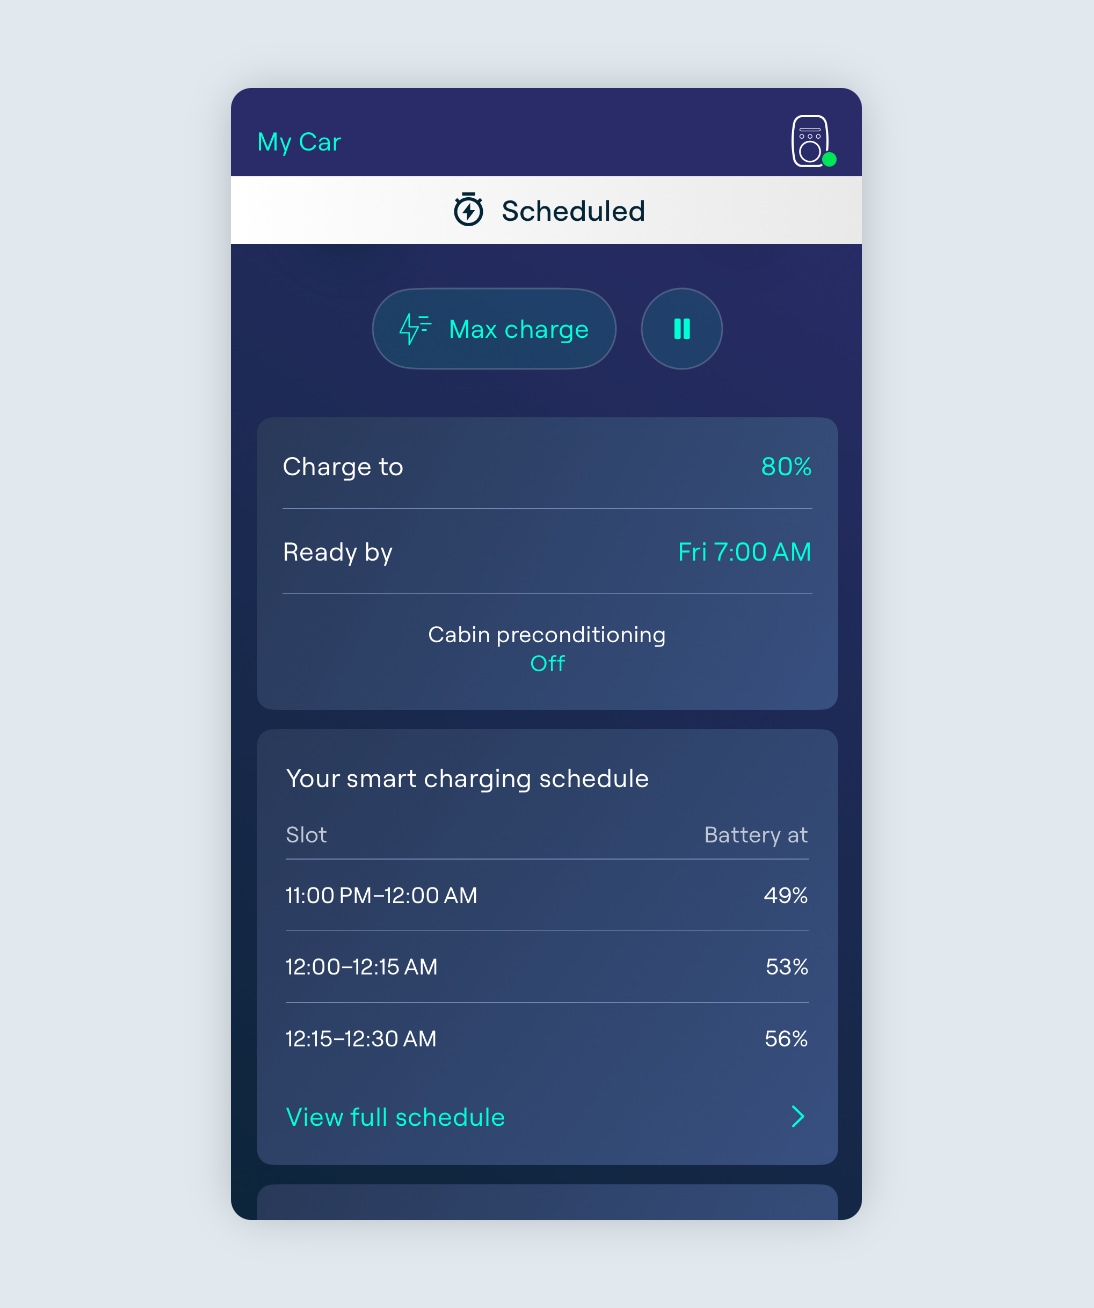
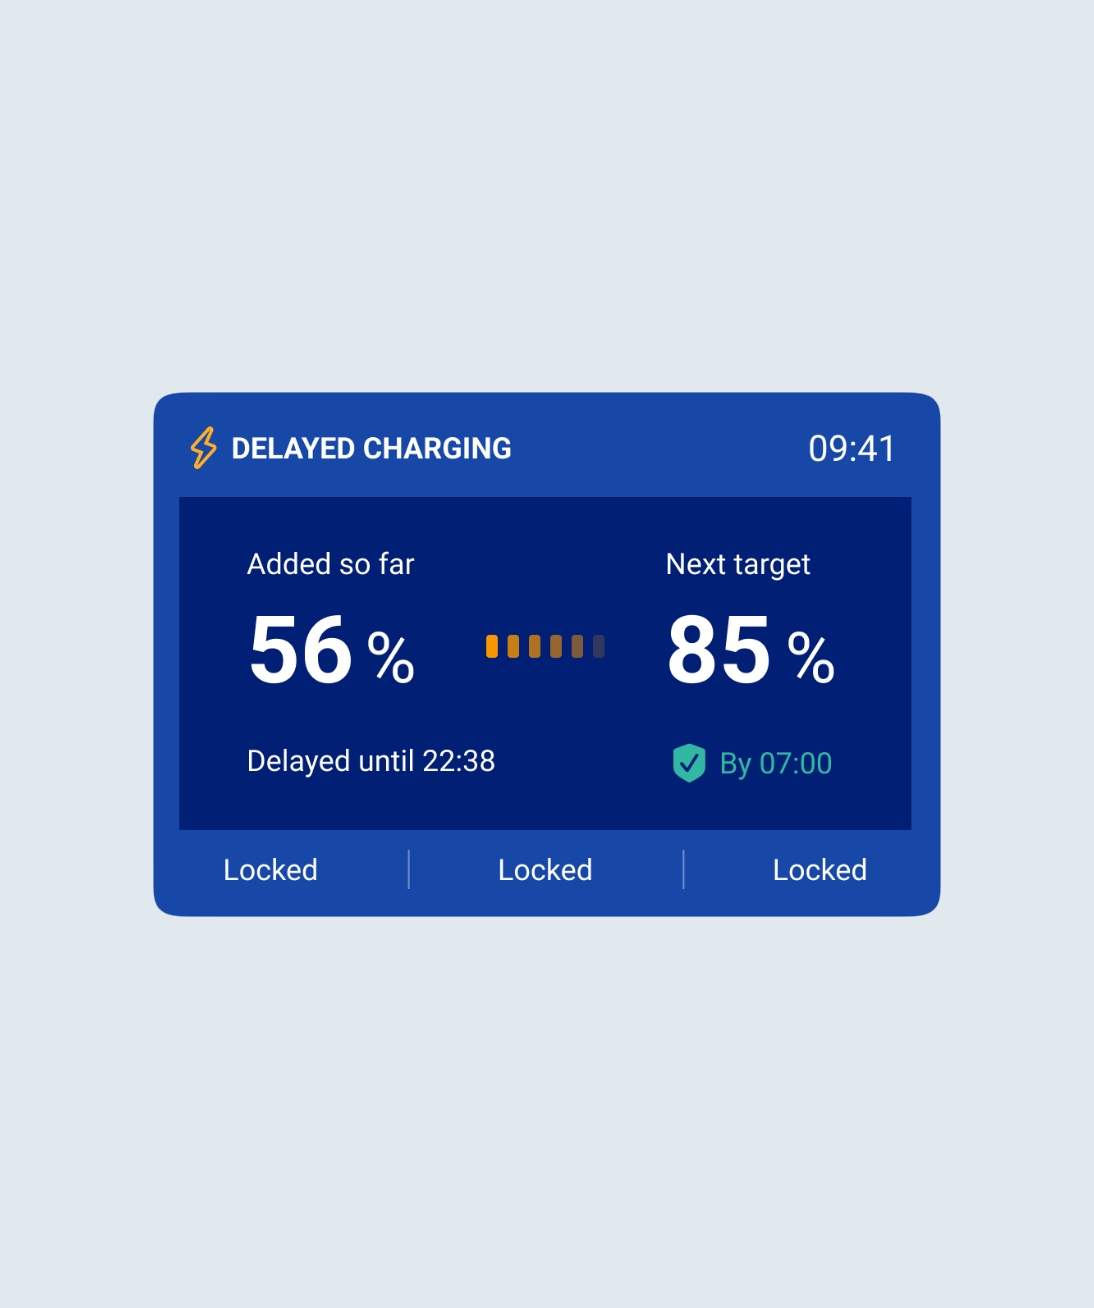
Smart charging schedule
Upon plugin, the Charging slots will be displayed on the Charging page of the app. These slots let you know when Ohme is scheduling to charge to help you reach your target.
Here, you can see the expected battery level by the end of each slot. For example, by 12:00am the battery level is scheduled to be at 49%, while by 12:30am the battery level will be at 56% charge.
Note: If you do not have vehicle API integrated, you will see the expected amount of charge added to the vehicle at the end of each slot instead.
Charge to full ASAP
If you want to start an immediate charge each time you plug in and continue until the car is full, you can turn off Dynamic charging using the toggle on the Charging page.
While this setting is disabled, the charger will default to ‘Charge to Full ASAP’ mode. This means Ohme will charge the vehicle at full power until the vehicle battery is full, reaches the battery limit set inside the car or the charger is unplugged from the vehicle.
If at any time you wish to set a specific amount of charge or set a departure time, you can enable Dynamic charging by tapping the toggle again.

When charging with Dynamic charging off, Ohme will still abide by any restrictions in place such as a Price cap or Regulated charging hours. For example, if you have a price cap where Ohme is only allowed to charge between 00:30am and 04:30am a schedule will be created to charge as much as possible between these two times.
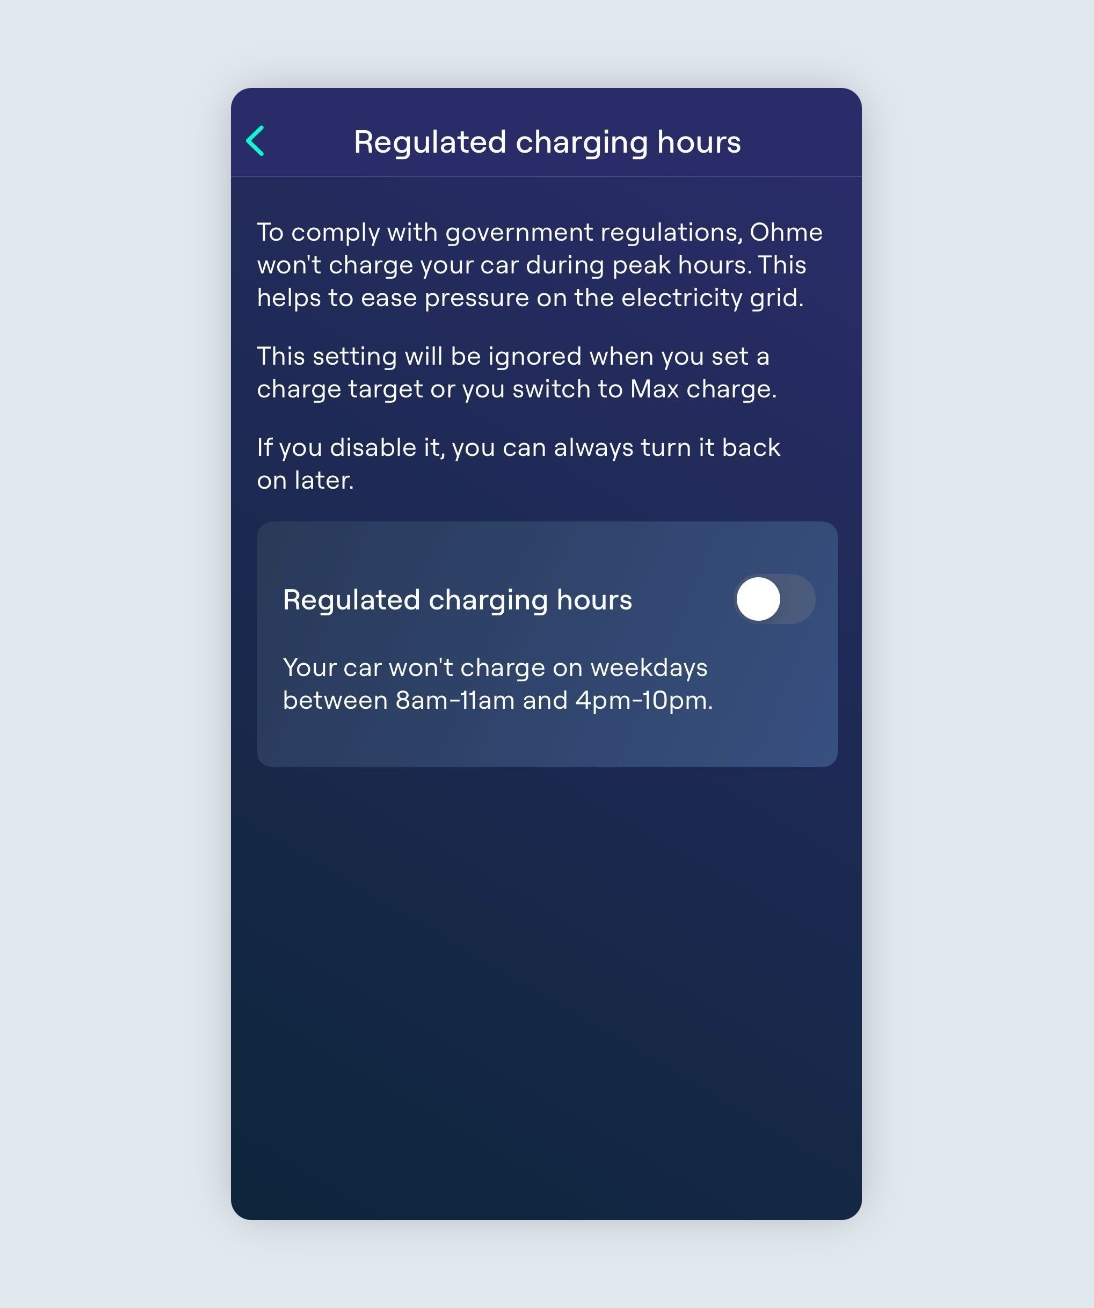
Regulated charging hours
Regulated charging hours is a setting introduced as part of the UK Smart Charging Regulations and is enabled by default.
When enabled, Ohme will prevent charging between 08:00am-11:00am and 04:00pm-10:00pm, when demand on the electricity grid is at its highest, and schedule charging for outside these time slots. This helps to ease pressure on the electricity grid.
If you enable Dynamic charging or switch to Max Charge, this setting will be ignored and charging can occur in these times.
Turn off Regulated charging hours
To turn the Regulated charging hours setting on or off, navigate to the My Charger section of the app. This page can be reached either from the Charging page by tapping on the charger status or from the Settings page by tapping My Charger under Charging settings.
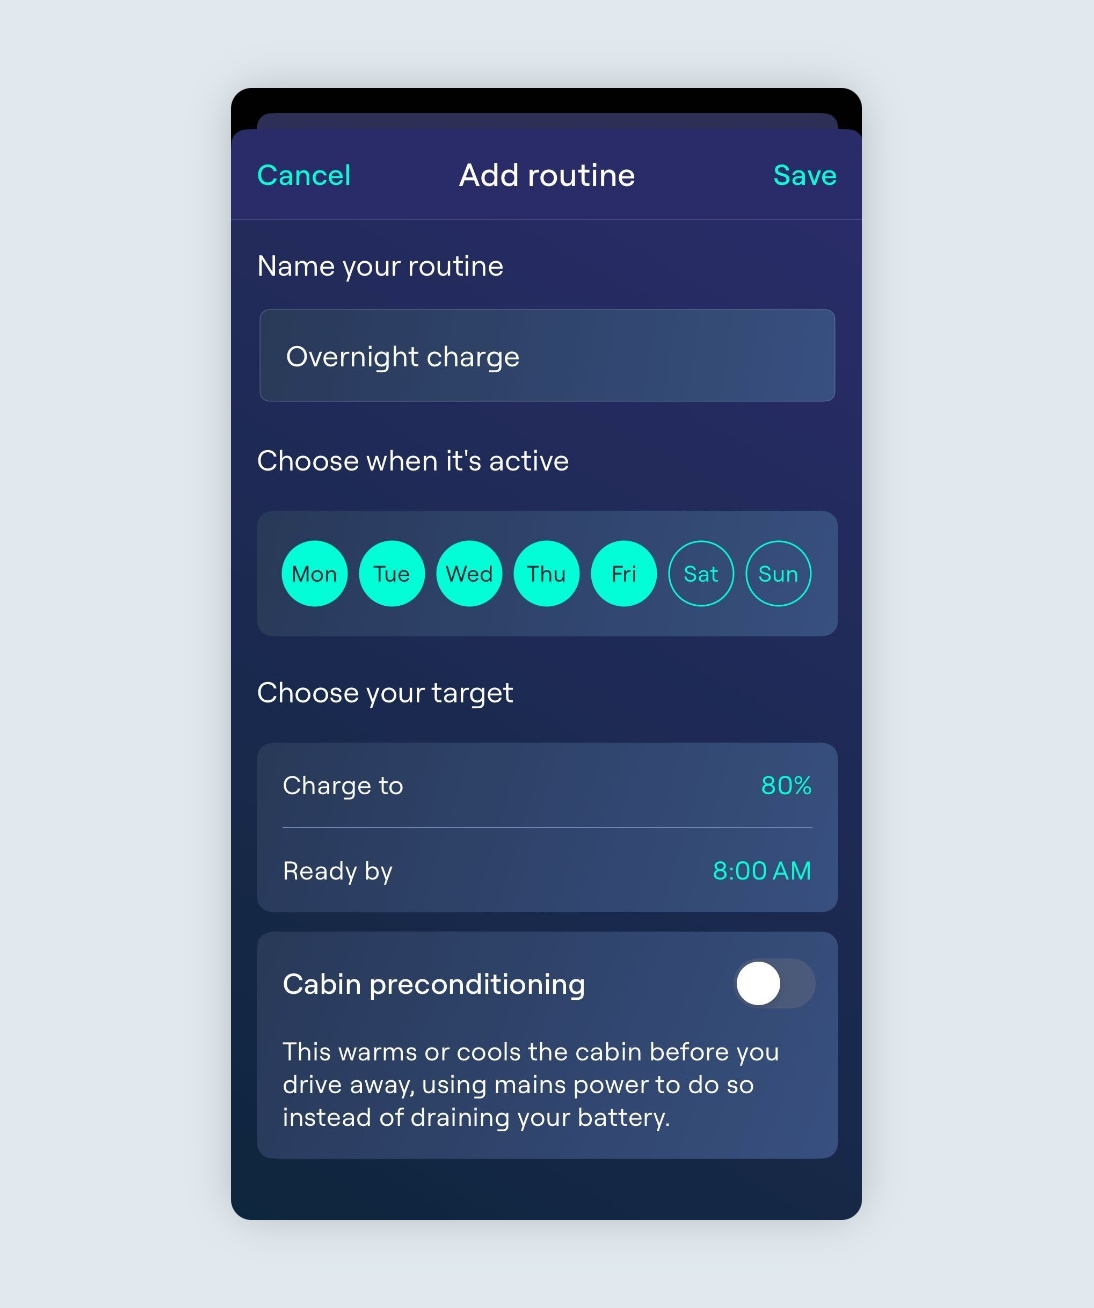
Routines
Routines are schedules you can set for specific times or days throughout the week. These can be set up via the ‘Routines’ button at the bottom of the Charging page. Note: you will need to have Dynamic charging enabled in order to see Routines.
Add routine
To set a routine, tap the ‘Create a routine’ button at the bottom of the screen.
You will then be able to name the routine, and choose the following information:
Once you have entered this information, tap “Save” to finish.
Enabling a price cap
Enabling a price cap in the Ohme app limits charging to when your electricity is cheapest. This means that Ohme will only start charging your vehicle when the price drops below a certain rate, and stop charging as soon as the price increases.
If you’re on a dual rate tariff and you pay a reduced rate of 10p/kWh between 12:00am-05:00am, you could set a maximum price of 10p/kwh. This would mean that Ohme would only start charging at 12:00am and would stop charging at 05:00am (unless the car becomes full before this time).
Note: Limiting your charging with a price cap may result in you not achieving your charge target if there isn’t enough time to charge to your desired amount.
Step 1
You can update the price cap settings by heading to the bottom of the Charging page in the Ohme app and tapping price cap.
Step 2
Slide the toggle to the right to enable the price cap, and to the left to disable it. Tap ‘Confirm’ to save the settings.
Ohme will automatically set the price cap based on the off-peak rate of the tariff provided, however, if you wish to edit this, simply tap on the price and adjust it as needed.
When the price cap is on, Ohme will let you know what times this will limit charging to.
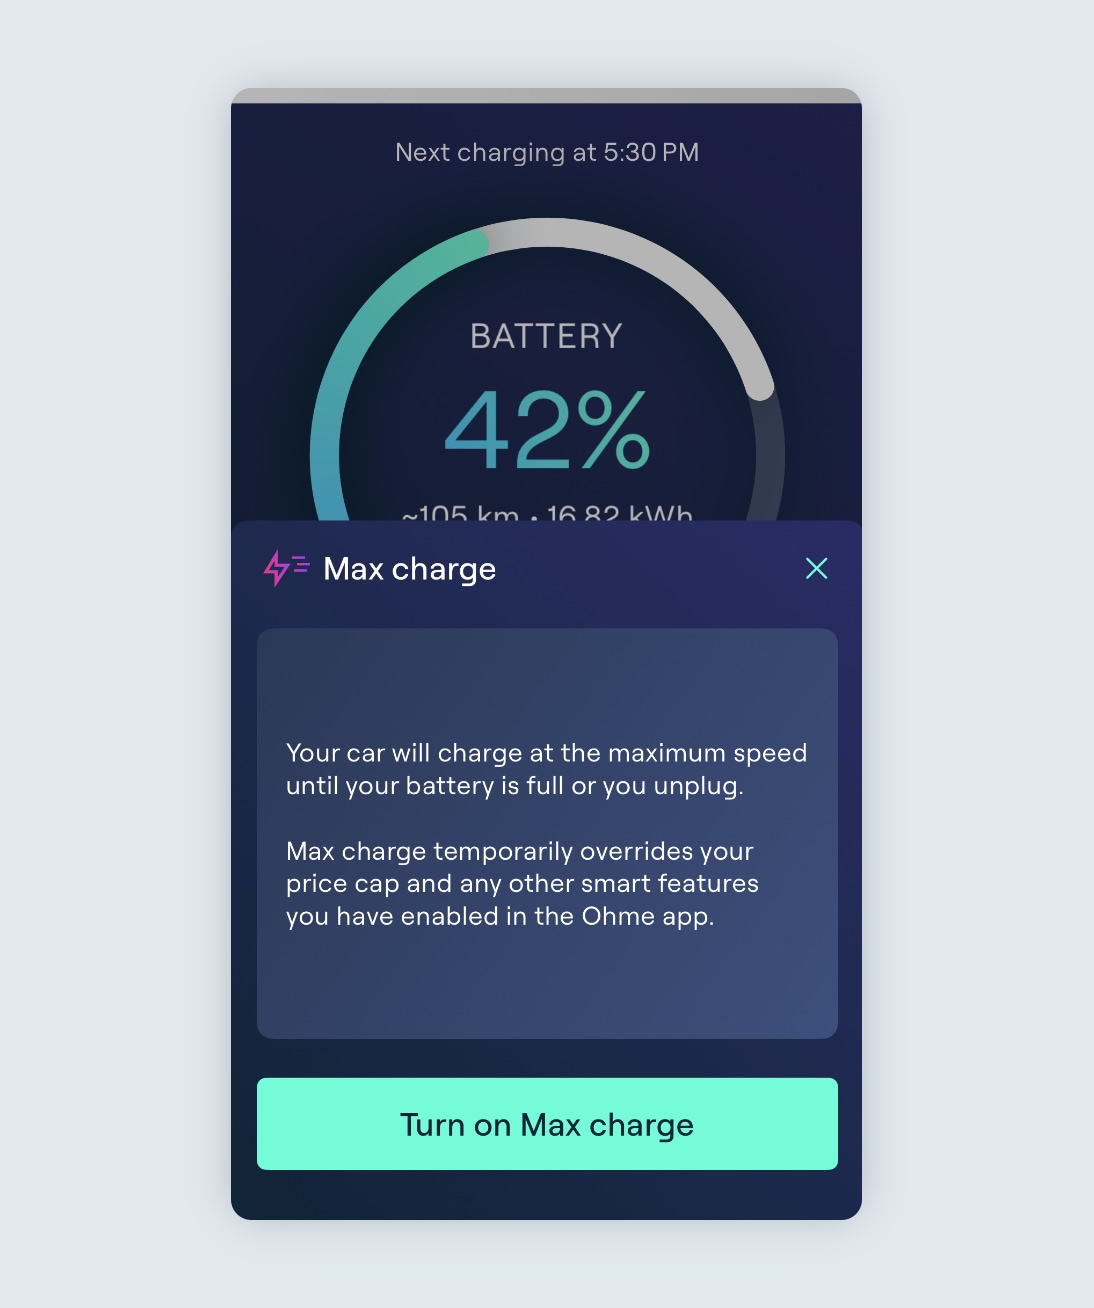
How to Max charge
If you need to charge now, you can activate a ‘Max charge’ in the Ohme app. This temporarily overrides your charge settings and simply charges your car as quickly as possible until the battery is full or you un-plug.
Step 1
Open the Ohme app and go to the Charging screen. A few moments after you have plugged in, Ohme will start a smart charge.
In this example, you can see the Status Banner at the top of the screen shows that Ohme has scheduled to start charging later.
To override the smart charge and charge right away, tap Max Charge.
Step 2
You’ll see a message appear letting you know how Max charge works and asking you to confirm. Tap ‘Turn on Max Charge’ to begin the Max charge session.
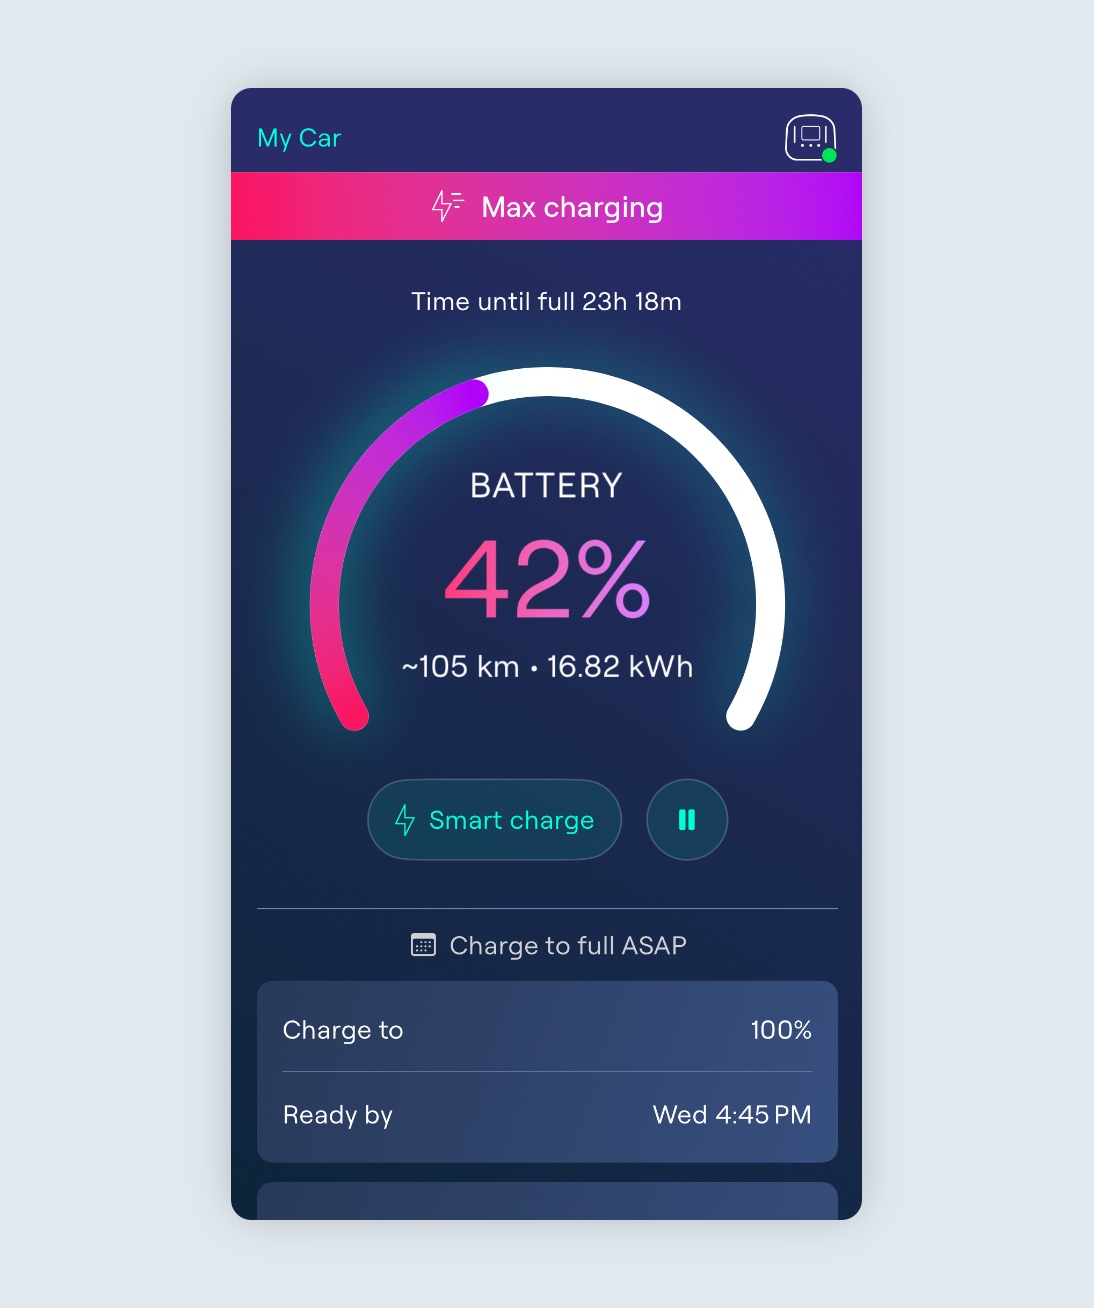
Step 3
Once a Max charge has started, you’ll see Max charging appear in the status bar on the Charging screen. If you would like to end the Max charge session, tap ‘Smart charge’ or simply unplug. Ohme will revert back to a smart charge and reschedule the session, taking into account any active smart settings such as your price cap and the requested amount of added charge.
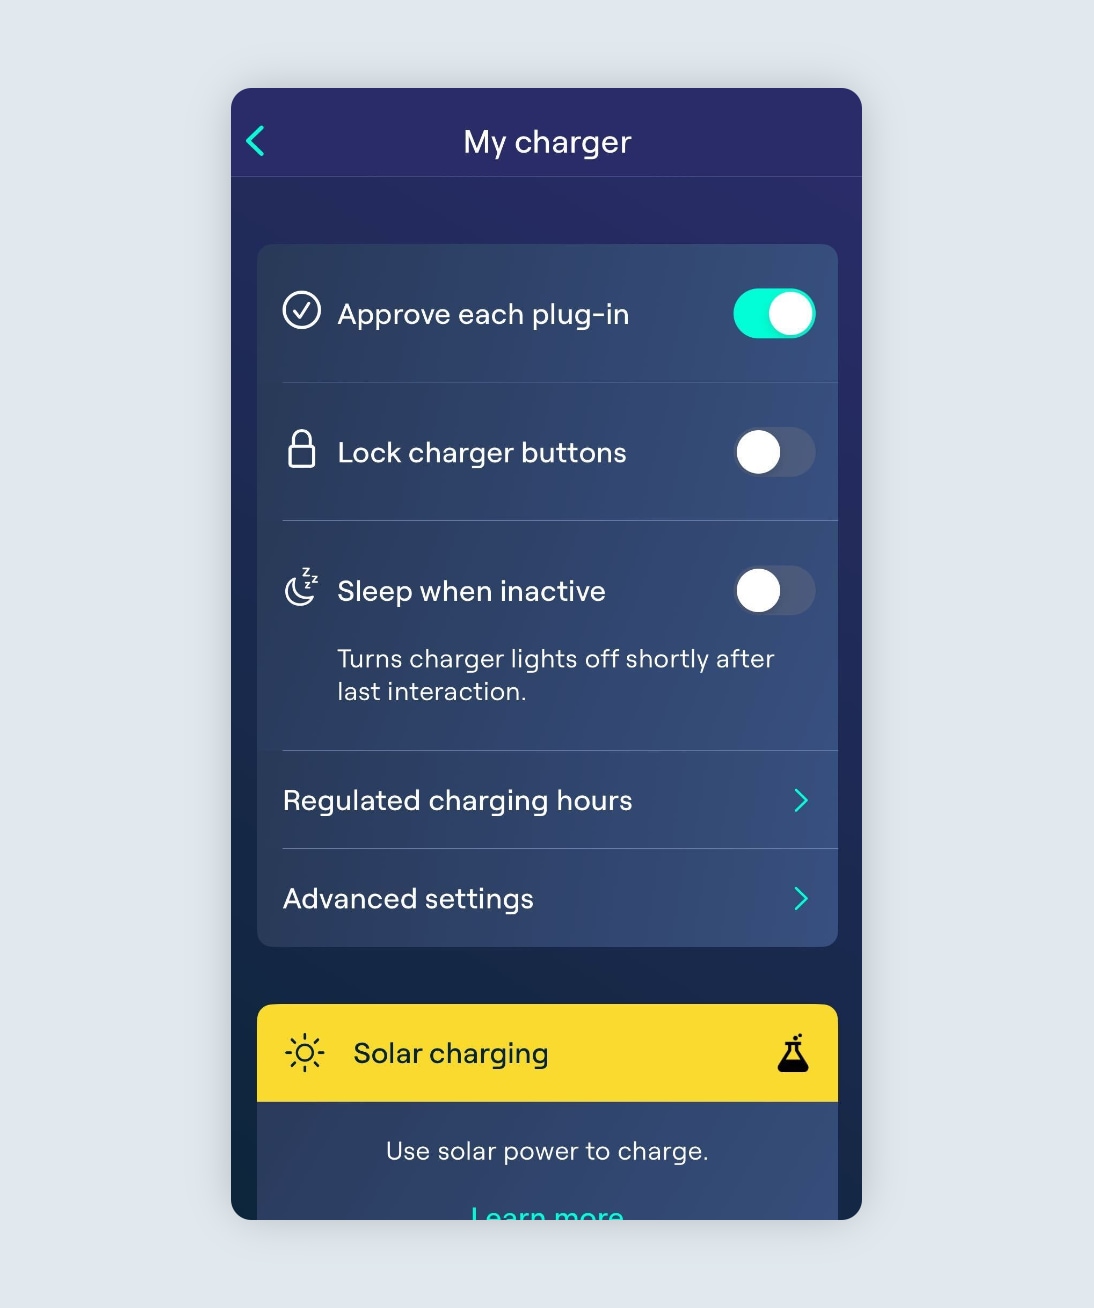
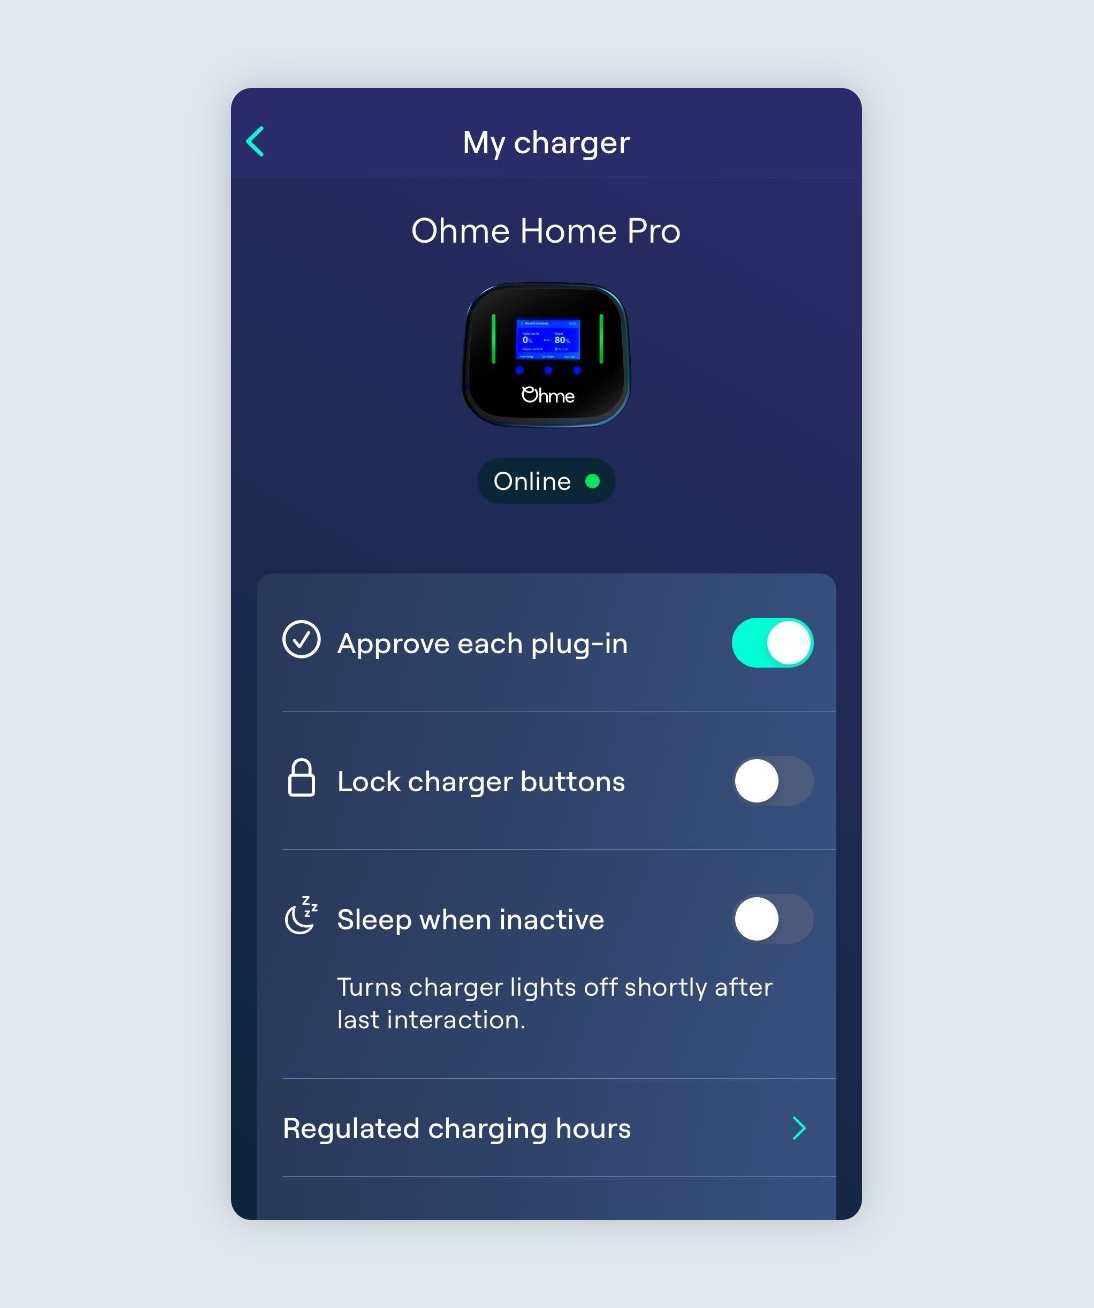
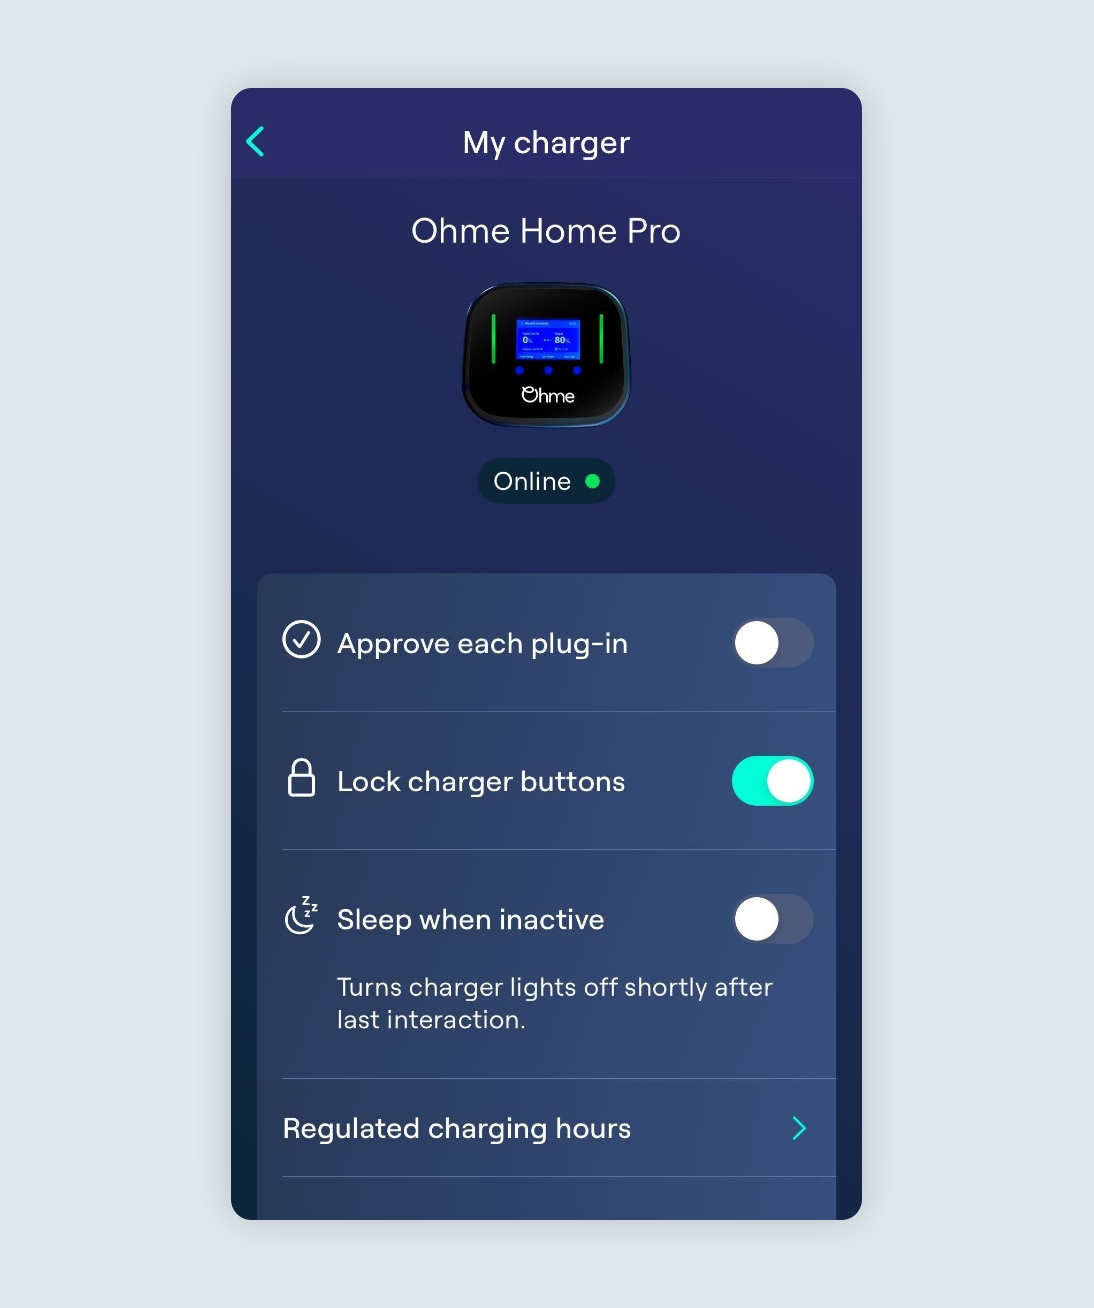
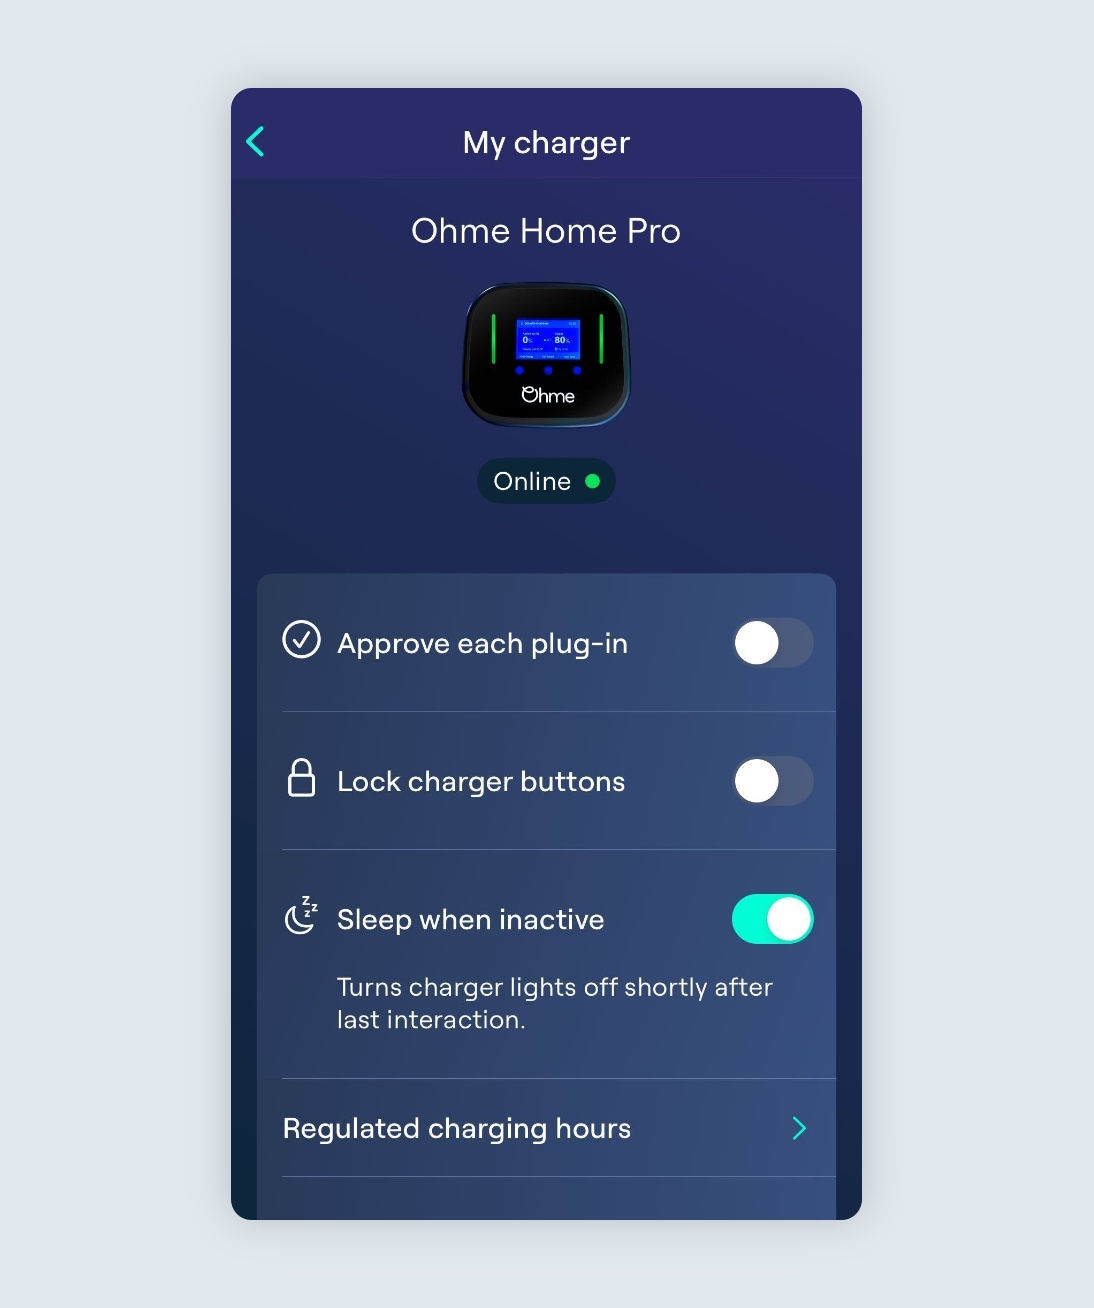
Enabling security settings
On the My Charger page section of the Ohme app, you’ll find three features that can be enabled to help keep your Ohme charger secure. You can reach this page from the Settings screen by tapping My Charger.
- Approve each plug-in
- Lock charger buttons
- Sleep when inactive
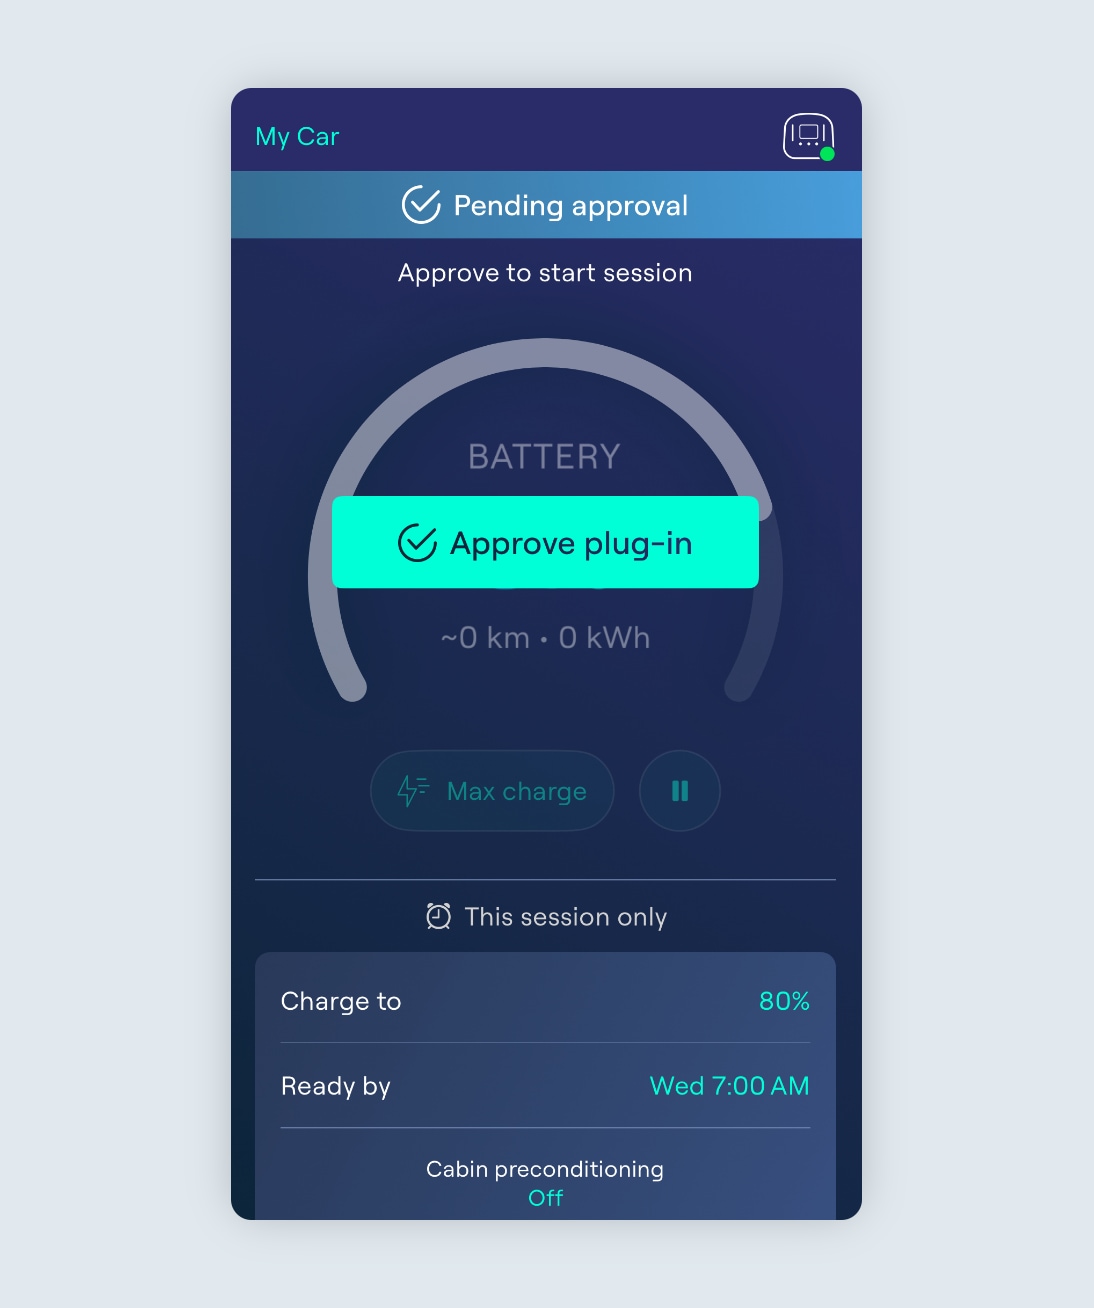
Approve each plug-in
This feature enables you to approve charging every time a vehicle is plugged into your charger, so you can control who has access to your charger.
Tip: Make sure you have push notifications enabled in the Ohme app in order to use this feature (you can enable these in Settings).
Step 1
Head to the My Charger page and tap the toggle next to ‘Approve each plug-in’ to enable the setting.
Step 2
Upon plug in, you’ll receive a notification to approve the charging session.
You’ll need to tap the ‘Approve plug-in’ button on the Charging page in the Ohme app before the session will start.
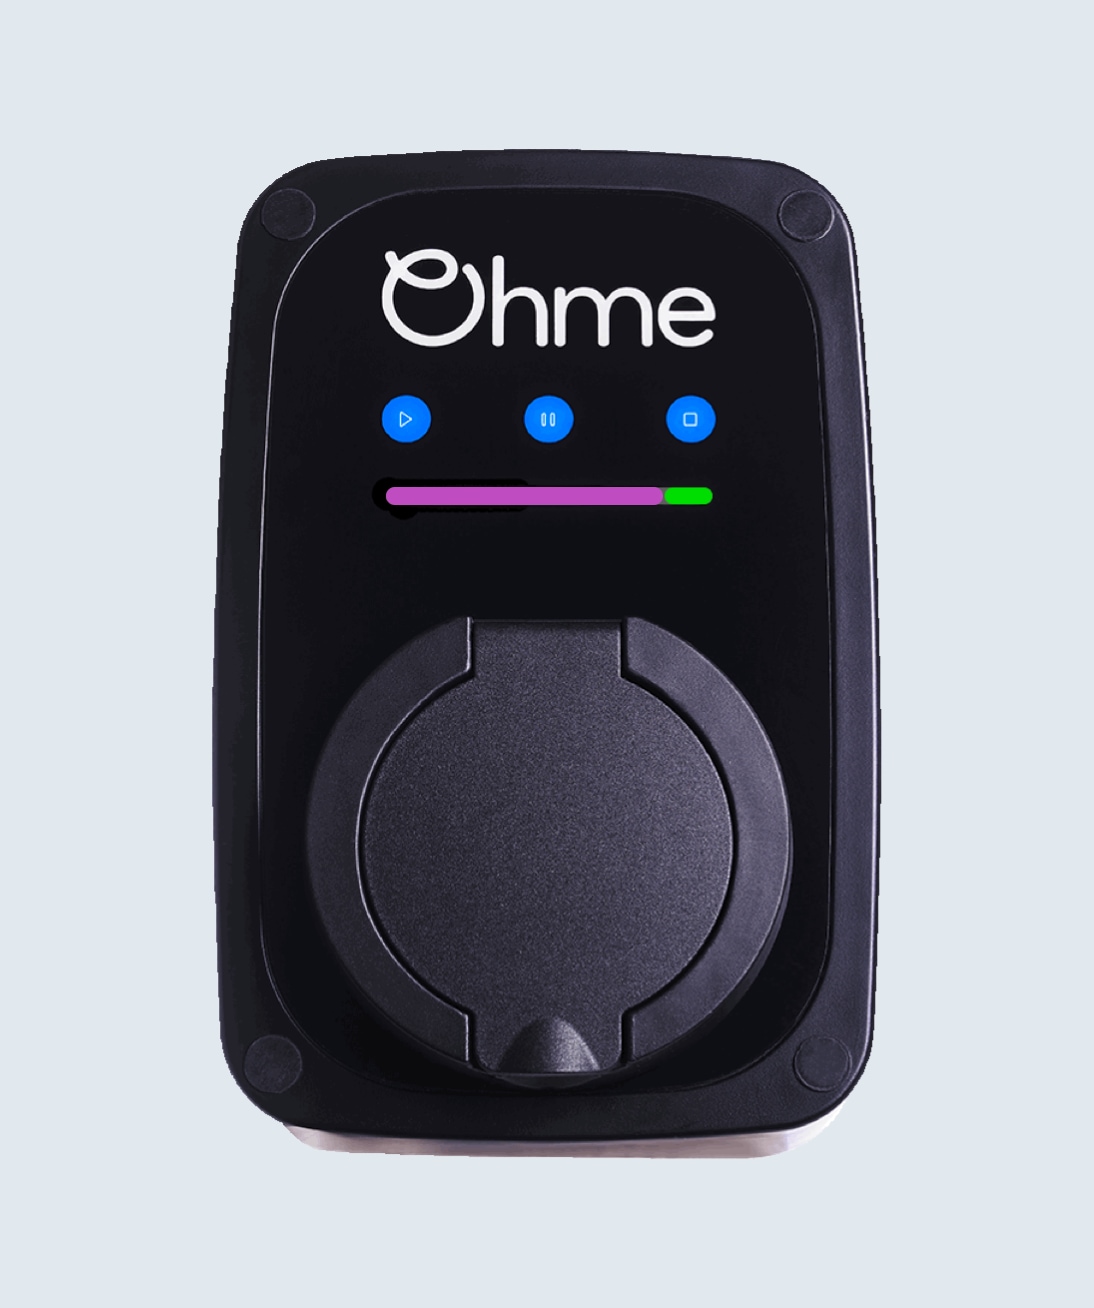
Ohme ePod
The indicator light on your Ohme ePod will show a purple light moving sideways. This indicates approval is needed in the Ohme app.
Ohme Home Pro
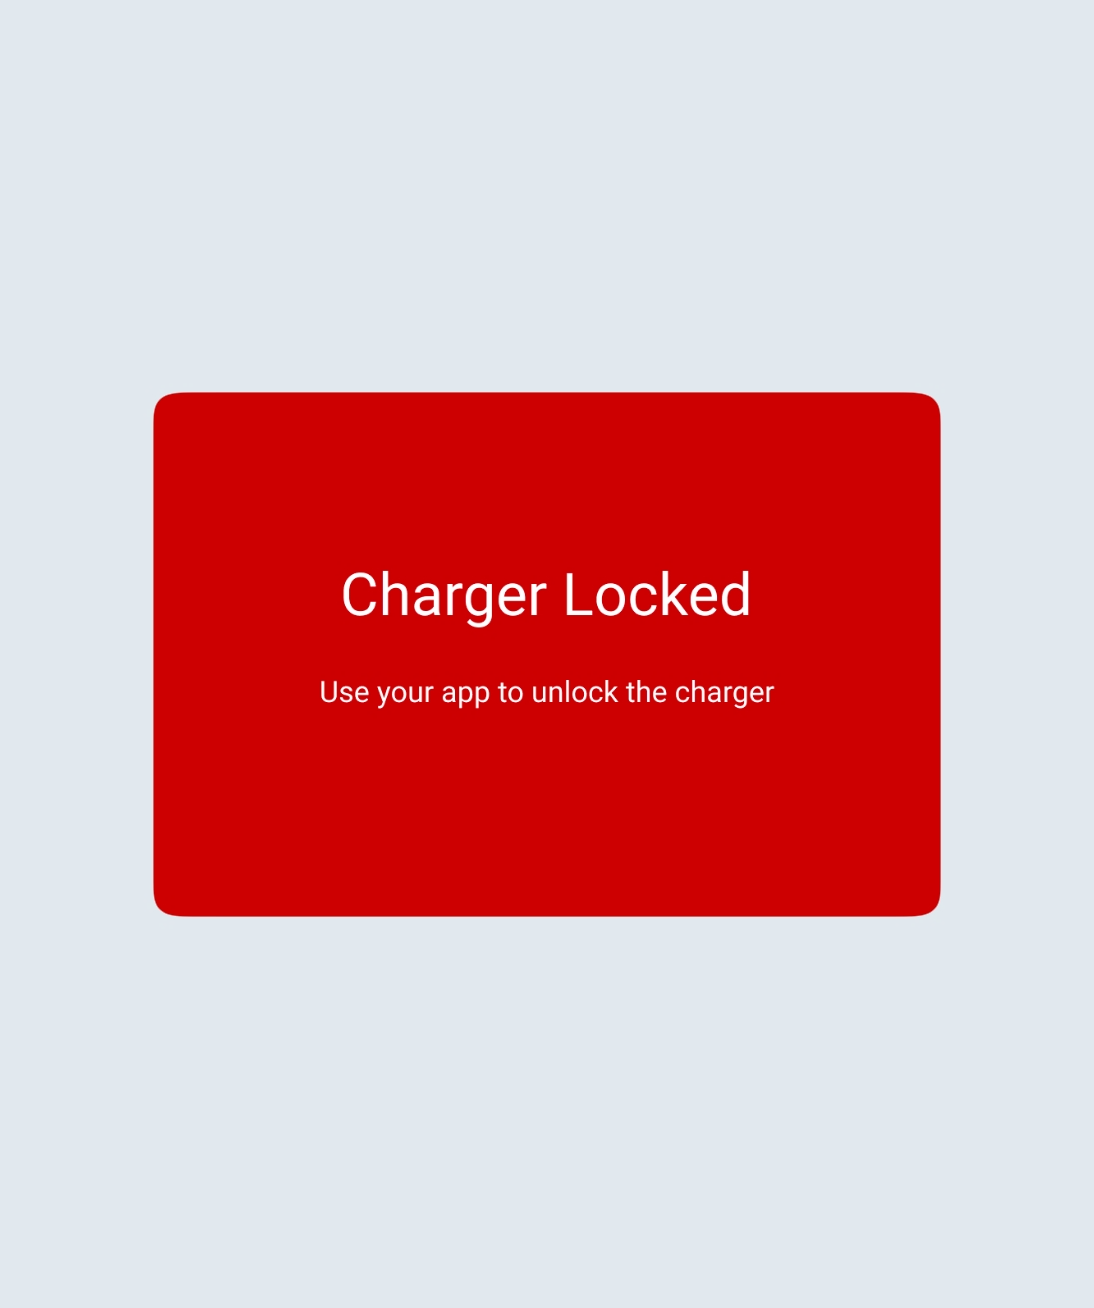
The Ohme Home Pro will display a message on the charger screen that the charger is locked and the session needs to be approved in the Ohme app before it can start.
Lock charger buttons
This allows you to disable the on-charger controls, preventing any unauthorised changes being made to your charging.
Step 1
Head to the Charging page in the Ohme app and tap the toggle next to ‘Lock charger buttons’ to enable.
Ohme ePod
When the blue buttons on your charger are touched, you’ll see the indicator light flash purple to show the buttons are locked.
Ohme Home Pro
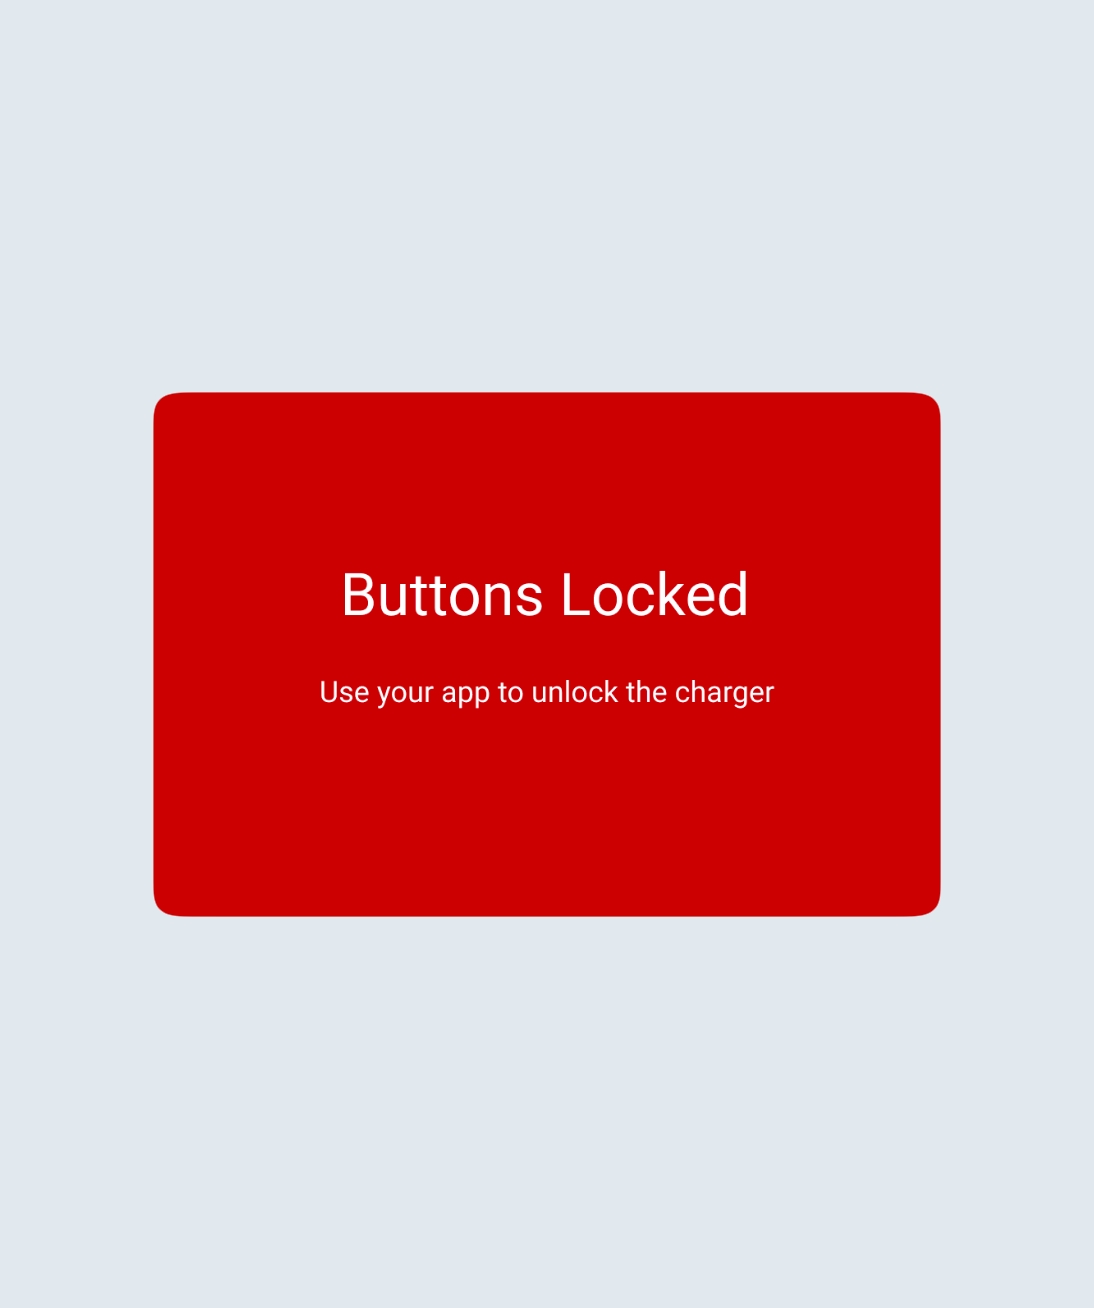
While the buttons are locked the contextual menus above each button will show ‘Locked’.
Buttons locked
Tapping the buttons will display a message to notifying you the buttons have been locked and can be unlocked in the app.
Sleep when inactive
This turns off the on-charger lights shortly after your last interaction with the charger, making it more discreet and reducing any unnecessary power consumption.
Head to the Charging screen in the Ohme app and tap the toggle next to ‘Sleep when inactive’ to enable.
Once enabled, the lights and screen of the charger will turn off automatically after 30 seconds of inactivity. To illuminate the screen again, simply tap one of the blue buttons.
You are now ready to charge your vehicle with Ohme! We hope this guide has been helpful, however, if you have any questions or concerns please feel free to contact our Customer Care team below.